URC URC-WR7 Owners Manual - Page 2
Congratulations, Quick Set-up - codes
 |
View all URC URC-WR7 manuals
Add to My Manuals
Save this manual to your list of manuals |
Page 2 highlights
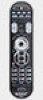
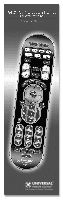
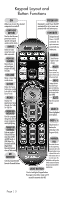
Congratulations! With your new WR7 universal remote, you now have the power to control your home entertainment system with just one easy-to-use control. Thousands of audio and video component codes have already been programmed into the remote for you, making it a breeze to set up. Be sure to install the included batteries first. See page 6 for instructions. Quick Set-up Note: Selecting the proper Component button is a key to your success. If you have a combination component that includes a DVD or Blu-Ray player, use the DVD button regardless of other functions, so that the DVD transport controls will work properly. Select SAT/CABLE for your cable box so the Menu, Guide, Info and Exit buttons work correctly. Set-up one component at a time, and you'll move quickly through your system. STEP 1: Turn on the component you want to activate. (Other components can be on or off, it doesn't matter.) STEP 2: Point your new WR7 universal remote toward the component and press the appropriately labeled Component button (TV for TV, DVD for DVD, etc.) While holding this button down,press the numeric assigned to your brand in the Quick Set-up Code Table(See Page 2) and release both Component button and the number key to save the code. The component light will blink three times to confirm that the code has been stored. STEP 3: Point the remote control at the component. STEP 4: Press the power button. If it turns off, it is programmed for your component. If it does not turn off, use the Pre-Programmed 3-Digit code Method or Auto-Search Method. Check your work before you move to the next component. Press the POWER [ON] button to turn the component back on. Next, test the VOLUME and CHANNEL buttons (or PLAY and STOP buttons for VCR and DVD). Repeat Steps 1-4 to activate up to seven components. Didn't work for one of your components? See other set-up options on page 9. Page | 1
-
 1
1 -
 2
2 -
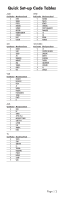 3
3 -
 4
4 -
 5
5 -
 6
6 -
 7
7 -
 8
8 -
9
-
10
-
11
-
12
-
13
-
14
-
15
-
16
-
17
-
18
-
19
-
20
-
21
-
22
-
23
-
24
-
25
-
26
-
27
-
28
-
29
-
30
-
31
-
32
-
33
-
34
-
35
-
36
-
37
-
38
-
39
-
40
-
41
-
42
-
43
-
44
-
45
-
46
-
47
-
48
-
49
-
50
-
51
-
52
 |
 |
