URC URC-WR7 Owners Manual - Page 29
OSD On-Screen Display Control Punch, Through
 |
View all URC URC-WR7 manuals
Add to My Manuals
Save this manual to your list of manuals |
Page 29 highlights
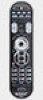
OSD (On-Screen Display) Control Punch Through This "punch through" enables you to set up the WR7 so that CBL or DVD OSD Controls (MENU, GUIDE, INFO, EXIT, SEL and 4 Cursor Controls) will also operate in other component modes on the remote control. STEP 1: Press and hold the component button you want to add OSD Control to, such as [TV] or [VCR], and the SELECT [SEL] button at the same time for two seconds until the Component LED light turns on. STEP 2: Press the [MENU] button. The component LED will blink once. Note: If you do not press a button within 30 seconds, the component light will turn off. The remote will exit the set up mode, and you will have to start over with step one. STEP 3: Press either the [CABLE/SAT] or [DVD] button that you want to use as the source of OSD Control. The component LED will blink three times to confirm it is saved. COMPONENT BUTTONS MENU On Screen Display (OSD) SELECT Page | 28
-
 1
1 -
2
-
3
-
4
-
5
-
6
-
7
-
8
-
9
-
10
-
11
-
12
-
13
-
14
-
15
-
16
-
17
-
18
-
19
-
20
-
21
-
22
-
23
-
 24
24 -
 25
25 -
 26
26 -
 27
27 -
 28
28 -
 29
29 -
 30
30 -
 31
31 -
 32
32 -
 33
33 -
 34
34 -
35
-
36
-
37
-
38
-
39
-
40
-
41
-
42
-
43
-
44
-
45
-
46
-
47
-
48
-
49
-
50
-
51
-
52
 |
 |
