Xerox 3200MFPB User Guide - Page 104
Create Overlay, Overlay, The default is C:\For
 |
UPC - 095205731965
View all Xerox 3200MFPB manuals
Add to My Manuals
Save this manual to your list of manuals |
Page 104 highlights
6 Printing 4. In the Edit Overlay window, click Create Overlay. 5. In the Create Overlay win- dow, type a name of up to eight characters in the File name box. Select the destination path, if necessary. (The default is C:\Formover). 6. Click Save. The name appears on the Overlay List box. 7. Click OK or Yes to finish creating. The file is not printed. Instead it is stored on your computer hard disk drive. NOTE: The overlay document size must be the same as the documents you print with the overlay. Do not create an overlay with a watermark. 6-24 Xerox Phaser 3200MFP
-
 1
1 -
2
-
3
-
4
-
5
-
6
-
7
-
8
-
9
-
10
-
11
-
12
-
13
-
14
-
15
-
16
-
17
-
18
-
19
-
20
-
21
-
22
-
23
-
24
-
25
-
26
-
27
-
28
-
29
-
30
-
31
-
32
-
33
-
34
-
35
-
36
-
37
-
38
-
39
-
40
-
41
-
42
-
43
-
44
-
45
-
46
-
47
-
48
-
49
-
50
-
51
-
52
-
53
-
54
-
55
-
56
-
57
-
58
-
59
-
60
-
61
-
62
-
63
-
64
-
65
-
66
-
67
-
68
-
69
-
70
-
71
-
72
-
73
-
74
-
75
-
76
-
77
-
78
-
79
-
80
-
81
-
82
-
83
-
84
-
85
-
86
-
87
-
88
-
89
-
90
-
91
-
92
-
93
-
94
-
95
-
96
-
97
-
98
-
 99
99 -
 100
100 -
 101
101 -
 102
102 -
 103
103 -
 104
104 -
 105
105 -
 106
106 -
 107
107 -
 108
108 -
 109
109 -
110
-
111
-
112
-
113
-
114
-
115
-
116
-
117
-
118
-
119
-
120
-
121
-
122
-
123
-
124
-
125
-
126
-
127
-
128
-
129
-
130
-
131
-
132
-
133
-
134
-
135
-
136
-
137
-
138
-
139
-
140
-
141
-
142
-
143
-
144
-
145
-
146
-
147
-
148
-
149
-
150
-
151
-
152
-
153
-
154
-
155
-
156
-
157
-
158
-
159
-
160
-
161
-
162
-
163
-
164
-
165
-
166
-
167
-
168
-
169
-
170
-
171
-
172
-
173
-
174
-
175
-
176
-
177
-
178
-
179
-
180
-
181
-
182
-
183
-
184
-
185
-
186
-
187
-
188
-
189
-
190
-
191
-
192
-
193
-
194
-
195
-
196
-
197
-
198
-
199
-
200
-
201
-
202
-
203
-
204
-
205
-
206
-
207
-
208
-
209
-
210
-
211
-
212
-
213
-
214
-
215
-
216
-
217
-
218
-
219
-
220
-
221
-
222
-
223
-
224
-
225
-
226
-
227
-
228
-
229
-
230
-
231
-
232
-
233
-
234
-
235
-
236
 |
 |

6
Printing
6-24
Xerox Phaser 3200MFP
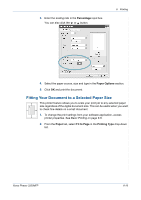
4.
In the Edit Overlay window,
click
Create Overlay
.
5.
In the Create Overlay win-
dow, type a name of up to
eight characters in the
File
name
box. Select the des-
tination path, if necessary.
(The default is C:\For-
mover).
6.
Click
Save
. The name
appears on the
Overlay
List
box.
7.
Click
OK
or
Yes
to finish
creating.
The file is not printed. Instead it is stored on your computer hard disk drive.
NOTE:
The overlay document size must be the same as the documents you
print with the overlay. Do not create an overlay with a watermark.