Xerox 3200MFPB User Guide - Page 49
Setting the Date and Time, Changing Numbers or Names, Inserting a Pause
 |
UPC - 095205731965
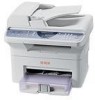
View all Xerox 3200MFPB manuals
Add to My Manuals
Save this manual to your list of manuals |
Page 49 highlights
2 Getting Started Keypad Letters and Numbers Key 1 2 3 4 5 6 7 8 9 0 Assigned numbers, letters, or characters Space 1 A B C 2 D E F 3 G H I 4 J K L 5 M N O 6 P Q R S 7 T U V 8 W X Y Z 9 0 Changing Numbers or Names If you make a mistake while entering a number or name, press the button to delete the last digit or character. Then enter the correct number or character. Inserting a Pause With some telephone systems, you must dial an access code (9, for example) and listen for a second dial tone. In such cases, you must insert a pause in the telephone number. To insert a pause, press Redial/Pause at the appropriate place while entering the telephone number. A "−" appears on the display at the corresponding location. Setting the Date and Time When you turn the machine on for the first time, the display prompts you to enter the current date and time. After entering, it will not appear again. NOTE: When turning on the machine after it has been off for a long time (Approx. 72 hours), you need to reset date and time. 1. Press Menu until "Machine Setup" appears on the top line of the display. 2. Press the scroll button ( or ) to display "Date & Time" on the bottom line and press Enter. Xerox Phaser 3200MFP 2-17
-
 1
1 -
2
-
3
-
4
-
5
-
6
-
7
-
8
-
9
-
10
-
11
-
12
-
13
-
14
-
15
-
16
-
17
-
18
-
19
-
20
-
21
-
22
-
23
-
24
-
25
-
26
-
27
-
28
-
29
-
30
-
31
-
32
-
33
-
34
-
35
-
36
-
37
-
38
-
39
-
40
-
41
-
42
-
43
-
 44
44 -
 45
45 -
 46
46 -
 47
47 -
 48
48 -
 49
49 -
 50
50 -
 51
51 -
 52
52 -
 53
53 -
 54
54 -
55
-
56
-
57
-
58
-
59
-
60
-
61
-
62
-
63
-
64
-
65
-
66
-
67
-
68
-
69
-
70
-
71
-
72
-
73
-
74
-
75
-
76
-
77
-
78
-
79
-
80
-
81
-
82
-
83
-
84
-
85
-
86
-
87
-
88
-
89
-
90
-
91
-
92
-
93
-
94
-
95
-
96
-
97
-
98
-
99
-
100
-
101
-
102
-
103
-
104
-
105
-
106
-
107
-
108
-
109
-
110
-
111
-
112
-
113
-
114
-
115
-
116
-
117
-
118
-
119
-
120
-
121
-
122
-
123
-
124
-
125
-
126
-
127
-
128
-
129
-
130
-
131
-
132
-
133
-
134
-
135
-
136
-
137
-
138
-
139
-
140
-
141
-
142
-
143
-
144
-
145
-
146
-
147
-
148
-
149
-
150
-
151
-
152
-
153
-
154
-
155
-
156
-
157
-
158
-
159
-
160
-
161
-
162
-
163
-
164
-
165
-
166
-
167
-
168
-
169
-
170
-
171
-
172
-
173
-
174
-
175
-
176
-
177
-
178
-
179
-
180
-
181
-
182
-
183
-
184
-
185
-
186
-
187
-
188
-
189
-
190
-
191
-
192
-
193
-
194
-
195
-
196
-
197
-
198
-
199
-
200
-
201
-
202
-
203
-
204
-
205
-
206
-
207
-
208
-
209
-
210
-
211
-
212
-
213
-
214
-
215
-
216
-
217
-
218
-
219
-
220
-
221
-
222
-
223
-
224
-
225
-
226
-
227
-
228
-
229
-
230
-
231
-
232
-
233
-
234
-
235
-
236
 |
 |
