Xerox 3200MFPB User Guide - Page 72
Making Copies from the Automatic Document Feeder, Stop/Clear, face up, Start - scanning
 |
UPC - 095205731965
View all Xerox 3200MFPB manuals
Add to My Manuals
Save this manual to your list of manuals |
Page 72 highlights
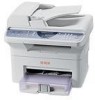
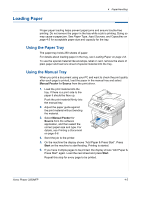
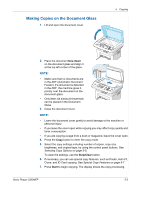
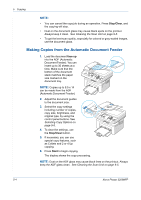
5 Copying NOTE: • You can cancel the copy job during an operation. Press Stop/Clear, and the copying will stop. • Dust on the document glass may cause black spots on the printout. Always keep it clean. See Cleaning the Scan Unit on page 9-5. • To get the best scan quality, especially for colored or gray-scaled images, use the document glass. Making Copies from the Automatic Document Feeder 1. Load the document face up into the ADF (Automatic Document Feeder). You can insert up to 30 sheets at a time. Make sure that the bottom of the document stack matches the paper size marked on the document tray. NOTE: Copies up to 8.5 x 14 can be made from the ADF (Automatic Document Feeder) 2. Adjust the document guides to the document size. 3. Select the copy settings including number of copies, copy size, brightness, and original type, by using the control panel buttons. See Selecting Copy Options on page 5-5. 4. To clear the settings, use the Stop/Clear button. 5. If necessary, you can use special copy features, such as Collate and 2 or 4 Up copying. 6. Press Start to begin copying. The display shows the copy processing. NOTE: Dust on the ADF glass may cause black lines on the printout. Always keep the ADF glass clean. See Cleaning the Scan Unit on page 9-5. 5-4 Xerox Phaser 3200MFP
-
 1
1 -
2
-
3
-
4
-
5
-
6
-
7
-
8
-
9
-
10
-
11
-
12
-
13
-
14
-
15
-
16
-
17
-
18
-
19
-
20
-
21
-
22
-
23
-
24
-
25
-
26
-
27
-
28
-
29
-
30
-
31
-
32
-
33
-
34
-
35
-
36
-
37
-
38
-
39
-
40
-
41
-
42
-
43
-
44
-
45
-
46
-
47
-
48
-
49
-
50
-
51
-
52
-
53
-
54
-
55
-
56
-
57
-
58
-
59
-
60
-
61
-
62
-
63
-
64
-
65
-
66
-
 67
67 -
 68
68 -
 69
69 -
 70
70 -
 71
71 -
 72
72 -
 73
73 -
 74
74 -
 75
75 -
 76
76 -
 77
77 -
78
-
79
-
80
-
81
-
82
-
83
-
84
-
85
-
86
-
87
-
88
-
89
-
90
-
91
-
92
-
93
-
94
-
95
-
96
-
97
-
98
-
99
-
100
-
101
-
102
-
103
-
104
-
105
-
106
-
107
-
108
-
109
-
110
-
111
-
112
-
113
-
114
-
115
-
116
-
117
-
118
-
119
-
120
-
121
-
122
-
123
-
124
-
125
-
126
-
127
-
128
-
129
-
130
-
131
-
132
-
133
-
134
-
135
-
136
-
137
-
138
-
139
-
140
-
141
-
142
-
143
-
144
-
145
-
146
-
147
-
148
-
149
-
150
-
151
-
152
-
153
-
154
-
155
-
156
-
157
-
158
-
159
-
160
-
161
-
162
-
163
-
164
-
165
-
166
-
167
-
168
-
169
-
170
-
171
-
172
-
173
-
174
-
175
-
176
-
177
-
178
-
179
-
180
-
181
-
182
-
183
-
184
-
185
-
186
-
187
-
188
-
189
-
190
-
191
-
192
-
193
-
194
-
195
-
196
-
197
-
198
-
199
-
200
-
201
-
202
-
203
-
204
-
205
-
206
-
207
-
208
-
209
-
210
-
211
-
212
-
213
-
214
-
215
-
216
-
217
-
218
-
219
-
220
-
221
-
222
-
223
-
224
-
225
-
226
-
227
-
228
-
229
-
230
-
231
-
232
-
233
-
234
-
235
-
236
 |
 |