Yamaha DVD-S1800 Owner's Manual - Page 12
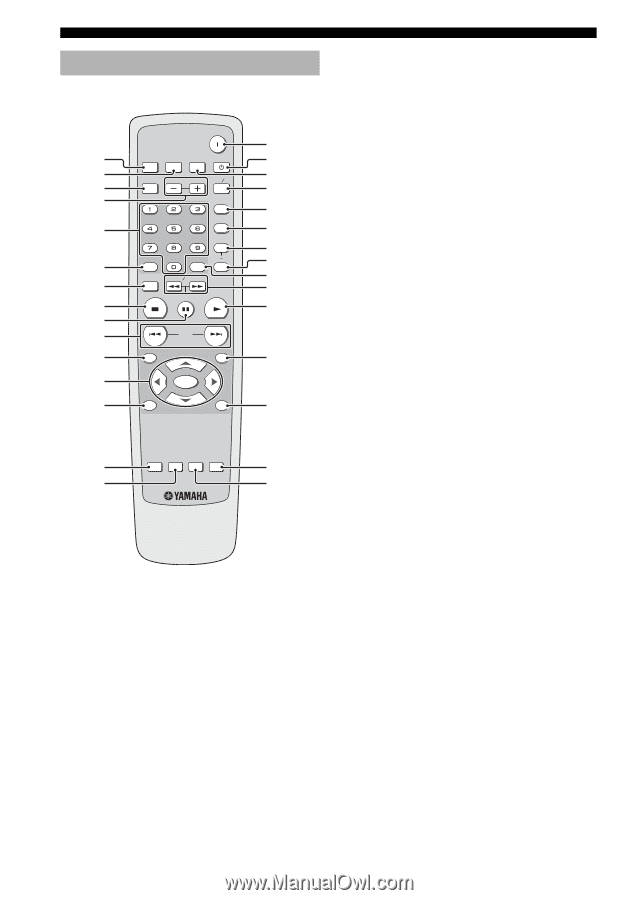
Remote control, DIMMER, GROUP, Numeric buttons 0-9, CLEAR, SETUP, PAUSE, TOP MENU
 |
View all Yamaha DVD-S1800 manuals
Add to My Manuals
Save this manual to your list of manuals |
Page 12 highlights
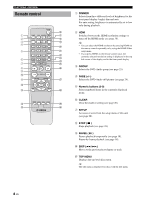
FUNCTIONAL OVERVIEW Remote control POWER y 1 DIMMER HDMI AUDIODIRECT STANDBY u 2 i GROUP PAGE MULTI 2CH 3 o 4 PROG p RANDOM 5 a REPEAT s 6 CLEAR ENTER A B d SETUP SLOW SEARCH f 7 g STOP PAUSE PLAY 8 h 9 0 SKIP q TOP MENU ON SCREEN j w ENTER MENU e RETURN k r SUBTITLE AUDIO ANGLE ZOOM l t ; 1 DIMMER Selects from three different levels of brightness for the front panel display: bright, dim and auto. For auto setting, brightness is automatically set to low only during playback. 2 HDMI Switches between the HDMI resolution settings or turns off the HDMI mode (see page 36). y • You can select the HDMI resolution by pressing HDMI on the remote control repeatedly or by using the HDMI Video setup menu. • If you press HDMI on the remote control once, the currently selected resolution setting is displayed in the top left corner of the display and in the front panel display. 3 GROUP Selects the DVD-Audio group (see page 25). 4 PAGE (+/-) Selects the DVD-Audio still picture (see page 24). 5 Numeric buttons (0-9) Select numbered items in the currently displayed menu. 6 CLEAR Clear the mode or setting (see page 20). 7 SETUP Accesses or exits from the setup menu of this unit (see page 28). 8 STOP ( 7 ) Stops playback (see page 18). 9 PAUSE ( 8 ) Pauses playback temporarily (see page 18). Frame-by-frame playback (see page 18). 0 SKIP (l22 / 33l) Moves to the previous/next chapter or track. q TOP MENU Displays the top-level disc menu. y The title menu is displayed for discs with the title menu. 8 En
-
 1
1 -
2
-
3
-
4
-
5
-
6
-
 7
7 -
 8
8 -
 9
9 -
 10
10 -
 11
11 -
 12
12 -
 13
13 -
 14
14 -
 15
15 -
 16
16 -
 17
17 -
18
-
19
-
20
-
21
-
22
-
23
-
24
-
25
-
26
-
27
-
28
-
29
-
30
-
31
-
32
-
33
-
34
-
35
-
36
-
37
-
38
-
39
-
40
-
41
-
42
-
43
-
44
-
45
-
46
-
47
-
48
-
49
 |
 |