Yamaha EL-500 Owner's Manual
Yamaha EL-500 Manual
 |
View all Yamaha EL-500 manuals
Add to My Manuals
Save this manual to your list of manuals |
Yamaha EL-500 manual content summary:
- Yamaha EL-500 | Owner's Manual - Page 1
- Yamaha EL-500 | Owner's Manual - Page 2
user to the present of important operating and maintenance (servicing) instructions of used batteries promptly and as regulated by applicable laws. Note: In some areas, the servicer is retain this manual as a permanent record of your purchase. IMPORTANT NOTICE: All Yamaha electronic products - Yamaha EL-500 | Owner's Manual - Page 3
user-serviceable parts. If it should appear to be malfunctioning, discontinue use immediately and have it inspected by qualified Yamaha service personnel. • Do not expose the instrument to rain, use keyboard. • Do not rest your weight on, or place heavy objects on the instrument, and do not use - Yamaha EL-500 | Owner's Manual - Page 4
Congratulations! You are the proud owner of a fine electronic organ, Electone EL-700/500. The Yamaha EL-700/500 Electone combines the most advanced AWM tone generation technology with state-of-the-art digital electronics and features to give you stunning sound quality with maximum - Yamaha EL-500 | Owner's Manual - Page 5
Organ Sounds) - EL-700 only ...... 37 1 Creating Flute Voices 37 2 Save to User Flute Voice 39 3 Using Preset and User 67 7 Preset/User Keyboard Percussion 68 8 Troubleshooting 177 Specifications 180 Index 182 5 1 Quick Introductory Guide 2 Voice Sections Flute Voices 3 (Organ Sounds) - EL - Yamaha EL-500 | Owner's Manual - Page 6
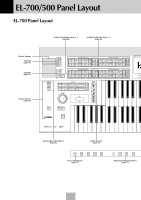
EL-700/500 Panel Layout EL-700 Panel Layout LOWER KEYBOARD VOICE 1, 2 (page 26) UPPER KEYBOARD VOICE 1, 2 (page 26) Monitor Speaker REVERB (page 49) SUSTAIN (page 52) Rhythm Section (page 56) KEYBOARD PERCUSSION LOWER 1 PEDAL 2 INTRO. ENDING REVERB MAX MIN SUSTAIN UPPER (KNEE) LOWER (KNEE) - Yamaha EL-500 | Owner's Manual - Page 7
2 CONTRA BASS ELEC. BASS 1 BRILLIANCE VOLUME BRILLIANT MAX ORGAN BASS TUBA TO LOWER ORGAN BASS TUBA TO LOWER MELLOW MIN MELLOW MIN Monitor Speaker TEMPO + FORMAT CUSTOM PLAY Floppy Disk Slot LED (Lamp in-use) Eject Button 9 10 11 12 D. D. (Disable) Button (page 77) POWER ( - Yamaha EL-500 | Owner's Manual - Page 8
EL-500 Panel Layout LOWER KEYBOARD VOICE 1, 2 (page 26) UPPER KEYBOARD VOICE 1, 2 (page 26) Monitor Speaker REVERB (page 49) SUSTAIN (page 52) Rhythm Section (page 56) KEYBOARD PERCUSSION LOWER 1 PEDAL 2 INTRO. ENDING REVERB MAX MIN SUSTAIN UPPER (KNEE) LOWER (KNEE) PEDAL UPPER KEYBOARD - Yamaha EL-500 | Owner's Manual - Page 9
1 OBOE TRUMPET TO LOWER MIN PEDAL VOICE 1 MAX CONTRA BASS ELEC. BASS 1 ORGAN BASS TUBA TO LOWER MIN MASTER VOLUME PEDAL VOICE 2 MAX 1 TO LOWER MIN Monitor FORMAT CUSTOM PLAY Floppy Disk Slot LED (Lamp in-use) Eject Button D. D. (Disable) Button (page 77) POWER (page 12) MUSIC - Yamaha EL-500 | Owner's Manual - Page 10
Display (page 20) DATA CONTROL DATA CONTROL Buttons (page 21) EL-500 LCD Display (page 20) DATA CONTROL DATA CONTROL Buttons (page Monitor Speakers Jacks (page 157) Speaker Unit Keyboard Cover/Music Stand Front Panel (page 6~9) Upper Keyboard Lower Keyboard MIDI Jacks (page 157) Knee Lever ( - Yamaha EL-500 | Owner's Manual - Page 11
musical instrument. You can enjoy playing a total of 173 AWM/FM voices using the touch response function. (page 26) 2 Limitless Variety of Organ Sounds (EL-700 only) The Electone also has separate voice sections that feature classic organ sounds-from jazz and pop to church and theater-and lets you - Yamaha EL-500 | Owner's Manual - Page 12
will also be important when you later use the Electone's more advanced features. 1 Getting Started Only use the voltage specified as correct for the Electone. The required voltage is printed on the name plate of the Electone. Yamaha products are manufactured specifically for the supply voltage - Yamaha EL-500 | Owner's Manual - Page 13
of the entire instrument. Quick Introductory Guide MASTER VOLUME 4 Press the Expression a suitable level, you can use the Expression pedal to change the for the Upper/Lower keyboards and Pedalboard and each specially turn the power on, the Electone automatically selects Basic Registration 1. - Yamaha EL-500 | Owner's Manual - Page 14
Quick Introductory Guide 1 3 Registration Menu Disk The Electone includes convenient Registrations that let you completely and instantly change the voices and other settings for all of the keyboards, even as you play. Each registration is pre-programmed to be used for a specific music style or - Yamaha EL-500 | Owner's Manual - Page 15
the LCD by pressing the appropriate Data Control button. Quick Introductory Guide Up to 16 registration selections are shown on the LCD, and the 16 Data Control buttons correspond to those selections. The Data Control buttons are used to select voices, rhythms and various functions. They are also - Yamaha EL-500 | Owner's Manual - Page 16
1 Registration Menu List Quick Introductory Guide Page 1: Symphonic Orchestra LCD (Name) Content 1 Maestoso Symphonic Orchestra 1 3 Mute Ens. Big Band Orchestra 3 4 SolidTutti Big Band Orchestra 4 5 Moon Light Big Band Orchestra 5 6 Trb. Ens. Big Band Orchestra 6 7 Quartet Quartet - Yamaha EL-500 | Owner's Manual - Page 17
Fusion 13 OceanGtr. West coast 1 14 16Bt.Pf West coast 2 15 16Bt.Balad 16 Beat Ballad 16 16Bt.Latin 16 Beat Latin 17 Quick Introductory Guide 1 - Yamaha EL-500 | Owner's Manual - Page 18
Introductory Guide Page 5: Black & White ~ Organ Sounds LCD (Name) Content 1 Straight Flute Combi. 1 2 Cluster Flute Combi. 2 3 Dry Combi Flute Combi. 3 4 Fat &Rich Flute Combi. 4 5 Moody Jazz Ballad 1 6 Full Balad Jazz Ballad 2 7 LightCombi Organ Bossa 1 8 OrganCla. Organ Bossa - Yamaha EL-500 | Owner's Manual - Page 19
Basic Operation Registration Set-up Select the keyboard to play Select the voice (Voice Menu) Voice Edit (User Voice) * The Controls and Effects may Program (User Rhythm /Rhythm Sequence) Add reverb Quick Introductory Guide 1 Adjust the total volume (Master Volume) Playing Electone Expression - Yamaha EL-500 | Owner's Manual - Page 20
Quick Introductory Guide 1 5 Using the LCD use (For example, press the STRINGS button in the Upper Keyboard Voice 1 section). STRINGS BRASS UPPER KEYBOARD VOICE 1 CLARINET SAXO- CHORUS HARMO- PHONE NICA 1 BRILLIANCE VOLUME BRILLIANT MAX ORGAN PIANO GUITAR VIBRAPHONE COSMIC TUTTI EL - Yamaha EL-500 | Owner's Manual - Page 21
or function shown on the display. Press the STRINGS button in the Upper Keyboard Voice 1 section once again. This LCD changes to show some of the other ways in which the Data Control buttons are used to control Electone functions. Each pair of buttons corresponding to the section of the display - Yamaha EL-500 | Owner's Manual - Page 22
q Setting the User Keyboard Percussion q Displaying Voice Display (Manual Balance) q q Selecting Flute voices or setting Flute Voices (EL-700 only) q Selecting and setting Tremolo/Chorus page you want to use with the Page buttons 3. To Actually Change the Settings Using the Data Control buttons - Yamaha EL-500 | Owner's Manual - Page 23
EL-700 LCD Display DATA CONTROL Data Control Buttons Display Select Page Buttons Buttons PAGE CONTRAST VOICE EFFECT A. B. Contrast Dial at the right side of the LCD display can be used for adjusting the relative sharpness of the characters displayed on the LCD. CONTRAST 23 Quick Introductory - Yamaha EL-500 | Owner's Manual - Page 24
Quick Introductory Guide 1 6 Voice List A variety of voices can be divided into the following categories. Cosmic 14 Cosmic 10 Cosmic 15 Cosmic 16 Chorus 3 Theatre Organ 2 Pop Organ 2 Jazz Organ 2 Jazz Organ 3 Jazz Organ 4 Organ 4 Bandoneon Electric Piano 2 Electric Piano 3 Clavi. Guitar 3 - Yamaha EL-500 | Owner's Manual - Page 25
Yokobue Trumpet 6 Euphonium Upright Bass Synth Bass 2 Organ Bass 4 Timpani Roll Synth Bass 3 The Preset Voices for Upper/Lower Flute Voices (EL-700 only) Jazz Organ 1 Jazz Organ 2 Jazz Organ 3 Pop Organ 1 Pop Organ 2 Pop Organ 3 Jazz Organ 4 Pop Organ 4 Quick Introductory Guide 1 25 - Yamaha EL-500 | Owner's Manual - Page 26
used for instruction in the following sections. PEDAL VOICE 2 MAX 1 TO LOWER MIN 1 Selecting Voices from the Panel Since selection of panel voices follows the same procedure throughout the various voice sections, instructions for only the Upper Keyboard Voice 1 are given here. NOTE: To the EL-500 - Yamaha EL-500 | Owner's Manual - Page 27
of 0, or no sound, to a maximum of full volume. STRINGS BRASS UPPER KEYBOARD VOICE 1 CLARINET SAXO- CHORUS HARMO- PHONE NICA 1 BRILLIANCE VOLUME BRILLIANT MAX ORGAN PIANO GUITAR VIBRAPHONE COSMIC TUTTI EL-700 2 MELLOW MIN Fine: Pressing the same panel voice button again (or the - Yamaha EL-500 | Owner's Manual - Page 28
EL-700 DISPLAY SELECT EL-500 When the TO LOWER button is turned on, the Lead voices and Pedal voices cannot be played on the Upper keyboard restores the original volume setting. Turning the Electone off erases all panel settings you have made. When the Electone is turned on, Basic Registration 1 - Yamaha EL-500 | Owner's Manual - Page 29
The Electone also User voices can be selected from these buttons. STRINGS BRASS UPPER KEYBOARD VOICE 1 CLARINET SAXO- CHORUS HARMO- PHONE NICA 1 BRILLIANCE VOLUME BRILLIANT MAX ORGAN PIANO GUITAR VIBRAPHONE COSMIC TUTTI 2 EL-700 MELLOW MIN The dotted buttons have three basic uses - Yamaha EL-500 | Owner's Manual - Page 30
from the display (PIANO 1, for example) PIANO 1 will be shown at the top of LCD indicating that it has been selected. To select User voices: Select the USER page when you wish to play voices that you've created in Voice Edit (page 107) or voices from a Voice Disk (page 115) PAGE - Yamaha EL-500 | Owner's Manual - Page 31
3 Voice Menus The following chart lists the voices available and their button/page assignment. STRINGS Upper/Lower Strings 1 Pizz. Strings Strings 2 Trem. Strings Strings 3 STRINGS Strings 4 Strings 5 Synth. Strs.1 Strings 6 Synth. Strs.2 Strings 7 Synth. Strs.3 VIOLIN Lead Violin 1 - Yamaha EL-500 | Owner's Manual - Page 32
nica2 HARMONICA ORGAN Upper/Lower ORGAN Organ 1 Organ 2 Organ 3 Organ 4 Jazz Jazz Jazz Jazz Organ 1 Organ 2 Organ 3 Organ 4 Pop Pop Theat. Theat. Accor- Organ 1 Organ 2 Organ 1 Organ 2 dion Bandoneon ORGAN BASS Pedal ORGAN BASS Organ Bass 1 Organ Bass 2 Organ Bass 3 Organ Bass - Yamaha EL-500 | Owner's Manual - Page 33
Cosmic Cosmic Cosmic Cosmic Cosmic Cosmic 9 10 11 12 13 14 15 16 USER VOICE USER 1 USER 9 USER 2 USER 10 USER VOICE USER 3 USER 4 USER 5 USER 6 USER 11 USER 12 USER 13 USER 14 USER 7 USER 15 USER 8 USER 16 * The details for each voices such as octave (feet) setting and effect - Yamaha EL-500 | Owner's Manual - Page 34
classicals. 8' - For big band with brighter attack. Brass 3 8' - With strong impact. Can be used as orchestra hit. Brass 4 U16'/L8' - Trombone ensemble. Brass 5 Synth. Brass 1 8' - Tight that the feet settings of each voice are preset to 16' on the upper keyboard and 8' on the lower - Yamaha EL-500 | Owner's Manual - Page 35
3 Chorus 4 Chorus 5 Vocal Harmonica 1 Harmonica 2 Organ 1 Organ 2 Organ 3 Organ 4 Jazz Organ 1 Jazz Organ 2 Jazz Organ 3 Jazz Organ 4 Pop Organ 1 Pop Organ 2 Theat. Organ 1 Theat. Organ 2 Accordion Bandoneon Organ Bass 1 Organ Bass 2 Organ Bass 3 Organ Bass 4 Piano 1 Piano 2 Honkytonk Elec. Piano - Yamaha EL-500 | Owner's Manual - Page 36
. Distorted guitar. Grand harp. Hawaiian guitar. Effective when used with the glide function. Japanese Koto. Japanese Taisho Koto. Regist. 4. Brass type.LK in Basic Regist. 5. Decay type. With fantastic image. Spacious sounds with feedback. Synth. brass type. Vocal type with feedback. Distortion - Yamaha EL-500 | Owner's Manual - Page 37
. You can select various Preset Flute Voices, or create your own and save those to User Voices. There are five pages: Menu, Footage, Attack, Volume, Save. 3 1 Creating Flute Voices Flute Voices (Organ Sounds) - EL-700 only To create the Flute Voices: 1 Press one of the Flute Voice buttons (UPPER - Yamaha EL-500 | Owner's Manual - Page 38
functions. ATTACK Page PAGE 3 Flute Voices (Organ Sounds) - EL-700 only NOTE: "Mode" is common to level here, unless you raise the total reverb level using the panel Reverb buttons (page 49). NOTE: If the keyboard response faster; higher settings result in a slower response, creating a pipe organ - Yamaha EL-500 | Owner's Manual - Page 39
SAVE Page PAGE Flute Voices (Organ Sounds) - EL-700 only NOTE: All settings in the Footage, Attack and Volume pages can be saved to the Save page, except for the following: Attack Mode, Tremolo On/Off, Reverb and Volume. 2 Select the desired user voice number (USER 1 through 8) to which the new - Yamaha EL-500 | Owner's Manual - Page 40
3 Using Preset and User Voices To call up the Preset Voices and User Voices: 3 1 Press the Page buttons to select the MENU page. MENU Page PAGE Flute Voices (Organ Sounds) - EL-700 only NOTE: The User area described in this section has no relation to that of the Voice Menu page. 2 Select - Yamaha EL-500 | Owner's Manual - Page 41
Electone is equipped with two general kinds of functions that can be used to change the sound of the voices: Voice Controls and Effects. Voice controls are used Keyboard Voice 1 Upper Keyboard Voice 2 Lower Keyboard Voice 1 Lower Keyboard buttons are provided on the EL-500's front panel, the - Yamaha EL-500 | Owner's Manual - Page 42
: Minimum setting produces no effect at all. NOTE: In the case of the EL-500 the Touch Tone (Initial/After) value of the Pedal Voice section is grayed out control over the volume and timbre of a voice. Two types of keyboard touch affect this function: Initial Touch and After Touch. All voices are - Yamaha EL-500 | Owner's Manual - Page 43
Pedal Voice sections. 3 PAN Determines the position of the voice in the stereo image. Seven pan positions are available. 4 REV. (REVERB) Determines the amount you raise the level here, unless you raise the total reverb level using the panel Reverb buttons (page 49). 4 Voice Condition [PAGE 2] - Yamaha EL-500 | Owner's Manual - Page 44
settings make the voice brighter. (This control is the same as on the EL-700's front panel.) Range: -3- +3 Voice Condition [PAGE 3] Press the PAGE 3. PAGE Voice Controls and Effects Upper/Lower/Pedal NOTE: The User vibrato may not be effective for some voices such as Harmonica2, Electric Piano1 - Yamaha EL-500 | Owner's Manual - Page 45
On/Off switch for the Touch Vibrato function. In the case of the EL-500 the Touch Touch Vibrato lets you apply vibrato to individual notes as you control lets you detune the Lead voice relative to the other voices of the Electone, for producing a richer sound. The higher the value set, the higher - Yamaha EL-500 | Owner's Manual - Page 46
pronounced echo effect, with distinct delayed repeats of the original sound. Independently applied to each voice section. Delay Effect Signal Time Adjusts the level balance using BALANCE parameter Delayed Signal Adjusts the delay interval using TIME parameter Adjust the number of repeated sounds - Yamaha EL-500 | Owner's Manual - Page 47
Mono, ST (Stereo) 1, 2, 3. Selecting one of the Stereo Delays produces more expanding image or an image sounds move from right to left (or left to right). Range: MONO, ST.1, ST Signal Time Changes the pitch using SPEED parameter Sets the depth using DEPTH parameter Intensifies the pitch change - Yamaha EL-500 | Owner's Manual - Page 48
Range: 37.8% - 87.8% 5 DISTORTION Distortion adds a distorted image to the sounds usually found in electric guitars. Independently applied to each voice section. Distortion Effect Signal Determines the depth using LEVEL parameter Changes the timbre using HIPASS parameter 5 -1 5 -2 5 5-1 LEVEL - Yamaha EL-500 | Owner's Manual - Page 49
voices, or set individually for each voice section of the Electone, even independently for rhythm and accompaniment. To adjust the reverb Press one of the REVERB buttons, located to the left of the Upper Keyboard Voices section. REVERB MAX Voice Controls and Effects MIN REVERB Page 1 PAGE - Yamaha EL-500 | Owner's Manual - Page 50
Controls and Effects 4 NOTE: In the case of EL-500 equipped with 8 Registration Memories (page 77), from 1 through 8, executing the operation (uniforming Length/Depth) equally affects the Registration Memories 9 through 16, too. This function is useful when you edit the data created with the upper - Yamaha EL-500 | Owner's Manual - Page 51
-700 only) Sections Determines the amount of reverb applied to each voice section. Range: 0-24 2 LOWER 1, 2, FLUTE (EL-700 only) Sections Determines the amount of reverb applied to each voice section. Range: 0-24 3 LEAD Section Determines the amount of reverb applied to the - Yamaha EL-500 | Owner's Manual - Page 52
sustain length settings are independent for each keyboard, providing maximum expressive control. 4 If SUSTAIN buttons are on/off switches. If you use them to simply check the sustain length values, LOWER (KNEE) PEDAL The lamp of the button lights up to indicate that sustain is on. Press the - Yamaha EL-500 | Owner's Manual - Page 53
button or the Left Footswitch (when properly set for Footswitch operation). s Tremolo Operation For Upper/Lower Flute Voice 4 For Panel Voices (Voice Menu) (EL-700 only) 1 Select (turn on) Tremolo effect in each Voice Condition page 2. 1 Turn on Tremolo effect in VOL. (Volume) page of Flute - Yamaha EL-500 | Owner's Manual - Page 54
be applied selectively to the voice sections; in other words, the Upper Keyboard voices can have the Tremolo effect while the Lead voices have another effect SEQUENCE U. FLUTE L. FLUTE TREMOLO VOICE VOICE (FAST) DISPLAY SELECT EL-700 3. Select TREM. to turn on Tremolo for the selected Voice - Yamaha EL-500 | Owner's Manual - Page 55
button lights up EL-500 4 Voice Controls and Effects 12 1 TREM. SPEED (Tremolo Speed) Determines the speed of the Tremolo (rapid rotation) effect. Range: 4.75Hz - 7.77Hz 2 CHOR. MODE (Chorus Mode) Determines the effect applied when Tremolo is switched off: a slow chorus effect (SLOW) or STOP. Use - Yamaha EL-500 | Owner's Manual - Page 56
sounds to automatically play various rhythms. Automatic Accompaniment functions are used with the rhythms, providing appropriate and completely automatic accompaniment to match the style of the selected rhythm. Moreover, the Electone has a Keyboard Percussion feature that allows you to play drum and - Yamaha EL-500 | Owner's Manual - Page 57
keyboard or Pedalboard. To stop the rhythm, press this button again. 3 INTRO. ENDING NOTE: The Left Footswitch can also be used to SEQ. 2 MARCH WALTZ SWING BOUNCE SLOW ROCK 1 USER 1 USER 2 USER 3 USER 4 A B NOTE: When the Electone is turned on, the Rhythm Volume is automatically set - Yamaha EL-500 | Owner's Manual - Page 58
THE START OF A SONG: Fill In patterns can also be used as introductions; simply press the FILL IN button before starting the rhythm with the START or SYNCHRO START buttons. 1 Select and play a rhythm. 2 As you play the Electone along with the rhythm, occasionally press the FILL IN button. INTRO - Yamaha EL-500 | Owner's Manual - Page 59
to make up each drum/percussion instrument, each of which comprises the rhythms and is playable using the Keyboard Percussion function. 1) To select the Rhythm Condition page: Choose a rhythm, and press that pattern's panel button again (or again press the Data Control button corresponding - Yamaha EL-500 | Owner's Manual - Page 60
Preset/ User rhythm patterns and Keyboard Percussion. Consequently Determines the position of the currently selected instrument in the stereo image. Seven pan positions are available. 4 REV. (Reverb) the factory preset value. Using registration data created on other Electone models will restore all - Yamaha EL-500 | Owner's Manual - Page 61
To use the Copy function, press one of the rightmost Data Control buttons. The following display will appear: Copy Cancel Press any of the Data Control buttons below [Copy] on the display to erase all user settings and restore the preset data. When [Copy] is selected, a "Completed" message - Yamaha EL-500 | Owner's Manual - Page 62
and is irrelevant to the Rhythm Menu below. 5 3 Press the Data Control button corresponding to the rhythm you wish to use. Rhythm and Accompaniment NOTE: When you select the user rhythm with the Lower Rhythmic function turned on, "RHYTHMIC" will be shown above the "ACCOMPANI." on the LCD display - Yamaha EL-500 | Owner's Manual - Page 63
4 Rhythm Menus This chart lists all 66 of the rhythms available on the Electone. MARCH March 1 Country1 March 2 Country2 MARCH March 3 Polka 1 Broadway Baroque Polka 2 WALTZ Waltz 1 Waltz 2 WALTZ Waltz 3 Waltz 4 Jazz Jazz Jazz Waltz 1 Waltz 2 Waltz 3 Bolero Waltz 5 - Yamaha EL-500 | Owner's Manual - Page 64
Pop 4 8 Beat 5 16 BEAT 16 Beat 16 Beat 1 2 16 BEAT 16 Beat 16 Beat 3 4 16 Beat 5 16 Beat 16 Beat 16 Beat Funk 1 Funk 2 Funk 3 USER RHYTHM USER RHYTHM USER USER USER USER A B 1 2 3 4 USER USER USER USER C D 5 6 7 8 64 - Yamaha EL-500 | Owner's Manual - Page 65
Chord (A.B.C.) function works with the Rhythm section of the Electone to automatically produce chord and bass accompaniment as you play. produces bass and chord accompaniment for chords played in the Lower keyboard. It allows you to use a wider range of chord types than in the Single Finger - Yamaha EL-500 | Owner's Manual - Page 66
DISPLAY SELECT EL-500 3) Chords Recognized in the Single Finger Mode Major, minor, 7th and minor 7th chords can all be played in the Single Finger mode. NOTE: With Single Finger, the chord produced will sound in the same octave regardless of where it is played on the Lower keyboard. NOTE: PLAYING - Yamaha EL-500 | Owner's Manual - Page 67
. When rhythms are used, A.B.C. provides rhythmical ROCK 1 USER 1 USER 2 USER 3 USER 4 A B SEQ. 3 SEQ. 4 TANGO LATIN 1 LATIN 2 8 BEAT 16 BEAT 2 USER 5 USER 6 USER 7 USER 8 C value. Range: 0 - 24 NOTE: When the Electone is turned on, the Accompaniment Volume is automatically set - Yamaha EL-500 | Owner's Manual - Page 68
Lower keyboard and Pedalboard, while the User Keyboard Percussion lets you freely assign the 120 available sounds to any key or pedal you wish. The two Keyboard Percussion buttons on the panel function as on/off switches for both Keyboard Percussion modes. Rhythm and Accompaniment 1) To use the - Yamaha EL-500 | Owner's Manual - Page 69
assignments of the drum and percussion sounds using the following User Keyboard Percussion function. 69 OrcheWWSsTtonrorTaoaioardridSneAaABHgnngBDCglalgaoeoloroorlnguceegwcCdoTTkmokODbloooCHHLeLRrpmmsuliioloaggeelomww123ph1hndll Tom SnSarneaSSSBreyyyrunnnBsttthhhrhu...CsSTTThlhoooaRommmvteo1231sll - Yamaha EL-500 | Owner's Manual - Page 70
the LK 5 Preset is currently selected. The Menu can be selected from LK (Lower Keyboard) PRESET and eight Users, USER 1 through USER 8. When the PEDAL/2 button is used to call up the Menu display: KEYBOARD PERCUSSION LOWER 1 PEDAL 2 The Menu can be selected from PK (Pedalboard) PRESET and eight - Yamaha EL-500 | Owner's Manual - Page 71
the appropriate Data Control buttons. 3 CLEAR This function is used to erase User assignments for User 1. CLEAR works in two ways: either to erase a single instrument, or to erase all instruments. (See step #5 below.) User Keyboard Percussion Categories Page 1 Crash Cym 1 Orch. Cym 1 1.CYMBAL - Yamaha EL-500 | Owner's Manual - Page 72
Tom 1 2 Tom Br Tom Br Shot 1 Shot 2 5.TOM Tom Tom 3 4 Tom Br Tom Br Shot 3 Shot 4 Synth. Tom 1 Synth. Tom 2 Synth. Tom 3 Page 6 BD Light Analog BD 1 6.BASS DRUM BD Heavy BD Attack Synth. BD BD March Analog BD 2 ConcertBD Page 7 Conga High Bongo High 7.CONGA/BONGO Conga Low - Yamaha EL-500 | Owner's Manual - Page 73
or Pedalboard 5 Rhythm and Accompaniment Continue the operation above to build up your own User Keyboard Percussion set. 5 To erase an instrument/key assignment, use the Clear function. Clear can be used in two ways: to erase one instrument or all instruments. s To erase one instrument - Yamaha EL-500 | Owner's Manual - Page 74
the Page buttons. PAGE 5 COPY/LK PRESET (COPY/PK PRESET) Copies Lower Preset Keyboard Percussion (Pedal Preset Keyboard Percussion) to one of the eight Users. 2. With USER 1 selected as the Menu (for this example, use User 1), press one of the Data Control buttons below "LK PRESET" on the COPY - Yamaha EL-500 | Owner's Manual - Page 75
: 1. Select the MENU page by using the Page buttons. COPY/USER Copies one of the eight Users to another. 2. With USER 3 selected as the MENU (for this example, use User 3 as the destination and User 1 as the source), press one of the Data 5 Control buttons below "USER" in the COPY window. The - Yamaha EL-500 | Owner's Manual - Page 76
TREMOLO (FAST) DISPLAY SELECT EL-700 DISPLAY SELECT EL-500 NOTE: Melody On Chord applies only when the Upper keyboard voice section's volume is On/off switch for Knee Lever control over Melody On Chord operation. To use the Melody On Chord function with Knee Lever control (page 151), first switch - Yamaha EL-500 | Owner's Manual - Page 77
keyboards for easy access while playing. EL-700 M. 13 14 15 16 /TO DISK 1 2 3 4 5 6 7 8 9 10 11 12 D. EL-500 M. 1 2 3 4 5 6 7 8 D. /TO DISK Functions and settings that cannot be memorized are: • Reverb type • Voice Edit settings (except for User DISK EL-700 EL-500 - Yamaha EL-500 | Owner's Manual - Page 78
that corresponds to the registration you wish to select. Using the D (Disable) button: Rhythm and automatic accompaniment to the instructions how to format a disk (page 86). Registration Memory NOTE: No song names will be provided for the songs recorded by the other Electone models. NOTE: - Yamaha EL-500 | Owner's Manual - Page 79
taking your hands from the keyboards. By using the Right Footswitch on the light up as they are selected. s To set the Shift mode function: Press any of the Data Control buttons below SHIFT in the Registration Shift page. DISPLAY SELECT EL-700 DISPLAY SELECT EL-500 NOTE: Even with the EL-500 - Yamaha EL-500 | Owner's Manual - Page 80
Although the number of the Registration Memory buttons of EL-500 are limited to eight, from Registration Memory 1 through Enter the desired registration number using the Data Control 6 buttons to select the registration number. 4 USER Selects the User mode. In the User mode, each press of the - Yamaha EL-500 | Owner's Manual - Page 81
pages in the User mode: Mode and using the cursor controls. NOTE: The Shift End mark ( for Top and for Next Song) will automatically be put at the end of the registrations you entered when TOP or NEXT SONG is selected as the Shift End on the Mode page. Shift End mark NOTE: In the case of the EL-500 - Yamaha EL-500 | Owner's Manual - Page 82
. Then press the desired Registration Memory button (the selected button will light), and press the Data Control button corresponding to INS. 2-3 DEL. button corresponding to DEL. 2-4 CLEAR For erasing all current user Registration Shift Settings. After selecting CLEAR, the following display appears - Yamaha EL-500 | Owner's Manual - Page 83
Electone to the Factory Preset (Power On Reset) All current settings including Registration Memories, User voices and User rhythms can be deleted at once by using the Power On Reset function. Be careful when using Electone off erases all panel settings you have made. When the Electone the Electone - Yamaha EL-500 | Owner's Manual - Page 84
and 2HD type floppy disks can be used. A blank 2HD floppy disk has been included with your Electone for you to record your performances. Inserting slot and then repeat the eject procedure. LED (Lamp in-use) Eject button NOTE: When the EL-700/500 is turned on, the LED below the floppy disk slot - Yamaha EL-500 | Owner's Manual - Page 85
use. Music Disk Recorder Do not expose the disk to direct sunlight, extremely high or low temperatures, or excessive humidity, dust or liquids. Do not open the sliding shutter and touch the exposed surface of the floppy disk inside. Improved Potentiality of the M.D.R. The M.D.R. of the EL-700/500 - Yamaha EL-500 | Owner's Manual - Page 86
functions: the first function is printed in white above each button; the second function is printed in green below each button. The SHIFT button is used to select the second functions by pressing each function button while holding down the SHIFT. 86 - Yamaha EL-500 | Owner's Manual - Page 87
Electone. Make all the Electone settings necessary for the song you will record. This means entering the all registrations you will need for the entire performance in the Registration Memory. Make sure also to select the registration that you will use button. The RECORD lamp lights up and the PLAY - Yamaha EL-500 | Owner's Manual - Page 88
DEL. PAUSE STOP PLAY SONG SELECT RECORD CUSTOM PLAY MUSIC DISK RECORDER - TEMPO + FORMAT Never eject the floppy disk before the STOP lamp lights up. 8 To hear your newly recorded performance, press the PLAY button. Play back will begin after a couple of seconds. For more information on - Yamaha EL-500 | Owner's Manual - Page 89
or symbol you want to use by pressing the Data EL-700/500. The small letters can be recognized and displayed on certain models like EL User rhythms) and Rhythm Sequence data, and User voices. 2. Performance data The M.D.R. records your performance on the keyboards and pedalboard of the Electone - Yamaha EL-500 | Owner's Manual - Page 90
example, first recording the chords and bass to the song (using the Lower and Pedalboard), and after that recording the melody (using the Upper Keyboard). This function also lets you record the lead voice, keyboard percussion and performance control data, such as registration changes and expression - Yamaha EL-500 | Owner's Manual - Page 91
after numbers appear in the display. For this example, play the lower keyboard and pedalboard. 4 Press the STOP button when you are finished with your button again to record another part (Upper part). The RECORD lamp lights up and the PLAY and CUSTOM PLAY lamps begins blinking, indicating that - Yamaha EL-500 | Owner's Manual - Page 92
the parts being played back, start playing the melody on the Upper keyboard. When the end of the recorded performance is reached, playback is 7 You can retry to change a specific part which you don't want to use. Music Disk Recorder To execute the Punch-in recording: 1. Press the PLAY button - Yamaha EL-500 | Owner's Manual - Page 93
User voices, are also saved in the operation. There are two ways to record the registrations and bulk data: [1] To record only the registrations and bulk data: 1 On the Electone While holding down the RECORD button... M. 13 14 15 16 /TO DISK EL-700 1 2 3 4 5 6 7 8 9 10 11 12 D. - Yamaha EL-500 | Owner's Manual - Page 94
to the Electone by simply selecting the appropriate song number and pressing the PLAY button. When the operation has been completed, the M.D.R. returns to STOP status. The M.D.R. also makes it possible to use more than the 16 Registration Memory registrations (eight for the EL-500) in a performance - Yamaha EL-500 | Owner's Manual - Page 95
EL-700/500 the Lead/Keyboard Percussion part(s) you have recorded separately will automatically be on when you start playback. NOTE: When you play back the data which is made by other Electone models such as EL turned off. This function is especially useful for playing a single part, such - Yamaha EL-500 | Owner's Manual - Page 96
others will follow in order. 2 SHold down the SHIFT button and simultaneously press the SONG REPEAT button. The lamps above SHIFT and SONG REPEAT light up, and "ALL" appears on the LED display. 3 To repeatedly playback all songs starting with the selected song: Press the PLAY button. Playback - Yamaha EL-500 | Owner's Manual - Page 97
XG song data using the M.D.R. Also, the XG Easy Convertor function of the EL-700/500 lets you convert the data created with the EL-700/500 to the XG the XG page. You can store both the XG songs (on the XG page) and Electone songs (on pages 1 - 4) in a single disk. muted automatically. 4 MUTE: Brings - Yamaha EL-500 | Owner's Manual - Page 98
(except for Next Song) To convert the EL-700/500 data to the XG song data: 1. Insert the disk containing the Electone data into the floppy disk slot. 2. Select to the Edit Song Name display (page 89). You can name the XG song using up to eight letters. When the XG song data is newly created in the - Yamaha EL-500 | Owner's Manual - Page 99
data, except for that of Rhythm Pattern Program, Rhythm Sequence, User voices, Keyboard Percussion assignments and Instrument (rhythm) settings, will be loaded and playback when you return to an earlier position using the fast reverse function. NOTE: Fast Forward and Fast Reverse operate at five - Yamaha EL-500 | Owner's Manual - Page 100
song is playing on the M.D.R. by holding down the SHIFT button and pressing the TEMPO + or TEMPO - button. (The Tempo dial on the Electone panel cannot be used to change the tempo on the Music Disk Recorder.) Each press of the button slows down or speeds up the tempo by a small amount - Yamaha EL-500 | Owner's Manual - Page 101
left of the LED display. NOTE: This function is available with the Electone data, not with the XG data. UPPER RECORD LOWER PEDAL CONTROL UPPER this case, you should erase one of the songs on the disk by using the Song Delete function (page 103). UPPER RECORD LOWER PEDAL CONTROL UPPER PLAY - Yamaha EL-500 | Owner's Manual - Page 102
(source) with the SONG SELECT buttons. 4 Press the RECORD button. The RECORD lamp lights up and the LED continues to indicate "00.--" as shown at the right. 5 PLAY MUSIC DISK RECORDER - TEMPO + FORMAT NOTE: You can also use the Data Control buttons to select the song number. UPPER RECORD - Yamaha EL-500 | Owner's Manual - Page 103
be deleted. 7 Music Disk Recorder 8) Disk Copy 1You can duplicate a floppy disk by copying the contents. Yamaha recommends that you keep two copies of important data on separate floppy disks by using this function. 1 Prepare the source disk and the formatted blank disk to be copied. The disk - Yamaha EL-500 | Owner's Manual - Page 104
Music Disk Recorder 7 3 Insert the source disk into the disk slot. The M.D.R. starts reading the data in the source disk. "out 1" appears on the LED display. UPPER RECORD LOWER PEDAL CONTROL UPPER PLAY LOWER PEDAL CONTROL SHIFT SONG REPEAT FROM TO SONG COPY SONG DEL. PAUSE STOP PLAY - Yamaha EL-500 | Owner's Manual - Page 105
copied or erased. You cannot save the data to another floppy disk. If you try to load data from such a "copy-protected" disk to the Electone, a "Protected Disk" (PrXX*) message will appear on the LED display. The data cannot be saved to the disk. *XX: song number 7 Music Disk Recorder 105 - Yamaha EL-500 | Owner's Manual - Page 106
the disk's Write-protect tab (page 85) to OFF. 2) If you are using a copy-protected playback-only disk, this message may appear when you attempt the (01 through 40). When you insert the "copy-protected" disk to the Electone, this message will appear on the LED display. You cannot overwrite or save - Yamaha EL-500 | Owner's Manual - Page 107
SELECT EL-700 DISPLAY SELECT EL-500 2 ....press desired Voice button. After you have selected a voice-Piano 1, in this example-the following LCD will appear. STRINGS BRASS UPPER KEYBOARD VOICE 1 CLARINET SAXO- CHORUS HARMO- PHONE NICA 1 BRILLIANCE VOLUME BRILLIANT MAX ORGAN PIANO - Yamaha EL-500 | Owner's Manual - Page 108
Algorithm Envelope Parameters At the left side of the display is the Algorithm used for this voice. An algorithm is a kind of "map" that shows all Operators, except Operator 1. To turn off each Operator: 1 .First, use the pair of Data Control buttons just below the algorithm display (below the - Yamaha EL-500 | Owner's Manual - Page 109
(Output Level) parameter. Envelope Parameters Changing the OL parameter affects the volume of the selected Operator. Raise the OL parameter from 0 to 110 by using the pair of Data Control buttons just below the OL. (Pressing the A button raises the level, and pressing the B button lowers the level - Yamaha EL-500 | Owner's Manual - Page 110
Release Rate) parameter. Play a note on the keyboard and then release it. Notice how the changes make the sound brighter and lowering the AR of the Operator 2 can produce a distinctive effect. Use the Data Control buttons below OL (Output Level) to change the level of Operator 2. Notice that - Yamaha EL-500 | Owner's Manual - Page 111
has been selected. 2 Adjust the LOW setting, and listen to how they affect the sound. Changing this parameter affects the lower range of the keyboard. Raising this parameter boosts the output of the lower range. 8 Voice Edit 3 Adjust the HIGH setting, and listen to how they affect the sound - Yamaha EL-500 | Owner's Manual - Page 112
of the Operators will forcibly be changed and saved as "on" in a User voice. If you want an Operator muted, set the OL parameter of the another function. If, however, you wish to keep the newly created voice for future use, you should save it. (See following section.) 2 Saving Your New Voice Once - Yamaha EL-500 | Owner's Manual - Page 113
section, See page 89 for more information. Up to 16 characters can be used in this case. This operation automatically erases any voice that had been previously saved to the selected User voice number. You should check the User voices (page 30) before saving a voice to make sure that you will not - Yamaha EL-500 | Owner's Manual - Page 114
SELECT EL-700 DISPLAY SELECT EL-500 4 Recalling an Edited Voice Once the voice has been saved, it can be selected from the last page (USER) of the dotted buttons' Voice Menu (page 30). To recall a User voice: 1 Press one of the dotted buttons in the voice section you want to use. 2 Use Page - Yamaha EL-500 | Owner's Manual - Page 115
Voice Disks to the 16 User voices in the Voice Menu. To do this: NOTE: The EL-700/500 can read the data from the EL-900/90/87 Voice Disk. and names. 8 Voice Edit 4 Using any of the Data Control button pairs, select the voice you wish to load. 5 Play the keyboard to check the sound of the - Yamaha EL-500 | Owner's Manual - Page 116
AWM Operators Sampling 6 Voice Editing Basics The EL-700/500 Electone uses a versatile tone generation system developed by Yamaha that is capable of producing an exceptionally wide range of voices. To be more specific, the system uses individual sound sources that "modulate" each other's - Yamaha EL-500 | Owner's Manual - Page 117
its second level. Range: -64 - +63 Some voices may not have remarkable effect using these AWM parameters. Voice Edit 4 RR (Release Rate) Determines how much time it takes the output of the lower range of the keyboard. Range: -64 - +63 6 HIGH Determines to boost or decrease the output of the - Yamaha EL-500 | Owner's Manual - Page 118
4) FM Operators The Operators 1 through 8 are the sine wave Operators of the algorithm. When one of these Operators has been selected, the following parameters are displayed: Voice Edit 8 NOTE: When the D2R is set to 0, the level set by the D1L will be maintained until the key is released. The - Yamaha EL-500 | Owner's Manual - Page 119
Envelope Parameters By using the modulators and setting them to various output levels, you Operator below it. This is called feedback, and it adds harmonic complexity to the tone. Operators using feedback are indicated by a line that encircles the right side of the Operator. Feedback cannot be - Yamaha EL-500 | Owner's Manual - Page 120
Voice Edit 8 5) General Guidelines for Editing Operators Before you edit a voice, always check its algorithm to see which Operators function as carriers and which as modulators. Then select each Operator in turn and edit its parameters. The Output Level and envelope parameters function differently - Yamaha EL-500 | Owner's Manual - Page 121
Level of Operator 3 makes for a rougher edge or more "bite" in the organ sound. s Ex. 3: Adding the 5th pitch to the Synth. Lead 5 to the maximum. Voice Edit s Ex. 5: Creating an electronic piano sounds suitable to use as the backings for the ballad from "E.Piano1." Increasing the OL of the AWM - Yamaha EL-500 | Owner's Manual - Page 122
Program allows you to record your own original rhythms using the 120 different high-quality percussion sounds of the Electone. The Rhythm Sequence Program lets you connect your original Sequence button.) (Optional) Finally, save all the User rhythm data you've created in the above steps to disk. 122 - Yamaha EL-500 | Owner's Manual - Page 123
and rhythm sequences. NOTE: Use of the playback and recording functions on the Music Disk Recorder automatically cancels the Rhythm Programming/Rhythm Sequencing operations. DISPLAY SELECT EL-700 DISPLAY SELECT EL-500 9 There are two ways to program a User pattern: copying a preset rhythm - Yamaha EL-500 | Owner's Manual - Page 124
NOTE: The User rhythm you have created can also be copied to the Rhythm specific rhythm from the Rhythm Menu beforehand. Copying the Fill Ins and Endings: The similar procedure can be used with the FILL IN and INTRO. ENDING buttons for copying Fill In and Ending patterns. Select the rhythm to - Yamaha EL-500 | Owner's Manual - Page 125
2) Percussion Sounds Used for Rhythm Pattern Program The total of 120 different instruments are available for the Rhythm Pattern Programming and are divided into two instrument sets: Normal and Extend, and assigned to each key on the Upper and Lower keyboards, as shown in the following chart. - Yamaha EL-500 | Owner's Manual - Page 126
lhoagtHCi-lohCsaertadOshpeCnymbal 1 Tambourine 126 SurdoSMuurdteoSMurudffolSeRduirmdoTOapmebnoTraimmbMoSurhitmeakOerpen NOTE: Some of the instruments such as Tom 1, 2 and 3 on the Upper and Lower keyboards are the same. The instruments marked with the underlines are exclusive to the Extend(ed) Set. - Yamaha EL-500 | Owner's Manual - Page 127
tape recorder; you can hear previously recorded parts of the pattern as you record new parts on top. Each method has its own advantages and uses. Step Write is good for precision and for entering percussion sounds whose note placement and rhythmic value has been determined, such as a bass drum that - Yamaha EL-500 | Owner's Manual - Page 128
enter, according to the specified Quantize resolution. 3 ASSIGN (NORMAL/EXTEND) Selects the instrument set you want to use. Two types are available: NORMAL: 91 different instruments are assigned to the Upper and Lower keyboards. EXTEND: 29 different instruments are assigned to the Upper and Lower - Yamaha EL-500 | Owner's Manual - Page 129
the Step Write mode: [1] Press the key on the Upper or Lower keyboard that corresponds to the sound. The instrument name automatically appears at the top instrument assignments.) * This method is especially useful when editing an existing rhythm, preset or user. EDIT Page-Step Write Rhythm Track - Yamaha EL-500 | Owner's Manual - Page 130
down the Data Control button corresponding to CHANGE and press the key on the Upper or Lower keyboard that corresponds to the instrument you want to use. 3 CLEAR The Clear function is used to erase an instrument from the rhythm. All instances of the selected instrument, irrespective of which tracks - Yamaha EL-500 | Owner's Manual - Page 131
to two measure and loops back to the beginning of the rhythm (1.1.1). 5 Use the Accent section of the EDIT page to enter the sound to the minimum of 0, or no sound, to a maximum of 8. The Accent 0 can be used when entering rests. NOTE: If you have copied an existing pattern, its name will be - Yamaha EL-500 | Owner's Manual - Page 132
9 About Quantize The Quantize function is a process of rounding off timing and/or duration values. With Real Time Write It allows you to automatically correct the timing of the notes you play, according to the specified Quantize resolution. The range can be corrected is within 50 percent of the - Yamaha EL-500 | Owner's Manual - Page 133
Real Time Write. q CLEAR As in Step Write, the Clear function is used to erase an instrument from the rhythm. However, the method of operation is by holding CLEAR and pressing the lowest key (C1) on the Lower keyboard. Be careful not to do this inadvertently since all sounds will be instantly - Yamaha EL-500 | Owner's Manual - Page 134
the accompaniment you want to use, in the Rhythm section on the panel. RHYTHM MAX SEQ. 1 SEQ. 2 MARCH WALTZ SWING BOUNCE SLOW ROCK 1 USER 1 USER 2 USER 3 USER 4 A B SEQ. 3 SEQ. 4 TANGO LATIN 1 LATIN 2 8 BEAT 16 BEAT 2 USER 5 USER 6 USER 7 USER 8 C D MIN 3 Select the desired - Yamaha EL-500 | Owner's Manual - Page 135
To create your own backings with the Lower Rhythmic function: You can add backings (lower rhythmic pattern) to the rhythm. The lower rhythmic pattern, using one track, can be entered by the same method as the one for the rhythm. 1 Select the ACC. (Accompaniment) page with the Page buttons. PAGE 2 - Yamaha EL-500 | Owner's Manual - Page 136
display. Select the voice you want to use by pressing the Data Control buttons corresponding (Saxophone) Acc.Clari (Clarinet) Acc.JzOrg (Jazz Organ) Acc.Accord (Accordion) Acc.Woody Acc.Metal * volume or Accent level. NOTE: When the user rhythm contains the lower rhythmic pattern data, the ACC. - Yamaha EL-500 | Owner's Manual - Page 137
page with the Page buttons. The current rhythm, if playing, will automatically be stopped when this page is selected. PAGE 2 Using the appropriate Data Control buttons, select both the User number and variation type to which you wish to save the newly created rhythm. Keep in mind that you cannot - Yamaha EL-500 | Owner's Manual - Page 138
M.D.R. section, See page 89 for more information. Up to 10 characters can be used in this case. 4 Select [Save] to save the rhythm or [Cancel] to NOTE: The Power On Reset function (page 83) can be to delete all User rhythms from memory. You should periodically save your rhythm as you are making - Yamaha EL-500 | Owner's Manual - Page 139
SLOW ROCK 1 USER 1 USER 2 USER 3 USER 4 A B SEQ. 3 SEQ. 4 TANGO LATIN 1 LATIN 2 8 BEAT 16 BEAT 2 USER 5 USER 6 USER 7 USER 8 C D MIN The Rhythm Menu appears. 2 Select the USER page with the Page buttons. PAGE 3 Select the desired User rhythm from the LCD display by using the Data - Yamaha EL-500 | Owner's Manual - Page 140
list included with your Pattern Disk for pattern numbers and names. 4 Using any of the Data Control button pairs, select the pattern you wish to Page buttons. 7 Press the corresponding Data Control buttons to designate both the User Rhythm number and its variation type (A, B, C, or D). Press one - Yamaha EL-500 | Owner's Manual - Page 141
PATTERN SEQUENCE TREMOLO (FAST) DISPLAY SELECT EL-700 DISPLAY SELECT EL-500 NOTE: When you select one of the preset rhythms of the Electone are indicated by a two-digit number (i.e., [05] or [16]). User patterns are indicated by function. Also, use of the Music Disk Recorder function automatically cancels - Yamaha EL-500 | Owner's Manual - Page 142
and begin the newly selected rhythm from the first measure, insert a different type, Fill In, before using the new rhythm pattern. Press these Data Control buttons to select PRESET and USER, alternately. 2 Select the desired rhythm by pressing the appropriate button in the Rhythm section, then - Yamaha EL-500 | Owner's Manual - Page 143
Fill In, Intro./Ending 01F March 1 Fill In 01I March 1 Intro. 01E March 1 Ending Examples of User U1A User 1 A U1B User 1 B U1C User 1 C U1D User 1 D U1F User 1 Fill In U1I User 1 Intro. * U1E User 1 Ending ** 3 If you wish to enter a Fill In, Intro, or Ending pattern, hold down the appropriate - Yamaha EL-500 | Owner's Manual - Page 144
though a pattern has been entered. NOTE: The Coarse button can also be used with the cursor controls to move the cursor several steps at a time. one measure to the right. 2 Data Controls 2-1 PRESET/USER Selects the type of rhythm, Preset or User. 2-2 SET For initially entering a pattern number to an - Yamaha EL-500 | Owner's Manual - Page 145
create a registration that contains the specific rhythms that you will use in a given sequence, and call up that registration when SWING BOUNCE SLOW ROCK 1 USER 1 USER 2 USER 3 USER 4 A B SEQ. 3 SEQ. 4 TANGO LATIN 1 LATIN 2 8 BEAT 16 BEAT 2 USER 5 USER 6 USER 7 USER 8 C D MIN 2 Press - Yamaha EL-500 | Owner's Manual - Page 146
are all lit. RHYTHM MAX SEQ. 1 SEQ. 2 MARCH WALTZ SWING BOUNCE SLOW ROCK 1 USER 1 USER 2 USER 3 USER 4 A B SEQ. 3 SEQ. 4 TANGO LATIN 1 LATIN 2 8 BEAT 16 BEAT 2 USER 5 USER 6 USER 7 USER 8 C D MIN 2 Press the START button. INTRO. ENDING SYNCHRO START START 9 NOTE: The SEQ - Yamaha EL-500 | Owner's Manual - Page 147
using User rhythms and sequences you've saved to disk can be loaded back to the Electone any time. Rhythm Pattern and Rhythm Sequence data are included in the bulk data that is saved when you record registrations to disk. Refer to the section Recording Registrations, page 93, for instructions - Yamaha EL-500 | Owner's Manual - Page 148
various performance functions without taking your hands from the keyboards. VOICE EFFECT A. B. C. DISPLAY SET M. O. EL-700 DISPLAY SELECT EL-500 1 Footswitch The Electone has two Footswitches on the main expression pedal that can be used to control various functions. The Right Footswitch is used - Yamaha EL-500 | Owner's Manual - Page 149
1) Rhythm Control Selection of Left Footswitch control over rhythm functions. When this is chosen, the following display appears: FOOTSWITCH-LEFT Page-Rhythm 123 One of the three Rhythm Control functions can be selected. Pressing the Footswitch executes the corresponding function. 1 STOP Functions - Yamaha EL-500 | Owner's Manual - Page 150
TREMOLO (FAST) button in the DISPLAY SELECT section. If you want to use this function, the tremolo settings require to be set properly. See page 53 2 Knee Lever The Knee Lever, located on the underside of the keyboard panel, can be used to turn on and off the Sustain effect, Melody On Chord function - Yamaha EL-500 | Owner's Manual - Page 151
Data Control button corresponding to a Lead voice). 2 Select PAGE 3 by pressing Page buttons. DISPLAY SELECT EL-700 DISPLAY SELECT EL-500 NOTE: If the KNEE is set to ON, the Melody On Chord cannot be applied without using the Knee Lever. 3 Then select KNEE and set the TIME parameter in the SLIDE - Yamaha EL-500 | Owner's Manual - Page 152
SEQUENCE U. FLUTE L. FLUTE TREMOLO VOICE VOICE (FAST) DISPLAY SELECT EL-700 3 Expression Pedals There are two types of Expression Pedals: (This control is the same as for Tempo below; the two cannot be used independently.) 2 Voice Sections/PITCH BEND Selects the voice sections to which the Pitch - Yamaha EL-500 | Owner's Manual - Page 153
%). (This control is the same as for Pitch Bend above; the two cannot be used independently.) 3 TEMPO On/off switch for control over the rhythm tempo. When on, it to return to center, restoring the original tempo. NOTE: Don't use the Pitch Bend and Tempo at the same time since you may inadvertently - Yamaha EL-500 | Owner's Manual - Page 154
controls on the Electone: Transpose and Pitch page: Press the EXP. PITCH/MIDI button (PITCH/MIDI button for EL-500) in the DISPLAY SELECT section, and (if necessary,) select the matching the pitch with other instrument, use the Clarinet voice on the Lower keyboard. About the Pitch Each voice is - Yamaha EL-500 | Owner's Manual - Page 155
keyboard, the Lower keyboard and the Pedalboard UPPER: 1 - 16 LOWER: 1 - 16 PEDAL: 1 - 16 The MIDI receive channel of each connected MIDI device should match the numbers set here. DISPLAY SELECT EL-700 DISPLAY SELECT EL-500 Receive Channels When using another MIDI device to play the Electone - Yamaha EL-500 | Owner's Manual - Page 156
, this control is set to Auto. However, when it is set to INT., you can manually control the expression pedal functions during M.D.R. playback. When set to EXT., another (external) Electone controls over the expression pedal functions. 12 NOTE: This control has no relation to MIDI. L.I.T. (Lead - Yamaha EL-500 | Owner's Manual - Page 157
On the underside of the Electone keyboard is a separate panel equipped with various input/output terminals and miscellaneous controls, the functions of which are described below. HOST SELECT EL-700 4-2 2 -2 MAX REV L MIN MIC. VOL 4-1 3 EL-500 HEADPHONES R AUX. OUT 1 -2 2 -2 L R AUX - Yamaha EL-500 | Owner's Manual - Page 158
Windows users: To actually exchange the data via the Serial Cable you need to install the included MIDI driver (Yamaha CBX Driver) to your personal computer in advance. Macintosh EL-700/500 RS-232C (DB9) IBM PC/AT NOTE: Select the HOST SELECT switches as follows: When you use MIDI connection - Yamaha EL-500 | Owner's Manual - Page 159
connected. q The performance on the EL-700/500 can be recorded onto your personal computer using a sequencing software. 2. Control the EL-700/500 using an external device q Playing the external MIDI keyboard can cause your Electone to be played using Electone's voices. (The MIDI transmit channel - Yamaha EL-500 | Owner's Manual - Page 160
keys are pressed, will be transmitted via a specific channel. The channel messages from an external keyboard can be received by the EL-700/500 and thus you can play the EL-700/500 from an external keyboard. Note On Indicates which keys are played with the note numbers 0 through 127. The reception - Yamaha EL-500 | Owner's Manual - Page 161
(a sequencing software). First, you need to connect your EL-700/500 with a personal computer (a sequencing software) using a Serial EL-700/500 to the Personal Computer (PC) • Preparation 1 Set the Strings voice on the Upper Keyboard of the EL-700/500. Press STRINGS button for the Upper Keyboard - Yamaha EL-500 | Owner's Manual - Page 162
sequencing software (PC) to the EL700/500. Once the EL-700/500 receive the Request-to-Receive all RAM message, the EL-700/500 automatically 7F" (Hexadecimal) to the EL700/500. The EL-700/500 receives the Note-On message and plays the C2 key on the Upper Keyboard using the Strings 1 you have selected - Yamaha EL-500 | Owner's Manual - Page 163
. The internal tone generator section of the EL-700/500 is normally set to EL Mode for playing as an "Electone." Sending an appropriate system exclusive message from the sequencing software (PC) to the EL-700/500 changes the mode to XG Mode, in which you can use the Electone as an XG tone generator - Yamaha EL-500 | Owner's Manual - Page 164
2ch 3ch (4ch)* 5-14ch 15ch 1ch 2ch 3ch (4ch)* 5-14ch 15ch 5-14ch Remarks UK LK PK LEAD XG Keyboard Percussion UK LK PK (EL-500: note on transmit velocity=50H) LEAD XG Keyboard Percussion XG ˛ 16ch (4ch)** ˛ ˛ 5-14ch 16ch (4ch)* 5-14ch 5-14ch XG Control LEAD XG XG ˛ ˛ 16ch 5-14ch 5-14ch 16ch - Yamaha EL-500 | Owner's Manual - Page 165
LEAD XG XG Transmit ˛ (1ch) (2ch)* (3ch)* ˛ Receive 1-16ch 1-16ch 1-16ch Remarks UK LK PK(EL-500: note on transmit velocity=50H) ˛ 16ch (4ch)** ˛ ˛ 1-16ch ˛ 1-16ch 1-16ch Control (EL-700 only) LEAD (EL-700 only) ˛ ˛ 16ch 1-16ch 1-16ch 1-16ch 1-16ch 1-16ch 1-16ch 1-16ch 1-16ch 1-16ch 1-16ch - Yamaha EL-500 | Owner's Manual - Page 166
16ch 1-16ch (1ch)* (2ch)* (3ch)* ˛ Control 1-16ch 1-16ch UK LK PK (EL-500 not transmit) 2. Realtime Messages Code (Hexadecimal) F8 FA FC FE FF * Received only when 00,MM,LL,cc,F7 F0,43,1N,4C,00,00,7E,00,F7 Electone/Single Keyboard Common Messages Code (Hexadecimal) F0,43,73,01,02,F7 03 Message - Yamaha EL-500 | Owner's Manual - Page 167
Electone Exclusive Code (Hexadecimal) F0,43,70,70,00,...(Data)...F7 78 ID F0,43 Data EL MIDI Parameters External MDR EL ON Bar Signal ID=47 on EL-700, 48 on EL-500 *1 Data Codes to Send nn Data 10 All RAM 11 Registrations 12 Rhythm Sequences 14,15 User Patterns 16 User Voices 17 Keyboard Percussion - Yamaha EL-500 | Owner's Manual - Page 168
[00-04] Ø [00-0B] ˛ Receive Rx Range Remarks [00-0D] Switch Number [00-0D] Switch Number [00-0D] Switch Number (transmit value for EL-500: [00-01]) [00-0D] Switch Number (transmit value for EL-500: [00-01]) [00-04] Switch Number [00-04] Switch Number [00-04] Switch Number (transmit value for - Yamaha EL-500 | Owner's Manual - Page 169
Sustain Code Switch 50 Upper Keyboard 51 Lower Keyboard 52 Pedalboard Keyboard Percussion Code Switch 5B Lower Keyboard 5C Pedal Board Disable Code Switch 5F Disable Tremolo Code Switch 60 Tremolo Rhythm Sequence Code Switch 61 Sequence 1 62 Sequence 2 63 Sequence 3 64 Sequence 4 - Yamaha EL-500 | Owner's Manual - Page 170
1 00-7F Initial Touch Sensitivity 1 00-7F After Touch Sensitivity 1 00-01 User Vibrato 1 02-1A Vibrato Delay 1 00-54 Vibrato Depth 1 3C-6C Vibrato [02] [02] ˓ [02-7F] ˓ [00-7F] ˓ [00-24] ˓ [00-7F] ˓ [00] ˓ [00] EL-500 not transmit [01] [01-7F] ˓ [00] ˓ [00] [01] [01-7F] Appendix 14 170 - Yamaha EL-500 | Owner's Manual - Page 171
Flute Voice Parameters (EL-700 only) Address Size Data Parameter 01 00-01 00 1 00-7F FLUTE 16Feet 01 00-01 01 1 00-7F FLUTE 8Feet 01 00-01 - Yamaha EL-500 | Owner's Manual - Page 172
Ø [00] Ø [00] 01-08:UserAssign1-8 [01-08] [01-08] Effect Parameters (Keyboard) Address Size Data 02 00-02 40-42 1 02 00-02 48-4A 1 02 00-02 7F:Drums 03 00 16 1 00-01 2nd Expression 00:OFF Ø [00] Ø [00] EL-500 not transmit Tempo Control 01:ON [01] [01-7F] 03 00 17 1 00-03 - Yamaha EL-500 | Owner's Manual - Page 173
Accompaniment Parameters Address Size Data 03 02 10 1 00-03 Parameter Pattern Selector Number 03 02 11 1 00-01 Volume Mute 03 02 12 1 00-7F Volume 03 02 13 1 00-7F Reverb Send Level Content 00:Type1 01:Type2 02:Type3 03:Type4 00:OFF 01:MUTE 00:MIN 7F:MAX 00:MIN 7F:MAX A.B.C. Parameters - Yamaha EL-500 | Owner's Manual - Page 174
1 00-04 Glide Speed 01:Slow 05:Fast 07 1 34-4C Manual Balance 34:Upper 40:Center 4C:Lower 09 1 00-01 L.I.T. 00 00] [01] [01-7F] Ø [00] Ø [00] EL-500 not transmit [01] [01-7F] Ø [3A] Ø [3A] [40] [40] [46] [46] Ø [01-0C] Ø [01-0C] EL-500 not transmit Ø [00] Ø [00][04-7F] [01] - Yamaha EL-500 | Owner's Manual - Page 175
MIDI Inplementation Chart YAMAHA [Electone-EL mode] / Model: EL-700/500 Function Transmit Receive Basic Channel Default 1, 2, 3, 16 *1 Changed 1-16 1-3, 5-16 *2 4 Mode Default Mode 3 Messages ˛ Altered Mode 3 ˛ ˛ Note Number 36-96 *3 True Voice 0-127 *4 Velocity Note - Yamaha EL-500 | Owner's Manual - Page 176
YAMAHA [Electone-XG mode] / Model: EL-700/500 Function Transmit *12 Receive Basic Channel v=1-127 Ø 9nH, v=0, 8nH ˛ Ø Ø Date:14. Jan.1999 Version: 1.00 Remarks Transmit with EL-500: fixed to 80. Bank Select 2nd Expression Pedal Data Entry Expression Pedal Data Entry SW Sound Controller NRPN, - Yamaha EL-500 | Owner's Manual - Page 177
Troubleshooting Please note that the appearance of any of following phenomena does not indicate a mechanical failure of the Electone. Problem Possible Cause and Solution GENERAL OPERATION Some of the LEDs in the DISPLAY SELECT section do not light. The LEDs of on/off buttons (UPPER/LOWER FLUTE - Yamaha EL-500 | Owner's Manual - Page 178
Problem Possible Cause and Solution VOICES/RHYTHMS Only one sound is heard when two notes of the For practical performance reasons, the Electone tuning system keyboards. of the Electone is different Dotted buttons contain User rhythms, no page (for Flute Voices [EL-700]). SELECT section is - Yamaha EL-500 | Owner's Manual - Page 179
Problem Possible Cause and Solution VOICE EDITING During voice editing, the specified voice isn't The current settings keep the voice from sounding. Make sure that the volume heard, even when the keyboard finished, or the Song Copy function cannot be use another disk or delete the data of any - Yamaha EL-500 | Owner's Manual - Page 180
. Bass 1, 2, 3, 4, Synth. Bass 1, 2, 3; Organ Bass 1, 2, 3, 4; Tuba, Timpani, Timpani Roll; User 1-16; To Lower; Dotted Button; 19 Voices; Volume Fine; Brilliance ** Voice Display Upper 1,2; Lower 1,2; Lead; Pedal 1,2; Manual Balance Upper Flute Voice/Lower Flute Voice(EL-700 only) Flute Voices - Yamaha EL-500 | Owner's Manual - Page 181
User EL-500) 114.9cm x 55.6cm x 98.0cm *With Keyboard Cover Closed Bench: 79.6cm x 33.6cm x 58.0cm (EL-700) Bench: 66.5cm x 29.7cm x 58.0cm (EL-500) 93kg, Bench: 10kg (EL-700) 83kg, Bench: 7.5kg (EL-500) Specifications and description in this Owner's Manual are information purposes only. Yamaha - Yamaha EL-500 | Owner's Manual - Page 182
144 CLICK 38 COARSE 23 COMBINATION 37 CONTRAST 23 COPY/LK PRESET (KEYBOARD PERCUSSION) .... 74 COPY/PK PRESET (KEYBOARD PERCUSSION) .... 74 COPY/PRESET (INSTRUMENT 60 COPY PROTECT 105 COPY/USER (KEYBOARD PERCUSSION) ..... 75 Custom A.B.C 65 CUSTOM PLAY 87, 99 D D. (Disable 78, 83 DATA - Yamaha EL-500 | Owner's Manual - Page 183
60 TYPE (ACCOMPANIMENT 67 TYPE (REVERB 49 U U. FLUTE VOICE 37 UPPER KEYBOARD VOICE 26 USER (FLUTE VOICE 39 USER (KEYBOARD PERCUSSION 70 USER (REGIST SHIFT 80 USER (RHYTHM 62, 139 USER (SEQUENCE 141 USER (VIBRATO 44 USER (PANEL VOICE 30, 113 V VIBRATO 44 Voice Condition 42 VOICE DISK - Yamaha EL-500 | Owner's Manual - Page 184
Cosmos Corporation 1461-9, Seocho Dong, Seocho Gu, Seoul, Korea Tel: 02-3486-0011 MALAYSIA Yamaha Music Malaysia, Sdn., Bhd. Lot 8, Jalan Perbandaran, 47301 Kelana Jaya, Petaling Jaya, Selangor, Malaysia Tel: 3-703-0900 PHILIPPINES Yupangco Music Corporation 339 Gil J. Puyat Avenue, P.O. Box 885
-
 1
1 -
 2
2 -
 3
3 -
 4
4 -
 5
5 -
 6
6 -
 7
7 -
8
-
9
-
10
-
11
-
12
-
13
-
14
-
15
-
16
-
17
-
18
-
19
-
20
-
21
-
22
-
23
-
24
-
25
-
26
-
27
-
28
-
29
-
30
-
31
-
32
-
33
-
34
-
35
-
36
-
37
-
38
-
39
-
40
-
41
-
42
-
43
-
44
-
45
-
46
-
47
-
48
-
49
-
50
-
51
-
52
-
53
-
54
-
55
-
56
-
57
-
58
-
59
-
60
-
61
-
62
-
63
-
64
-
65
-
66
-
67
-
68
-
69
-
70
-
71
-
72
-
73
-
74
-
75
-
76
-
77
-
78
-
79
-
80
-
81
-
82
-
83
-
84
-
85
-
86
-
87
-
88
-
89
-
90
-
91
-
92
-
93
-
94
-
95
-
96
-
97
-
98
-
99
-
100
-
101
-
102
-
103
-
104
-
105
-
106
-
107
-
108
-
109
-
110
-
111
-
112
-
113
-
114
-
115
-
116
-
117
-
118
-
119
-
120
-
121
-
122
-
123
-
124
-
125
-
126
-
127
-
128
-
129
-
130
-
131
-
132
-
133
-
134
-
135
-
136
-
137
-
138
-
139
-
140
-
141
-
142
-
143
-
144
-
145
-
146
-
147
-
148
-
149
-
150
-
151
-
152
-
153
-
154
-
155
-
156
-
157
-
158
-
159
-
160
-
161
-
162
-
163
-
164
-
165
-
166
-
167
-
168
-
169
-
170
-
171
-
172
-
173
-
174
-
175
-
176
-
177
-
178
-
179
-
180
-
181
-
182
-
183
-
184
 |
 |