Yamaha EL-500 Owner's Manual - Page 57
Lead
 |
View all Yamaha EL-500 manuals
Add to My Manuals
Save this manual to your list of manuals |
Page 57 highlights
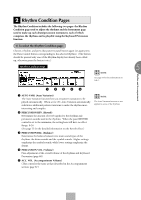
3 Turn the rhythm on. You can use one of three buttons to turn on the rhythm: INTRO. ENDING SYNCHRO START START 3 21 FILL IN 1 START This button does as its name indicates; the rhythm begins as soon as the button is pressed. To stop the rhythm, press this button again. 2 SYNCHRO START This button puts the rhythm in "stand-by"; the rhythm will start when you press a note on the Lower keyboard or Pedalboard. To stop the rhythm, press this button again. 3 INTRO. ENDING NOTE: The Left Footswitch can also be used to 5 Pressing this button automatically adds a short introduction (of up to turn the rhythm on and off in the middle of song. To assign the Footswitch for eight measures) before starting the actual rhythm. First, press the rhythm control, see page 148.) INTRO. ENDING button, then the START or SYNCRO START Rhythm and Accompaniment button to actually start the rhythm. While the introduction is playing, the display shows the countdown NOTE: to the first measure of the pattern. For example, if there is a eightmeasure lead-in for a pattern in 4/4 time, the following display appears: Pressing the INTRO. ENDING button again while the pattern is being played will automatically add an ending phrase before stopping ABOUT SYNCHRO START: Synchro Start functions quite differently when the Auto Bass Chord feature is turned on and the Accompaniment Memory is turned off. The rhythm starts when a key on the Lower keyboard is the rhythm. played, but then immediately stops when the key is released. To keep this from BAR/BEAT happening, turn the Memory function on. (Refer to the Auto Bass Chord section, page 65, for details on Auto Bass Chord and Memory.) TEMPO LEAD IN Pressing the START button while holding down the INTRO. ENDING button automatically plays a special one-measure Lead In, with a click on each beat, to cue you in to the beginning of the song. 4 Set the volume. Press the VOLUME controls to the right of the Rhythm buttons to set the desired level of the rhythm. The controls have seven volume settings, from a minimum of 0, or no sound, to a maximum of full volume. Fine adjustments in the volume of the rhythm can also be made from the Rhythm Condition page (page 59). RHYTHM MAX SEQ. 1 SEQ. 2 MARCH WALTZ SWING BOUNCE SLOW ROCK 1 USER 1 USER 2 USER 3 USER 4 A B NOTE: When the Electone is turned on, the Rhythm Volume is automatically set to 0. SEQ. 3 SEQ. 4 TANGO LATIN 1 LATIN 2 8 BEAT 16 BEAT 2 USER 5 USER 6 USER 7 USER 8 C D MIN 57
-
 1
1 -
2
-
3
-
4
-
5
-
6
-
7
-
8
-
9
-
10
-
11
-
12
-
13
-
14
-
15
-
16
-
17
-
18
-
19
-
20
-
21
-
22
-
23
-
24
-
25
-
26
-
27
-
28
-
29
-
30
-
31
-
32
-
33
-
34
-
35
-
36
-
37
-
38
-
39
-
40
-
41
-
42
-
43
-
44
-
45
-
46
-
47
-
48
-
49
-
50
-
51
-
 52
52 -
 53
53 -
 54
54 -
 55
55 -
 56
56 -
 57
57 -
 58
58 -
 59
59 -
 60
60 -
 61
61 -
 62
62 -
63
-
64
-
65
-
66
-
67
-
68
-
69
-
70
-
71
-
72
-
73
-
74
-
75
-
76
-
77
-
78
-
79
-
80
-
81
-
82
-
83
-
84
-
85
-
86
-
87
-
88
-
89
-
90
-
91
-
92
-
93
-
94
-
95
-
96
-
97
-
98
-
99
-
100
-
101
-
102
-
103
-
104
-
105
-
106
-
107
-
108
-
109
-
110
-
111
-
112
-
113
-
114
-
115
-
116
-
117
-
118
-
119
-
120
-
121
-
122
-
123
-
124
-
125
-
126
-
127
-
128
-
129
-
130
-
131
-
132
-
133
-
134
-
135
-
136
-
137
-
138
-
139
-
140
-
141
-
142
-
143
-
144
-
145
-
146
-
147
-
148
-
149
-
150
-
151
-
152
-
153
-
154
-
155
-
156
-
157
-
158
-
159
-
160
-
161
-
162
-
163
-
164
-
165
-
166
-
167
-
168
-
169
-
170
-
171
-
172
-
173
-
174
-
175
-
176
-
177
-
178
-
179
-
180
-
181
-
182
-
183
-
184
 |
 |
