Yamaha MG166CX-USB Owner's Manual - Page 13
Mixing with Cubase AI 4 - mixing manual
 |
View all Yamaha MG166CX-USB manuals
Add to My Manuals
Save this manual to your list of manuals |
Page 13 highlights
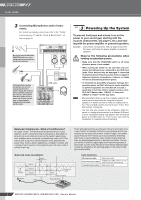
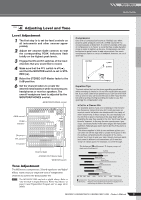
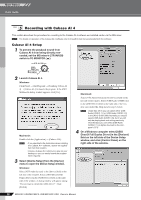
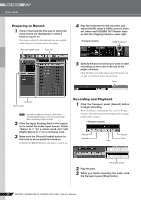
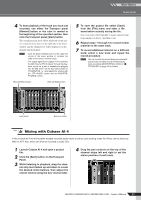
Mixer Basics Quick Guide 4 To hear playback of the track you have just recorded, use either the Transport panel [Rewind] button or the ruler to rewind to the beginning of the recorded section, then click the Transport panel [Start] button. The overall playback level will be displayed via the master section bus level meter on the right side of the mixer window, and the channel level will be displayed via the channel strip level meter. NOTE • Click the [Narrow/Wide] button in the upper left corner of the mixer window to increase the width of the mixer's channel strips. • The output signal from Cubase AI 4 is routed to the MG mixer's 2TR IN inputs. To hear the playback sound via a pair of headphones plugged into the MG mixer, set the bus select switch to TO MONITOR ( ) and adjust the volume with the 2TR IN/USB control and the MONITOR/ PHONES control. [Narrow/Wide] button [Narrow/Wide] button 5 To save the project file select [Save] from the [File] menu and enter a file name before actually saving the file. Save your project file frequently to insure against losing large amounts of data if a problem occurs. 6 Repeat steps 1 through 5 to record further material on the same track. 7 To record additional material on a different track, select a new track and repeat the record procedure. NOTE You can monitor the sound being recorded and a previously recorded sound simultaneously while recording (MONITOR MIX). Refer to "F 2TR IN/USB" on page 22 for details. Level meter Bus level meter 6 Step Mixing with Cubase AI 4 In this section we'll try mixing down multiple recorded audio tracks to stereo, and creating a wav file. Mixes can be stored as WAV or AIFF files, which can then be recorded to audio CDs. 1 Launch Cubase AI 4 and open a project file. 2 Click the [Start] button on the Transport Panel. 3 While listening to playback, drag the channel strip level faders up and down to create the desired initial balance, then adjust the overall volume using the bus volume fader. 4 Drag the pan controls on the top of the channel strips left and right to set the stereo position of each track. MG206C-USB/MG166CX-USB/MG166C-USB Owner's Manual 13
-
 1
1 -
2
-
3
-
4
-
5
-
6
-
7
-
 8
8 -
 9
9 -
 10
10 -
 11
11 -
 12
12 -
 13
13 -
 14
14 -
 15
15 -
 16
16 -
 17
17 -
 18
18 -
19
-
20
-
21
-
22
-
23
-
24
-
25
-
26
-
27
-
28
-
29
-
30
-
31
-
32
-
33
-
34
-
35
-
36
-
37
 |
 |
