Yamaha MG166CX-USB Owner's Manual - Page 14
Audio Mixdown]., Click [Export]. - 16 channel usb
 |
View all Yamaha MG166CX-USB manuals
Add to My Manuals
Save this manual to your list of manuals |
Page 14 highlights
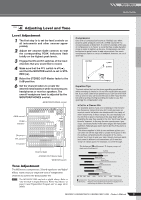
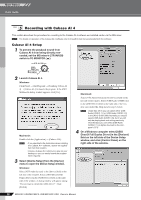
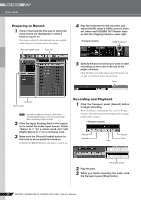
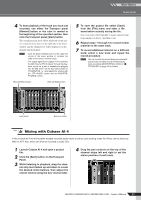
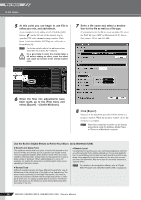
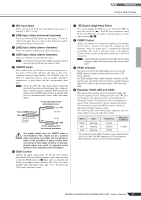
Mixer Basics Quick Guide 5 At this point you can begin to use EQ to refine your mix, and add effects. As an example let's try adding reverb. Click the [Edit] button ( ) on the left side of the channel strip to open the VST audio channel settings window. Click Insert 1 and select Earlier VST Plug-ins → Reverb → RoomWorks SE. NOTE For further details refer to the pdf manual provided with the Cubase AI 4 software. CAUTION It's a good idea to lower the channel fader a bit before adding an effect, since the effect can cause an increase in the overall channel level. 7 Enter a file name and select a destination for the file as well as a file type. If you intend to use the file to create an audio CD, select the WAV file type (AIFF on Macintosh OS X), Stereo Out (stereo), 16 bit, and 44.1 kHz. 6 When the final mix adjustments have been made, go to the [File] menu and select [Export] → [Audio Mixdown]. 8 Click [Export]. Progress of the mixdown operation will be shown in a progress window. When the progress window closes the mixdown is complete. NOTE Wave files created by mixdown can be directly played back using the Windows Media Player, or iTunes on a Macintosh computer. Use the Built-in Digital Effects to Refine Your Mixes (Only MG166CX-USB) ● Reverb and Delay Time The optimum reverb time for a piece of music will depend on the music's tempo and density, but as a general rule longer reverb times are good for ballads, while shorter reverb times are more suited to uptempo tunes. Delay times can be adjusted to create a wide variety of "grooves". When adding delay to a vocal, for example, try setting the delay time to dotted eighth notes corresponding to the tune's tempo. ● Reverb Tone Different reverb programs will have different "reverb tone" due to differences in the reverb time of the high or low frequencies. Too much reverb, particularly in the high frequencies, can result in unnatural sound and interfere with the high frequencies in other parts of the mix. It's always a good idea to choose a reverb program that gives you the depth you want without detracting from the clarity of the mix. ● Reverb Level It's amazing how quickly your ears can lose perspective and fool you into believing that a totally washed-out mix sounds perfectly fine. To avoid falling into this trap start with reverb level all the way down, then gradually bring the reverb into the mix until you can just hear the difference. Any more than this normally becomes a "special effect." NOTE For details on the modulation effects, refer to "Digital Effect Program List (Only MG166CX-USB)" on page 23. 14 MG206C-USB/MG166CX-USB/MG166C-USB Owner's Manual
-
 1
1 -
2
-
3
-
4
-
5
-
6
-
7
-
8
-
 9
9 -
 10
10 -
 11
11 -
 12
12 -
 13
13 -
 14
14 -
 15
15 -
 16
16 -
 17
17 -
 18
18 -
 19
19 -
20
-
21
-
22
-
23
-
24
-
25
-
26
-
27
-
28
-
29
-
30
-
31
-
32
-
33
-
34
-
35
-
36
-
37
 |
 |