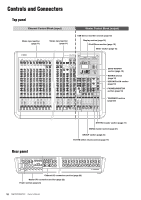
Yamaha MGP32X Owner's Manual - Page 7
Setup, Preparing the power supply, Connections, Powering up the system, Getting sound to the speakers
 |
View all Yamaha MGP32X manuals
Add to My Manuals
Save this manual to your list of manuals |
Page 7 highlights
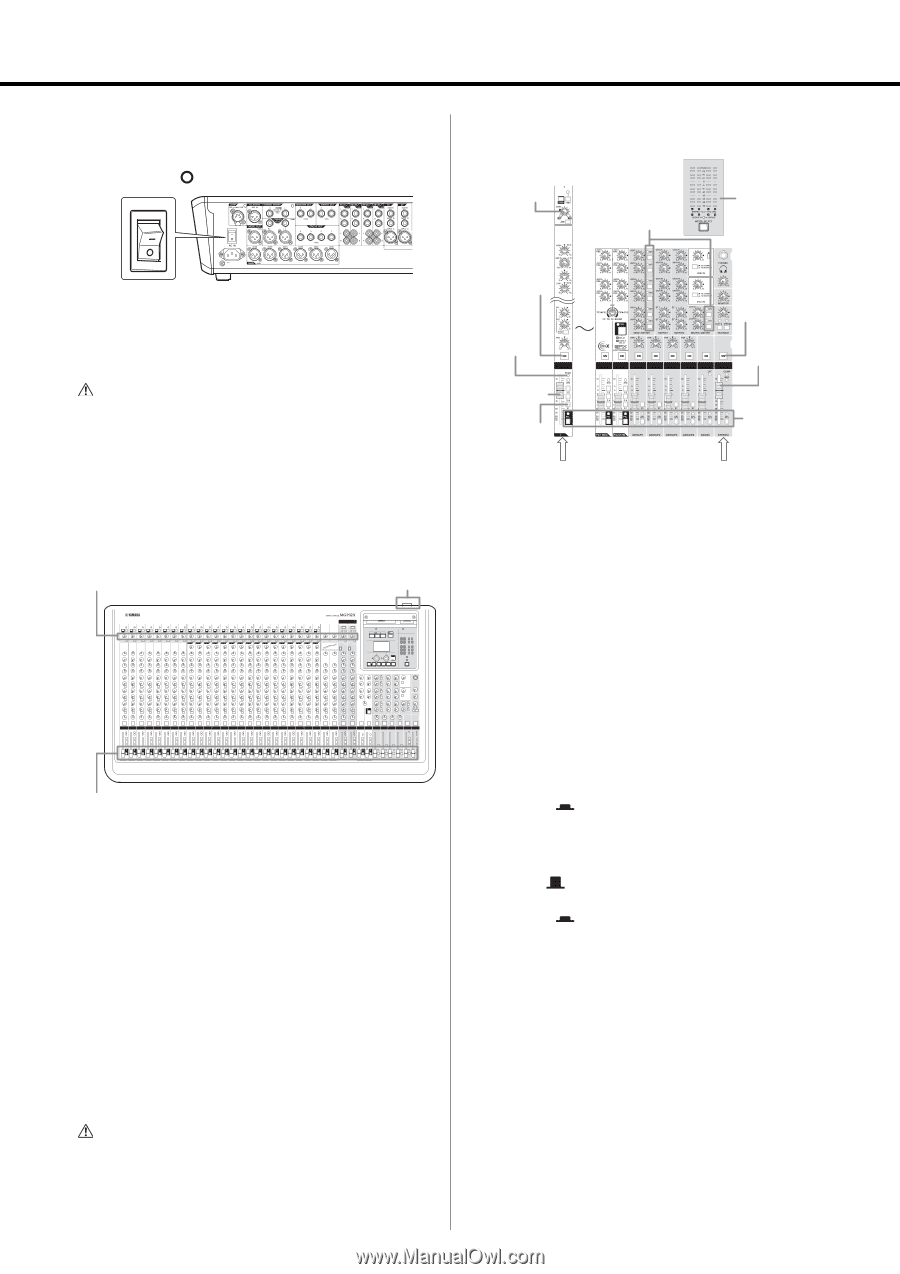
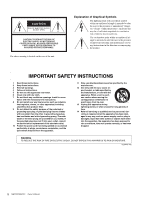
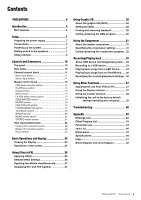
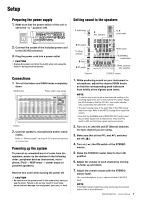
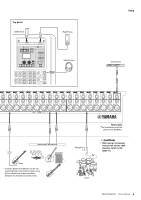
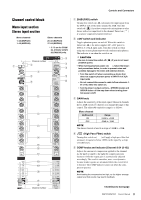
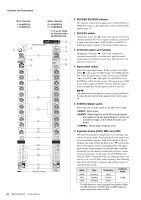
Setup Preparing the power supply 1. Make sure that the power switch of the unit is set to the " " position (off). Getting sound to the speakers 1 GAIN knob 3 AFL switches 1, 7 Level meter 2. Connect the socket of the included power cord to the [AC IN] connector. 3. Plug the power cord into a power outlet. CAUTION • Unplug the power cord from the outlet when not using the mixer or during electrical storms. Connections 1. Turn all the faders and GAIN knobs completely down. GAIN knobs Power switch (rear panel) Faders 2. Connect speakers, microphones and/or instru- ments. Refer to "Setup example" on pages 8-9 for more information on connections. Powering up the system To prevent an unwanted burst of noise from the speakers, power up the devices in the following order: peripheral devices (instrument, microphone, iPod) MGP mixer power amps (or powered speakers). Reverse this order when turning the power off. CAUTION • Be sure to turn the power on/off in this order every time you use the mixer. Failure to do so may result in loud noise bursts that can damage your equipment, your ears, or both. 2 ON switch 1 PEAK indicator 6 Fader 2 ST switch Channel 4 ON switch 5 STEREO master fader 3 PFL switches AFL switches STEREO master 1. While producing sound on your instrument or microphone, adjust the channel GAIN knobs so that the corresponding peak indicators flash briefly at the highest peak levels. NOTE • To use the level meter to get a more accurate reading of the incoming signal level, turn on the channel PFL switch. Adjust the GAIN knobs so that the PFL/AFL level meter indicator only occasionally rises above the "0" level. • The gain (volume) level of the audio files in the USB device may be too high. Refer to the NOTE on page 35 to adjust the volume. • Note that the PHONES jack or MONITOR OUT jacks output the pre-fader signal from all channels for which the PFL switch is ON, so that those signals can be monitored. 2. Turn on ( ) the ON and ST (Stereo) switches for each channel you are using. 3. Make sure that all the PFL and AFL switches are off ( ). 4. Turn on ( ) the ON switch of the STEREO master. 5. Raise the STEREO master fader to the 0 dB position. 6. Adjust the volume of each channel by moving its fader up and down. 7. Adjust the overall volume with the STEREO master fader. The overall headphone level is adjusted with the PHONES knob. NOTE If the PEAK indicator lights frequently, slowly lower the channel faders a little to avoid distortion. MGP32X/MGP24X Owner's Manual 7
-
 1
1 -
 2
2 -
 3
3 -
 4
4 -
 5
5 -
 6
6 -
 7
7 -
 8
8 -
 9
9 -
 10
10 -
 11
11 -
 12
12 -
13
-
14
-
15
-
16
-
17
-
18
-
19
-
20
-
21
-
22
-
23
-
24
-
25
-
26
-
27
-
28
-
29
-
30
-
31
-
32
-
33
-
34
-
35
-
36
-
37
-
38
-
39
-
40
-
41
-
42
-
43
-
44
-
45
-
46
-
47
-
48
-
49
-
50
-
51
-
52
-
53
-
54
-
55
-
56
 |
 |