Yamaha QY700 Owner's Manual - Page 103
Voice program, Measure, Tempo, Meter
 |
View all Yamaha QY700 manuals
Add to My Manuals
Save this manual to your list of manuals |
Page 103 highlights
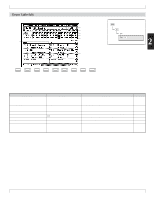
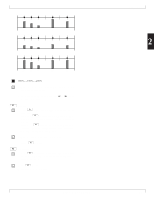
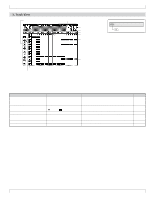
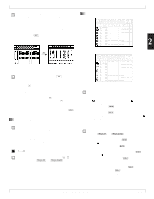
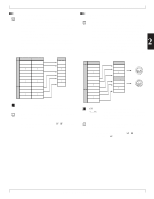
3. Track View 4. You can also use the solo feature to select multiple "solo" tracks, so that only the selected tracks are produced (with all other tracks silent). Begin by setting one of the tracks to SOLO as described above. Then move the cursor to another track and press s + s • To cancel all of these solo selections at once : Move the cursor to any one of these tracks and press s. To switch off only one of the solo selections : Move to the corresponding track, and then press s + s. 3. Voice program • Each icon indicates the voice program assigned to the corresponding track. (→ p.172) • You can make the voice settings from VOICE mode. (→ p.167) 4. Measure • The measure value selects the start point for song playback. • The measure and beat values increment during playback to indicate the current song location. 0101 1101 001,...,999 1. Press d [D1] to move the cursor to the measure setting area. 2. Set the measure value using the data dial, n/y, or the numeric keypad → e. • You can change the measure value while song playback is in progress. Playback will immediately jump to the new location. • There are three ways to change the measure during playback, as follows. • Press d [D1] to move the cursor to the measure display area, and then change the value as described above. • Rotate the shuttle dial, or press r or f. • Press t to return to the top of the song. 5. Tempo • The tempo value sets the tempo for recording or playback of the song. • The tempo setting applies to all tracks of the song. 0101 1101 25.0,...,300.0 (= ) 1. Press d [D1] to move the cursor to the tempo area. 2. Set the appropriate value using the data dial, n/y, or the numeric keypad. 6. Meter • This value shows the time signature set for each measure. • You can set these values from the Recording Standby page (→ p.108) or during step recording of the PATTERN track (→ p.125). 102 Chapter 2. SONG MODE
-
 1
1 -
2
-
3
-
4
-
5
-
6
-
7
-
8
-
9
-
10
-
11
-
12
-
13
-
14
-
15
-
16
-
17
-
18
-
19
-
20
-
21
-
22
-
23
-
24
-
25
-
26
-
27
-
28
-
29
-
30
-
31
-
32
-
33
-
34
-
35
-
36
-
37
-
38
-
39
-
40
-
41
-
42
-
43
-
44
-
45
-
46
-
47
-
48
-
49
-
50
-
51
-
52
-
53
-
54
-
55
-
56
-
57
-
58
-
59
-
60
-
61
-
62
-
63
-
64
-
65
-
66
-
67
-
68
-
69
-
70
-
71
-
72
-
73
-
74
-
75
-
76
-
77
-
78
-
79
-
80
-
81
-
82
-
83
-
84
-
85
-
86
-
87
-
88
-
89
-
90
-
91
-
92
-
93
-
94
-
95
-
96
-
97
-
 98
98 -
 99
99 -
 100
100 -
 101
101 -
 102
102 -
 103
103 -
 104
104 -
 105
105 -
 106
106 -
 107
107 -
 108
108 -
109
-
110
-
111
-
112
-
113
-
114
-
115
-
116
-
117
-
118
-
119
-
120
-
121
-
122
-
123
-
124
-
125
-
126
-
127
-
128
-
129
-
130
-
131
-
132
-
133
-
134
-
135
-
136
-
137
-
138
-
139
-
140
-
141
-
142
-
143
-
144
-
145
-
146
-
147
-
148
-
149
-
150
-
151
-
152
-
153
-
154
-
155
-
156
-
157
-
158
-
159
-
160
-
161
-
162
-
163
-
164
-
165
-
166
-
167
-
168
-
169
-
170
-
171
-
172
-
173
-
174
-
175
-
176
-
177
-
178
-
179
-
180
-
181
-
182
-
183
-
184
-
185
-
186
-
187
-
188
-
189
-
190
-
191
-
192
-
193
-
194
-
195
-
196
-
197
-
198
-
199
-
200
-
201
-
202
-
203
-
204
-
205
-
206
-
207
-
208
-
209
-
210
-
211
-
212
-
213
-
214
-
215
-
216
-
217
-
218
-
219
-
220
-
221
-
222
-
223
-
224
-
225
-
226
-
227
-
228
-
229
-
230
-
231
-
232
-
233
-
234
-
235
-
236
-
237
-
238
-
239
-
240
-
241
-
242
-
243
-
244
-
245
-
246
-
247
-
248
-
249
-
250
-
251
-
252
-
253
-
254
-
255
-
256
-
257
-
258
-
259
-
260
-
261
-
262
-
263
-
264
-
265
-
266
-
267
-
268
-
269
-
270
-
271
-
272
-
273
-
274
-
275
-
276
-
277
-
278
-
279
-
280
-
281
-
282
-
283
-
284
-
285
-
286
-
287
-
288
-
289
-
290
-
291
-
292
-
293
-
294
-
295
-
296
-
297
-
298
-
299
-
300
-
301
-
302
-
303
-
304
-
305
-
306
-
307
-
308
-
309
-
310
-
311
-
312
-
313
-
314
-
315
-
316
-
317
-
318
-
319
-
320
-
321
-
322
-
323
-
324
-
325
-
326
-
327
-
328
-
329
-
330
-
331
-
332
-
333
-
334
 |
 |
