Yamaha RX-V1000 Owner's Manual - Page 11
English, Introduction, Preparation, Basic, Operaiont, Advanced, Additional, Information, Appendix - reset
 |
View all Yamaha RX-V1000 manuals
Add to My Manuals
Save this manual to your list of manuals |
Page 11 highlights
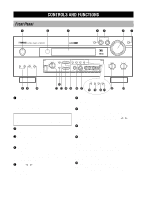
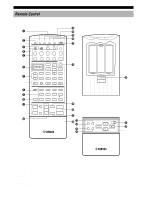
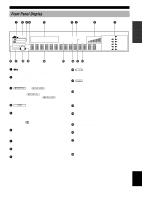
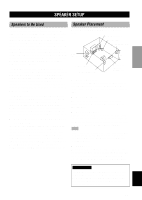
INTRODUCTION PREPARATION BASIC OPERAIONT 1 Infrared window Outputs infrared control signals. Aim this window at the component you want to operate. 2 TRANSMIT indicator Flashes while the remote control is sending signals. 3 STANDBY Sets this unit in the standby mode. 4 SYSTEM POWER Turns on the power of this unit. 5 Input selector buttons Select the input source. 6 Display window Shows the selected source component that you are controlling. 7 SOURCE SELECT k/n Selects the source component without switching the input. 8 10KEY/DSP Selects the numeric button (10KEY) mode or DSP mode. 9 DSP program group/Numeric buttons Select DSP programs or numbers according to the position of 10KEY/DSP. (Press a button repeatedly to select a DSP program within that group.) 0 6.1/ES Turns on or off the Dolby Digital Matrix 6.1 or DTS ES decoder with 10KEY/DSP set to the DSP position. q A/B/C/D/E Selects one of the 5 preset station groups. w PRESET +/- Selects a preset station number (1 to 8). e RE-NAME Used for changing the input source name in the display window (see page 59). r CLEAR Used for clearing functions acquired when using the learn and rename features, programmed macros, and set manufacturer codes (see pages 59 and 60). t LEARN Used for setting up the manufacturer code or for programming the functions of other remote controls (see pages 54 to 56). CONTROLS AND FUNCTIONS y MACRO Used to program a series of operations for control by a single button (see page 58). u MACRO ON/OFF Turns the macro function on and off. i 6CH INPUT Selects the source connected to the 6CH INPUT jacks. o MUTE Mutes the sound. Press again to restore the audio output to the previous volume level. p VOLUME +/- Increases or decreases the volume level. a EFFECT Switches the effect speakers (center, rear and rear center (see page 17)) on and off. If the output of these speakers is turned off, all Dolby Digital and DTS audio signals except for the LFE channel are directed to the left and right main channels. s Cover Slides down to show the setup buttons. d LEVEL Selects the effect speaker channels (center, rear, rear center (see page 17) and subwoofer) so you can adjust their output level independently. f ON SCREEN Selects the on-screen display (OSD) mode for your video monitor. g SLEEP Sets the sleep timer. h TEST Outputs the test tone. j PARAMETER/SET MENU Selects the PARAMETER mode or SET MENU mode. k Cursor buttons k/n/-/+ Select and adjust DSP program parameters and SET MENU items according to the position of PARAMETER/ SET MENU. l RESET Press this button after you have changed the batteries or when the remote control stops working properly. (Pressing RESET does not clear the acquired functions.) ADVANCED OPERATION ADDITIONAL INFORMATION APPENDIX English 7
-
 1
1 -
2
-
3
-
4
-
5
-
 6
6 -
 7
7 -
 8
8 -
 9
9 -
 10
10 -
 11
11 -
 12
12 -
 13
13 -
 14
14 -
 15
15 -
 16
16 -
17
-
18
-
19
-
20
-
21
-
22
-
23
-
24
-
25
-
26
-
27
-
28
-
29
-
30
-
31
-
32
-
33
-
34
-
35
-
36
-
37
-
38
-
39
-
40
-
41
-
42
-
43
-
44
-
45
-
46
-
47
-
48
-
49
-
50
-
51
-
52
-
53
-
54
-
55
-
56
-
57
-
58
-
59
-
60
-
61
-
62
-
63
-
64
-
65
-
66
-
67
-
68
-
69
-
70
-
71
-
72
-
73
-
74
-
75
-
76
-
77
-
78
-
79
-
80
-
81
-
82
-
83
-
84
-
85
-
86
 |
 |