Yamaha RX-V1000 Owner's Manual - Page 26
Adjusting The Speaker Output Levels, Before You Begin
 |
View all Yamaha RX-V1000 manuals
Add to My Manuals
Save this manual to your list of manuals |
Page 26 highlights
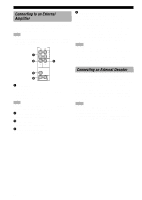
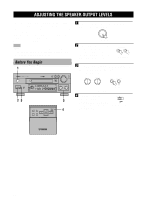
ADJUSTING THE SPEAKER OUTPUT LEVELS This section explains how to adjust the speaker output levels by using the test tone generator. When this adjustment is made, the output level heard at the listening position will be the same from each speaker. This is important for the best performance of the digital sound field processor, the Dolby Pro Logic decoder, Dolby Digital decoder and DTS decoder. Note • Since this unit cannot enter the test mode while headphones are connected to this unit, be sure to unplug the headphones from the PHONES jack when using the test tone. Before You Begin 1 STANDBY /ON SPEAKERS A B BASS PROCESSOR EXTENSION DIRECT ON OFF D I G I TA L INPUT MODE INPUT D I G I TA L SURROUND VOLUME 6CH INPUT SOURCE /REMOTE DVD MD/TAPE D-TV/LD CD-R A/B/C/D/E CBL/SAT VCR 1 VCR2 /DVR V-AUX TUNER CD EFFECT PHONO REC OUT/ZONE 2 PRESET/ TUNING PROGRAM PRESET TUNING /TUNING FM/AM MEMORY MODE EDIT MAN'L/AUTO FM AUTO/MAN'L MONO PHONES S VIDEO VIDEO L AUDIO R OPTICAL SILENT VIDEO AUX BASS TREBLE - + - + 23 DISC ON SCREEN LEVEL SLEEP TEST PARAMETER SET MENU 3 4 1 Press STANDBY/ON to turn on the power. Turn on the video monitor. STANDBY /ON Front panel 2 Press SPEAKERS A or B to select the main speakers to be used. If you are using two sets of the main speakers, press both A and B. SPEAKERS A B Front panel 3 Set BASS and TREBLE on the front panel to the center position and set BASS EXTENSION to OFF. BASS TREBLE BASS PROCESSOR EXTENSION DIRECT - +- + ON OFF Set to OFF. Front panel 4 Sit in the listening position and set PARAMETER/SET MENU on the remote control to PARAMETER. PARAMETER SET MENU Remote control 22
-
 1
1 -
2
-
3
-
4
-
5
-
6
-
7
-
8
-
9
-
10
-
11
-
12
-
13
-
14
-
15
-
16
-
17
-
18
-
19
-
20
-
 21
21 -
 22
22 -
 23
23 -
 24
24 -
 25
25 -
 26
26 -
 27
27 -
 28
28 -
 29
29 -
 30
30 -
 31
31 -
32
-
33
-
34
-
35
-
36
-
37
-
38
-
39
-
40
-
41
-
42
-
43
-
44
-
45
-
46
-
47
-
48
-
49
-
50
-
51
-
52
-
53
-
54
-
55
-
56
-
57
-
58
-
59
-
60
-
61
-
62
-
63
-
64
-
65
-
66
-
67
-
68
-
69
-
70
-
71
-
72
-
73
-
74
-
75
-
76
-
77
-
78
-
79
-
80
-
81
-
82
-
83
-
84
-
85
-
86
 |
 |
