Yamaha RX V2700 MCXSP10 Manual - Page 40
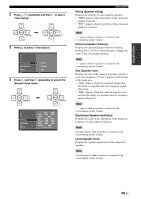
Distance, Size, Equalizing, or Level, Auto Setup.
 |
UPC - 027108927077
View all Yamaha RX V2700 manuals
Add to My Manuals
Save this manual to your list of manuals |
Page 40 highlights
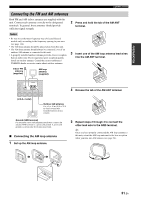
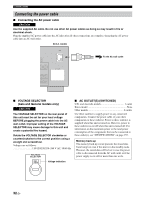
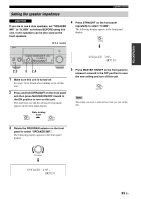
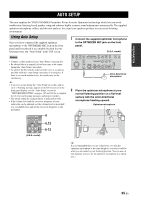
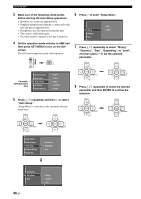
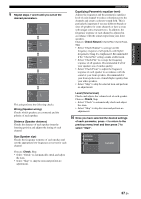
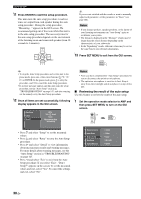
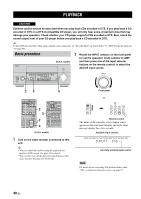
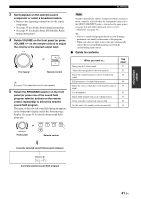
AUTO SETUP 3 Make sure of the following check points before starting the Auto Setup operations. • Speakers are connected appropriately. • Supplied optimizer microphone is connected to this unit and placed appropriately. • Headphones are disconnected from this unit. • The room is sufficiently quiet. • The video monitor connected to this unit is turned on. 6 Press h to enter "Setup Menu". Wiring Distance Size Skip Check 4 Set the operation mode selector to AMP and then press SET MENU to turn on the GUI screen. The GUI screen appears on the video monitor. AMP SOURCE TV SET MENU MENU SRCH MODE 7 Press k / n repeatedly to select "Wiring", "Distance", "Size", "Equalizing", or "Level", and then press h to set the selected parameter. PRESET/CH PRESET/CH Currently selected menu item Stereo/Surround Input Select Manual Setup Auto Setup System Memory Sound Video Basic NET/USB Option 5 Press k / n repeatedly and then h to select "Auto Setup". "Setup Menu" is selected as the currently selected menu item. PRESET/CH PRESET/CH ENTER A/B/C/D/E ENTER A/B/C/D/E 8 Press k / n repeatedly to select the desired parameter and then ENTER to confirm the selection. \ PRESET/CH PRESET/CH ENTER A/B/C/D/E ENTER A/B/C/D/E ENTER A/B/C/D/E ENTER A/B/C/D/E Input Select Manual Setup Auto Setup System Memory Signal Info. Information Setup Menu Start Information Setup Menu Start 36 En Wiring Distance Size
-
 1
1 -
2
-
3
-
4
-
5
-
6
-
7
-
8
-
9
-
10
-
11
-
12
-
13
-
14
-
15
-
16
-
17
-
18
-
19
-
20
-
21
-
22
-
23
-
24
-
25
-
26
-
27
-
28
-
29
-
30
-
31
-
32
-
33
-
34
-
 35
35 -
 36
36 -
 37
37 -
 38
38 -
 39
39 -
 40
40 -
 41
41 -
 42
42 -
 43
43 -
 44
44 -
 45
45 -
46
-
47
-
48
-
49
-
50
-
51
-
52
-
53
-
54
-
55
-
56
-
57
-
58
-
59
-
60
-
61
-
62
-
63
-
64
-
65
-
66
-
67
-
68
-
69
-
70
-
71
-
72
-
73
-
74
-
75
-
76
-
77
-
78
-
79
-
80
-
81
-
82
-
83
-
84
-
85
-
86
-
87
-
88
-
89
-
90
-
91
-
92
-
93
-
94
-
95
-
96
-
97
-
98
-
99
-
100
-
101
-
102
-
103
-
104
-
105
-
106
-
107
-
108
-
109
-
110
-
111
-
112
-
113
-
114
-
115
-
116
-
117
-
118
-
119
-
120
-
121
-
122
-
123
-
124
-
125
-
126
-
127
-
128
-
129
-
130
-
131
-
132
-
133
-
134
-
135
-
136
-
137
-
138
-
139
-
140
-
141
-
142
-
143
-
144
-
145
-
146
-
147
-
148
-
149
-
150
-
151
-
152
-
153
-
154
-
155
-
156
-
157
-
158
-
159
-
160
-
161
-
162
-
163
-
164
-
165
-
166
-
167
-
168
-
169
-
170
-
171
-
172
-
173
-
174
 |
 |
