Yamaha RX-V567 Owners Manual
Yamaha RX-V567 Manual
 |
UPC - 027108935980
View all Yamaha RX-V567 manuals
Add to My Manuals
Save this manual to your list of manuals |
Yamaha RX-V567 manual content summary:
- Yamaha RX-V567 | Owners Manual - Page 1
AV Receiver Owner's Manual English - Yamaha RX-V567 | Owners Manual - Page 2
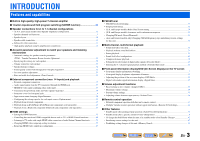
as needed (Advanced Setup menu 66 Displaying/Setting the Advanced Setup menu 66 Setting the impedance of speakers (U.S.A. and Canada models only 66 Avoiding crossing remote control signals when using multiple Yamaha receivers 66 High quality playback using bi-amplification connections 67 - Yamaha RX-V567 | Owners Manual - Page 3
at low volumes - Yamaha RX-V567 | Owners Manual - Page 4
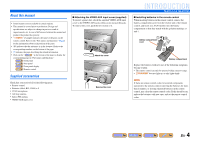
panel Front panel display Remote control Supplied accessories Check that you received all of the following parts. • Remote control • Batteries (AAA, R03, UM-4) x 2 • YPAO microphone • AM loop antenna • Indoor FM antenna • VIDEO AUX input cover ■ Attaching the VIDEO AUX input cover (supplied) To - Yamaha RX-V567 | Owners Manual - Page 5
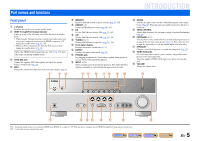
in the Yamaha iPod universal dock during the standby mode (☞p. 42). When the HDMI Control functions are you are using and the surround sound decoder (☞p. 30). Press either the left or CD RADIO TONE CONTROL PROGRAM STRAIGHT VIDEO AUX PORTABLE VIDEO L AUDIO R DIRECT VOLUME l m no - Yamaha RX-V567 | Owners Manual - Page 6
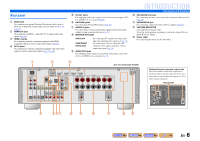
PB Y VIDEO ARC S VIDEO HDMI OUT (BD/DVD) HDMI 1 ANTENNA FM GND AM COMPONENT VIDEO PR HDMI 2 75ǡ PB VIDEO Y MONITOR OUT HDMI 3 HDMI 4 FRONT CENTER SPEAKERS SURROUND SURROUND BACK/ BI-AMP SINGLE OPTICAL AV 1 COAXIAL AV 2 COAXIAL (CD) AV 3 OPTICAL ( TV ) AV 4 AV 5 AV 6 AV OUT - Yamaha RX-V567 | Owners Manual - Page 7
volume level. a g Cursor indicators Light up if corresponding cursors on the remote control are available for operations. h Multi information display Displays a range of information on menu items and settings. i Speaker indicators Indicate speaker terminals from which signals are output. Subwoofer - Yamaha RX-V567 | Owners Manual - Page 8
Remote control a b c d e f g h i j k l m SOURCE 1 1 5 TRANSMIT CODE SET SLEEP RECEIVER HDMI 2 3 4 AV 2 3 4 AUDIO 6 1 2 V-AUX [ A ] [ B ] DOCK TUNER FM AM PRESET TUNING INFO MEMORY MOVIE ENHANCER SUR. DECODE MUSIC STEREO STRAIGHT DIRECT BD DVD SETUP SCENE TV CD RADIO - Yamaha RX-V567 | Owners Manual - Page 9
uses acoustic field effects and sound decoders to bring you the impact of a real movie theater or concert hall. These effects will sounds included in Dolby Digital and DTS. Use a subwoofer that is equipped with built-in amplifier. Ex. Subwoofer speaker layout: Place it exterior to the front left - Yamaha RX-V567 | Owners Manual - Page 10
Speaker layout ■ 7.1-channel speaker layout (7 speakers + subwoofer) Front speaker R Front speaker L Subwoofer Surround speaker R ■ 6.1-channel speaker layout (6 speakers + subwoofer) Front speaker R Front speaker L Subwoofer Surround speaker R CONNECTIONS Connecting speakers ■ 5.1-channel - Yamaha RX-V567 | Owners Manual - Page 11
speaker RL SPEAKERS HDMI 3 HDMI 4 FRONT CENTER SURROUND SURROUND BACK/ BI-AMP SINGLE AUDIO OUT SUBWOOFER PRE OUT SPEAKERS HDMI 3 HDMI 4 FRONT CENTER SURROUND SURROUND BACK/ BI-AMP SINGLE AUDIO OUT SUBWOOFER PRE OUT SPEAKERS HDMI 3 HDMI 4 FRONT CENTER SURROUND SURROUND BACK - Yamaha RX-V567 | Owners Manual - Page 12
Canada models only) Changing speaker impedance This unit is configured for 8Ω speakers as the factory ADVANCED SETUP" is displayed on the front panel display. After approximately a few seconds, the top menu INPUT BD DVD SCENE TV CD TONE CONTROL PROGRAM RADIO STRAIGHT STRAIGHT 3 Check that - Yamaha RX-V567 | Owners Manual - Page 13
VOLUME CROSSOVER/ HIGH CUT MIN MAX MIN MAX Subwoofer examples J 1 : Refer to the "Extended functionality that can be configured as needed (Advanced Setup menu)" (☞p. 66) for details on the Advanced Setup menu. ■ Bi-amp connection for front speakers This unit can connect speakers that support - Yamaha RX-V567 | Owners Manual - Page 14
audio signals. COAXIAL jacks These jacks transmit coaxial digital audio signals. Use pin cables for digital audio signals. Digital audio fiber-optic cable Digital audio pin cable AUDIO jacks These jacks transmit conventional analog audio signals. Use stereo pin cables, connecting the red plug - Yamaha RX-V567 | Owners Manual - Page 15
OUT, COMPONENT VIDEO or VIDEO. Select the proper connection according to the input signal format supported by your TV. COMPONENT VIDEO jacks HDMI OUT jack (MONITOR OUT) DOCK COMPONENT VIDEO PR PB Y VIDEO ARC HDMI OUT (BD/DVD) HDMI 1 ANTENNA FM GND AM COMPONENT VIDEO PR HDMI 2 75ǡ PB - Yamaha RX-V567 | Owners Manual - Page 16
VIDEO ARC HDMI OUT (BD/DVD) HDMI 1 ANTENNA FM GND AM COMPONENT VIDEO PR HDMI 2 75ǡ PB VIDEO Y MONITO V OPTICAL AV 1 COAXIAL AV 2 COAXIAL (CD) AV 3 OPTICAL (TV) AV 4 AV 5 AV 6 AV OUT AUDIO 1 AUDIO 2 Video input VIDEO V TV J 1 : When connecting to a TV that supports HDMI input - Yamaha RX-V567 | Owners Manual - Page 17
PB Y VIDEO ARC HDMI OUT (BD/DVD) HDMI 1 ANTENNA FM GND AM COMPONENT VIDEO PR HDMI 2 75ǡ PB VIDEO Y MONITOR OUT OPTICAL AV 1 COAXIAL AV 2 COAXIAL (CD) AV 3 OPTICAL (TV) AV 4 AV 5 AV 6 AV OUT AUDIO 1 AUDIO 2 You can control your TV using the receiver's remote control by entering - Yamaha RX-V567 | Owners Manual - Page 18
CODE SET SLEEP RECEIVER HDMI 2 3 4 AV 2 3 4 AUDIO 6 1 2 V-AUX [ A ] [ B ] DOCK TUNER FM AM PRESET TUNING INFO MEMORY MOVIE ENHANCER SUR. DECODE MUSIC STEREO STRAIGHT DIRECT BD DVD SETUP SCENE TV CD RADIO OPTION ENTER VOLUME RETURN DISPLAY TOP MENU REC POP-UP MENU - Yamaha RX-V567 | Owners Manual - Page 19
L R DOCK COMPONENT VIDEO PR PR PB PB YY VIDEO ARC HDMI OUT (BD/DVD) HDMI 1 ANTENNA FM GND AM COMPONENT VIDEO PR HDMI 2 75ǡ L PB VIDEO Y MONITOR OUT OPTICAL AV 1 COAXIAL AV 2 COAXIAL (CD) AV 3 OPTICAL (TV) AV 4 AV 5 R AV 6 AV OUT AUDIO 1 AUDIO 2 Game console You can use the - Yamaha RX-V567 | Owners Manual - Page 20
Y VIDEO L OPTICAL AV 1 COAXIAL AV 2 R COAXIAL (CD) AV 3 OPTICAL (TV) AV 4 ARC HDMI OUT (BD/DVD) HDMI 1 ANTENNA FM GND AM COMPONENT VIDEO PR HDMI 2 75ǡ PB VIDEO Y MONITOR OUT AV OUT AUDIO 1 AUDIO 2 O O OPTICAL AV 1 COAXIAL AV 2 COAXIAL (CD) AV 3 OPTICAL AV 5 AV 6 AV OUT - Yamaha RX-V567 | Owners Manual - Page 21
R DOCK COMPONENT VIDEO PR ARC HDMI OUT (BD/DVD) HDMI 1 ANTENNA FM GND AM COMPONENT VIDEO PR HDMI 2 PB VIDEO Y 75ǡ L PB VIDEO Y MONITOR OUT OPTICAL AV 1 COAXIAL AV 2 COAXIAL (CD) AV 3 OPTICAL (TV) AV 4 AV 5 R AV 6 AV OUT CD player Using optical digital output sources Select the - Yamaha RX-V567 | Owners Manual - Page 22
Audio input VIDEO V DOCK COMPONENT VIDEO PR ARC HDMI OUT (BD/DVD) HDMI 1 ANTENNA FM GND AM COMPONENT VIDEO PR HDMI 2 PB VIDEO Y 75ǡ V L PB VIDEO Y MONITOR OUT OPTICAL AV 1 COAXIAL AV 2 COAXIAL (CD) AV 3 OPTICAL (TV) AV 4 R AV 5 AV 6 AV OUT AUDIO 1 AUDIO 2 HDMI 3 HDMI 4 FRONT - Yamaha RX-V567 | Owners Manual - Page 23
these antennas properly to their respective jacks. Indoor FM antenna AM loop antenna Position the AM antenna away from the receiver. The wires of the AM antenna have no polarity. You can connect either wire to the AM jack or the GND jack. DOCK NENT O VIDEO - Yamaha RX-V567 | Owners Manual - Page 24
Yamaha Parametric Room Acoustic Optimizer) that adjusts the status, size, and volume test tone is output at high volume been selected. Subwoofer • The MENU" appears on the front panel display, and the following appears on the TV screen. J2 Auto Setup EQ Type;;;;Natural . Start [OPTION]:EQ Select [SETUP - Yamaha RX-V567 | Owners Manual - Page 25
CODE SET SLEEP RECEIVER HDMI 2 3 4 AV 2 3 4 AUDIO 6 1 2 V-AUX [ A ] [ B ] DOCK TUNER FM AM PRESET TUNING INFO MEMORY MOVIE ENHANCER SUR. DECODE MUSIC STEREO STRAIGHT DIRECT BD DVD SETUP SCENE TV CD RADIO OPTION ENTER VOLUME RETURN DISPLAY TOP MENU REC POP-UP MENU - Yamaha RX-V567 | Owners Manual - Page 26
CODE SET SLEEP RECEIVER HDMI 2 3 4 AV 2 3 4 AUDIO 6 1 2 V-AUX [ A ] [ B ] DOCK TUNER FM AM PRESET TUNING INFO MEMORY MOVIE ENHANCER SUR. DECODE MUSIC STEREO STRAIGHT DIRECT BD DVD SETUP SCENE TV CD RADIO OPTION ENTER VOLUME RETURN DISPLAY TOP MENU REC POP-UP MENU - Yamaha RX-V567 | Owners Manual - Page 27
protected. Set "Memory Guard" in the Setup menu to "Off" (☞p. 59). ■ the problem and test tone. E-9: USER Yamaha service center. Carry out the measuring process again. Do not operate this unit by, for example, adjusting the volume. Carry out the measuring process again. Contact a Yamaha service - Yamaha RX-V567 | Owners Manual - Page 28
(positive), and - (negative) are correct. We recommend the same speakers or speakers with as similar specifications as possible. Adjust the volume of the subwoofer. If "W-2" or "W-3" appears, you can apply measurement results, but they will not give optimal results. We recommend that you resolve - Yamaha RX-V567 | Owners Manual - Page 29
CODE SET SLEEP RECEIVER HDMI 2 3 4 AV 2 3 4 AUDIO 6 1 2 V-AUX [ A ] [ B ] DOCK TUNER FM AM PRESET TUNING INFO MEMORY MOVIE ENHANCER SUR. DECODE MUSIC STEREO STRAIGHT DIRECT BD DVD SETUP SCENE TV CD RADIO OPTION ENTER VOLUME RETURN DISPLAY TOP MENU REC POP-UP MENU - Yamaha RX-V567 | Owners Manual - Page 30
CODE SET SLEEP RECEIVER HDMI 2 3 4 AV 2 3 4 AUDIO 6 1 2 V-AUX [ A ] [ B ] DOCK TUNER FM AM PRESET TUNING INFO MEMORY MOVIE ENHANCER SUR. DECODE MUSIC STEREO STRAIGHT DIRECT BD DVD SETUP SCENE TV CD RADIO OPTION ENTER VOLUME RETURN DISPLAY TOP MENU REC POP-UP MENU - Yamaha RX-V567 | Owners Manual - Page 31
CODE SET SLEEP RECEIVER HDMI 2 3 4 AV 2 3 4 AUDIO 6 1 2 V-AUX [ A ] [ B ] DOCK TUNER FM AM PRESET TUNING INFO MEMORY MOVIE ENHANCER SUR. DECODE MUSIC STEREO STRAIGHT DIRECT BD DVD SETUP SCENE TV CD RADIO OPTION ENTER VOLUME RETURN DISPLAY TOP MENU REC POP-UP MENU - Yamaha RX-V567 | Owners Manual - Page 32
CODE SET SLEEP RECEIVER HDMI 2 3 4 AV 2 3 4 AUDIO 6 1 2 V-AUX [ A ] [ B ] DOCK TUNER FM AM PRESET TUNING INFO MEMORY MOVIE ENHANCER SUR. DECODE MUSIC STEREO STRAIGHT DIRECT BD DVD SETUP SCENE TV CD RADIO OPTION ENTER VOLUME RETURN DISPLAY TOP MENU REC POP-UP MENU - Yamaha RX-V567 | Owners Manual - Page 33
. It has been designed with the concept of an ideal movie theater, in which the audience is surrounded by beautiful reverberations from the and the sound field designs for "Action Game" to represent the depth and 3D feeling of the field during play, while offering movie-like surround effects in the - Yamaha RX-V567 | Owners Manual - Page 34
is suitable for movies. Reproduces sound using the DTS Neo:6 decoder. This is suitable for music. J 1 : You cannot select the Dolby Pro Logic IIx decoder in the following conditions: • When the "Sur. B" setting in "Speaker Setup" of the Setup menu is set to "None." • When headphones are connected - Yamaha RX-V567 | Owners Manual - Page 35
CODE SET SLEEP RECEIVER HDMI 2 3 4 AV 2 3 4 AUDIO 6 1 2 V-AUX [ A ] [ B ] DOCK TUNER FM AM PRESET TUNING INFO MEMORY MOVIE ENHANCER SUR. DECODE MUSIC STEREO STRAIGHT DIRECT BD DVD SETUP SCENE TV CD RADIO OPTION ENTER VOLUME RETURN DISPLAY TOP MENU REC POP-UP MENU - Yamaha RX-V567 | Owners Manual - Page 36
CODE SET SLEEP RECEIVER HDMI 2 3 4 AV 2 3 4 AUDIO 6 1 2 V-AUX [ A ] [ B ] DOCK TUNER FM AM PRESET TUNING INFO MEMORY MOVIE ENHANCER SUR. DECODE MUSIC STEREO STRAIGHT DIRECT BD DVD SETUP SCENE TV CD RADIO OPTION ENTER VOLUME RETURN DISPLAY TOP MENU REC POP-UP MENU - Yamaha RX-V567 | Owners Manual - Page 37
CODE SET SLEEP RECEIVER HDMI 2 3 4 AV 2 3 4 AUDIO 6 1 2 V-AUX [ A ] [ B ] DOCK TUNER FM AM PRESET TUNING INFO MEMORY MOVIE ENHANCER SUR. DECODE MUSIC STEREO STRAIGHT DIRECT BD DVD SETUP SCENE TV CD RADIO OPTION ENTER VOLUME RETURN DISPLAY TOP MENU REC POP-UP MENU - Yamaha RX-V567 | Owners Manual - Page 38
SOURCE 1 1 5 TRANSMIT CODE SET SLEEP RECEIVER HDMI 2 3 4 AV 2 3 4 AUDIO 6 1 2 V-AUX [ A ] [ B ] DOCK TUNER FM AM PRESET TUNING INFO MEMORY MOVIE ENHANCER SUR. DECODE MUSIC STEREO STRAIGHT DIRECT BD DVD SETUP SCENE TV CD RADIO OPTION Recalling a preset station You - Yamaha RX-V567 | Owners Manual - Page 39
CODE SET SLEEP RECEIVER HDMI 2 3 4 AV 2 3 4 AUDIO 6 1 2 V-AUX [ A ] [ B ] DOCK TUNER FM AM PRESET TUNING INFO MEMORY MOVIE ENHANCER SUR. DECODE MUSIC STEREO STRAIGHT DIRECT BD DVD SETUP SCENE TV CD RADIO OPTION ENTER VOLUME RETURN DISPLAY TOP MENU REC POP-UP MENU - Yamaha RX-V567 | Owners Manual - Page 40
CODE SET SLEEP RECEIVER HDMI 2 3 4 AV 2 3 4 AUDIO 6 1 2 V-AUX [ A ] [ B ] DOCK TUNER FM AM PRESET TUNING INFO MEMORY MOVIE ENHANCER SUR. DECODE MUSIC STEREO STRAIGHT DIRECT BD DVD SETUP SCENE TV CD RADIO OPTION ENTER VOLUME RETURN DISPLAY TOP MENU REC POP-UP MENU - Yamaha RX-V567 | Owners Manual - Page 41
CODE SET SLEEP RECEIVER HDMI 2 3 4 AV 2 3 4 AUDIO 6 1 2 V-AUX [ A ] [ B ] DOCK TUNER FM AM PRESET TUNING INFO MEMORY MOVIE ENHANCER SUR. DECODE MUSIC STEREO STRAIGHT DIRECT BD DVD SETUP SCENE TV CD RADIO OPTION ENTER VOLUME RETURN DISPLAY TOP MENU REC POP-UP MENU - Yamaha RX-V567 | Owners Manual - Page 42
CODE SET SLEEP RECEIVER HDMI 2 3 4 AV 2 3 4 AUDIO 6 1 2 V-AUX [ A ] [ B ] DOCK TUNER FM AM PRESET TUNING INFO MEMORY MOVIE ENHANCER SUR. DECODE MUSIC STEREO STRAIGHT DIRECT BD DVD SETUP SCENE TV CD RADIO OPTION ENTER VOLUME RETURN DISPLAY TOP MENU REC POP-UP MENU - Yamaha RX-V567 | Owners Manual - Page 43
CODE SET SLEEP RECEIVER HDMI 2 3 4 AV 2 3 4 AUDIO 6 1 2 V-AUX [ A ] [ B ] DOCK TUNER FM AM PRESET TUNING INFO MEMORY MOVIE ENHANCER SUR. DECODE MUSIC STEREO STRAIGHT DIRECT BD DVD SETUP SCENE TV CD RADIO OPTION ENTER VOLUME RETURN DISPLAY TOP MENU REC POP-UP MENU - Yamaha RX-V567 | Owners Manual - Page 44
CODE SET SLEEP RECEIVER HDMI 2 3 4 AV 2 3 4 AUDIO 6 1 2 V-AUX [ A ] [ B ] DOCK TUNER FM AM PRESET TUNING INFO MEMORY MOVIE ENHANCER SUR. DECODE MUSIC STEREO STRAIGHT DIRECT BD DVD SETUP SCENE TV CD RADIO OPTION ENTER VOLUME RETURN DISPLAY TOP MENU REC POP-UP MENU - Yamaha RX-V567 | Owners Manual - Page 45
CODE SET SLEEP RECEIVER HDMI 2 3 4 AV 2 3 4 AUDIO 6 1 2 V-AUX [ A ] [ B ] DOCK TUNER FM AM PRESET TUNING INFO MEMORY MOVIE ENHANCER SUR. DECODE MUSIC STEREO STRAIGHT DIRECT BD DVD SETUP SCENE TV CD RADIO OPTION ENTER VOLUME RETURN DISPLAY TOP MENU REC POP-UP MENU - Yamaha RX-V567 | Owners Manual - Page 46
match the format of the input audio. Selects DTS signals only. Other input signals are not reproduced. SETUP Configuring the settings specific for each input source (Option menu) ■ Selecting the 5.1-channel signal playback method Extended Surround Input source: HDMI1-4, AV1-4 J1 Selects whether to - Yamaha RX-V567 | Owners Manual - Page 47
-2 Combines video from HDMI or AV input sources with analog/ digital Optical digital audio input Select AV1 or AV4. Connect the external component audio cable to the optical SETUP Configuring the settings specific for each input source (Option menu) • For details of settings, refer to "Receiving - Yamaha RX-V567 | Owners Manual - Page 48
: DOCK (iPod) Charges an iPod/iPhone stationed in the iPod universal dock while the receiver is in standby mode (☞p. 42). SETUP Configuring the settings specific for each input source (Option menu) ■ Shuffle playback with iPod/iPhone Shuffle Input source: DOCK (iPod) Changes the shuffle playback - Yamaha RX-V567 | Owners Manual - Page 49
CODE SET SLEEP RECEIVER HDMI 2 3 4 AV 2 3 4 AUDIO 6 1 2 V-AUX [ A ] [ B ] DOCK TUNER FM AM PRESET TUNING INFO MEMORY MOVIE ENHANCER SUR. DECODE MUSIC STEREO STRAIGHT DIRECT BD DVD SETUP SCENE TV CD RADIO OPTION ENTER VOLUME RETURN DISPLAY TOP MENU REC POP-UP MENU - Yamaha RX-V567 | Owners Manual - Page 50
L/R SP Sur.B L/R SP Crossover Freq. Subwoofer Phase Extra Bass Level Distance Equalizer Test Tone Sound Setup Lipsync Adaptive DRC Dynamic.Range Max Volume Init.Volume (speakers) (unit and speakers) (speakers and frequency bands) HDMI Auto Auto Delay Manual Delay HDMI Setup Control TV Audio In J1 - Yamaha RX-V567 | Owners Manual - Page 51
channel layout). SETUP Setting various functions (Setup menu) Subwoofer Phase Sets the phase of the subwoofer if the subwoofer by using "Crossover Freq." setting. J 3 : If your subwoofer has a volume control or a crossover frequency control, set the crossover frequency to maximum and the volume - Yamaha RX-V567 | Owners Manual - Page 52
■ Controlling the volume of each speaker Level Separately adjusts the volume of each speaker. Use jCursor B / C to select the desired speaker and adjust the volume with back speaker R Surround back speaker Subwoofer SETUP Setting various functions (Setup menu) ■ Adjusting sound quality with the - Yamaha RX-V567 | Owners Manual - Page 53
Speaker Frequency band Setting the volume level for the selected frequency SETUP Setting various functions (Setup menu) ■ Generating test tones Test Tone Turns the test tone generator on or off. Off (Default) On Does not generate test tones. Generates test tones. While "On" is selected, test - Yamaha RX-V567 | Owners Manual - Page 54
monitor does not support the automatic lipsync function or "HDMI Auto" is set to "Off." Adjustable range 0 ms to 240 ms Adjustment 1 ms increments Default setting 0 ms SETUP Setting various functions (Setup menu) ■ Auto-adjusting the sound level to make even low volumes more audible Adaptive - Yamaha RX-V567 | Owners Manual - Page 55
on. When this parameter is set to "Off," the volume is set at the level when the receiver last entered standby mode. J1 Adjustable range Off, Mute, -80 dB to +16.5 dB Default setting Off Adjustment increments 0.5 dB SETUP Setting various functions (Setup menu) Setting HDMI functions ;HDMI - Yamaha RX-V567 | Owners Manual - Page 56
■ Receiver operation via TV (HDMI Control) Control Set the HDMI Control function to "On" to operate devices connected via HDMI. If the TV or other external components support HDMI Control (ex. Panasonic VIERA Link), you can use the remote controls of those devices to operate some of this unit's - Yamaha RX-V567 | Owners Manual - Page 57
this unit or through a TV. Amp (Default) TV Amp+TV Outputs audio through this unit only is only displayed with the HDMI Control function (Control) is set to "Off." supports, set "MON.CHK" in the Advanced Setup menu to "SKIP" (☞p. 67) and try again. SETUP Setting various functions (Setup menu - Yamaha RX-V567 | Owners Manual - Page 58
CODE SET SLEEP RECEIVER HDMI 2 3 4 AV 2 3 4 AUDIO 6 1 2 V-AUX [ A ] [ B ] DOCK TUNER FM AM PRESET TUNING INFO MEMORY MOVIE ENHANCER SUR. DECODE MUSIC STEREO STRAIGHT DIRECT BD DVD SETUP SCENE TV CD RADIO OPTION ENTER VOLUME RETURN DISPLAY TOP MENU REC POP-UP MENU - Yamaha RX-V567 | Owners Manual - Page 59
mode. Pressing any key of the remote control during the countdown cancels entering the standby mode and reset the timer. ■ Setting the brightness of to the settings on Setup menu. Off (Default) On Settings are not protected. Prohibits changes to the settings on Setup menu until it is returned - Yamaha RX-V567 | Owners Manual - Page 60
CODE SET SLEEP RECEIVER HDMI 2 3 4 AV 2 3 4 AUDIO 6 1 2 V-AUX [ A ] [ B ] DOCK TUNER FM AM PRESET TUNING INFO MEMORY MOVIE ENHANCER SUR. DECODE MUSIC STEREO STRAIGHT DIRECT BD DVD SETUP SCENE TV CD RADIO OPTION ENTER VOLUME RETURN DISPLAY TOP MENU REC POP-UP MENU - Yamaha RX-V567 | Owners Manual - Page 61
Pro Logic II Movie) decoder. Selects the Neo:6 (Cinema) decoder. DSP Level Change the effect control circuit. 7ch Stereo only CT Level Adjusts the center channel volume. J2 Adjustable range 0 to 100% Default setting 100% SETUP Setting sound field program parameters SR Level Adjusts the volume - Yamaha RX-V567 | Owners Manual - Page 62
Parameters usable in surround decoder Dolby PLIIx Music and Dolby PLII Music only Panorama Adjusts the soundscape of the front sound field. as you make the value more positive. Adjustable range -3 to STD to +3 Default setting STD (Standard) SETUP Setting sound field program parameters En 62 - Yamaha RX-V567 | Owners Manual - Page 63
CODE SET SLEEP RECEIVER HDMI 2 3 4 AV 2 3 4 AUDIO 6 1 2 V-AUX [ A ] [ B ] DOCK TUNER FM AM PRESET TUNING INFO MEMORY MOVIE ENHANCER SUR. DECODE MUSIC STEREO STRAIGHT DIRECT BD DVD SETUP SCENE TV CD RADIO OPTION ENTER VOLUME RETURN DISPLAY TOP MENU REC POP-UP MENU - Yamaha RX-V567 | Owners Manual - Page 64
CODE SET SLEEP RECEIVER MI 2 3 4 AV 2 3 4 AUDIO 6 1 2 V-AUX [ A ] [ B ] DOCK TUNER FM AM PRESET TUNING INFO MEMORY MOVIE ENHANCER SUR. DECODE MUSIC STEREO STRAIGHT DIRECT BD DVD SETUP SCENE TV CD RADIO OPTION ENTER VOLUME RETURN DISPLAY TOP MENU REC POP-UP MENU - Yamaha RX-V567 | Owners Manual - Page 65
SUR. DECODE MUSIC STEREO STRAIGHT DIRECT BD DVD SETUP SCENE TV CD RADIO OPTION ENTER VOLUME RETURN DISPLAY TOP MENU REC POP-UP MENU MUTE 1 2 3 4 5 6 7 8 9 INPUT MUTE 0 10 TV TV VOL TV CH ENT n Resetting all remote control codes Resetting all remote control codes for - Yamaha RX-V567 | Owners Manual - Page 66
"ADVANCED SETUP" is displayed on the front panel display. After approximately a few seconds, the top menu items are displayed. A STRAIGHT YPAO MIC PHONES SILENT CINEMA INFO MEMORY PRESET FM AM INPUT BD DVD SCENE TV CD TONE CONTROL PROGRAM RADIO STRAIGHT SP IMP. J1 REMOTE ID BI-AMP - Yamaha RX-V567 | Owners Manual - Page 67
CODE SET RECEIVER • If setup fails, repeat from step 1. • Returns to ID1 after the remote control code is initialized (☞p. 65). J 1 : For details on setting FM/AM frequency steps, refer to "FM/AM tuning" (☞p. 35). SETUP Extended functionality that can be configured as needed (Advanced Setup menu - Yamaha RX-V567 | Owners Manual - Page 68
supporting HDMI Control to this unit's HDMI output jack. 2 Turn on the TV and this unit. Refer to the TV's instruction manual on how to operate external components. 3 Set the TV and this unit's HDMI Control function to "On." Receiver unit Confirm that "Control" in the Setup menu (HDMI Setup - Yamaha RX-V567 | Owners Manual - Page 69
CODE SET SLEEP RECEIVER HDMI 2 3 4 AV 2 3 4 AUDIO 6 1 2 V-AUX [ A ] [ B ] DOCK TUNER FM AM PRESET TUNING INFO MEMORY MOVIE ENHANCER SUR. DECODE MUSIC STEREO STRAIGHT DIRECT BD DVD SETUP SCENE TV CD RADIO OPTION ENTER VOLUME RETURN DISPLAY TOP MENU REC POP-UP MENU - Yamaha RX-V567 | Owners Manual - Page 70
SOURCE 1 1 5 TRANSMIT CODE SET SLEEP RECEIVER HDMI 2 3 4 AV 2 3 4 AUDIO 6 1 2 V-AUX [ A ] [ B ] DOCK TUNER FM AM PRESET TUNING INFO MEMORY MOVIE ENHANCER SUR. DECODE MUSIC STEREO STRAIGHT DIRECT BD DVD SETUP SCENE TV CD RADIO OPTION ■ Single HDMI cable input to TV - Yamaha RX-V567 | Owners Manual - Page 71
APPENDIX Troubleshooting Refer to the table below when this unit does not function properly. If the problem you are experiencing is not listed below, or if the instructions below do not help, turn off this unit, disconnect the power cable, and contact the nearest authorized Yamaha dealer or service - Yamaha RX-V567 | Owners Manual - Page 72
"INIT" to reset the video connected to this unit via the parameters. HDMI OUT jack. Displays the Advanced Setup menu and set 67 "MON.CHK" to "YES." An appropriate video input is not Select an appropriate video input on the TV. - selected on the TV. APPENDIX Troubleshooting Problem No sound - Yamaha RX-V567 | Owners Manual - Page 73
to its instruction manual. There is noise interference from digital or radio frequency equipment. This unit is too close to other digital or radio frequency equipment. Move this unit further away from such equipment. See page 31 30 46 50 - - 47 - - APPENDIX Troubleshooting Problem Noise/hum - Yamaha RX-V567 | Owners Manual - Page 74
Return Channel Make sure that your TV supports Audio 56 Return Channel. Set the Audio Return Channel function to function is not working. on (Setup menu → HDMI Setup → AudioReturnChan). Tuner (FM/AM) APPENDIX Troubleshooting FM Problem FM stereo reception is noisy. There is distortion - Yamaha RX-V567 | Owners Manual - Page 75
manual Troubleshooting problem with the signal path from your iPod/iPhone to the unit. Turn off the unit and reconnect the Yamaha supported by the supported by the unit. unit. Your iPod/iPhone is properly placed in the Yamaha iPod universal dock. Your iPod/iPhone is removed from the Yamaha - Yamaha RX-V567 | Owners Manual - Page 76
Bluetooth component is turned on. - check if the Bluetooth component is within 10 m (32 feet) of the Yamaha Bluetooth wireless audio receiver. See page - - - - - - - Problem The remote control does not work or function properly. Cause Wrong distance or angle. Direct sunlight or lighting (from an - Yamaha RX-V567 | Owners Manual - Page 77
a high-definition home theater experience. Supporting bitrates up to 24.5 Mbps for Blu-ray Disc, DTS-HD Master Audio can carry up to 7.1 discrete channels of 24-bit/96 kHz audio simultaneously. Supported by HDMI version 1.3 and designed for the optical disc players and AV receivers/amplifiers of the - Yamaha RX-V567 | Owners Manual - Page 78
Code Yamaha CINEMA DSP uses Yamaha's original DSP technology to combine Dolby Pro Logic, Dolby Digital, and DTS systems to provide the audiovisual experience of a movie theater in the listening room of your own home AV receivers) and audio/video monitors (such as digital televisions), HDMI supports - Yamaha RX-V567 | Owners Manual - Page 79
decode the bitstream audio signals of audio commentaries, you can playback the audio sources with the audio commentaries mixed down by using the digital audio input (optical or coaxial) connections. • Refer to the supplied instruction manuals SIG and is used by Yamaha in accordance with a license - Yamaha RX-V567 | Owners Manual - Page 80
is possible. [SURROUND BACK, BI-AMP (FRONT L/R)] Subwoofer out x 1 AV OUT x 1 AUDIO OUT x 1 • Video MONITOR OUT - Component x 1 - Composite x 1 AV OUT - Composite x 1 • Other HDMI OUT x 1 ■ HDMI • HDMI Specification: Deep Color, "x.v.Color," Auto Lips Sync, ARC (Audio Return Channel) • Video - Yamaha RX-V567 | Owners Manual - Page 81
Network) Front Speakers 150 µV or less • Channel Separation (1 kHz/10 kHz) AV5, etc. (5.1 kΩ shortened 60 dB/45 dB or more • Volume Control MUTE / -80 dB to +16.5 dB • Tone Control dB/oct. L.P.F. (Subwoofer 24 dB/oct. ■ VIDEO SECTION • Video Signal Type [U.S.A., Canada, Korea and General models - Yamaha RX-V567 | Owners Manual - Page 82
adjustment 29 M Manual Preset 37 Max Volume, Sound Setup 55 Memory Guard 59 Menu browse mode 41 MON.CHK, Advanced Setup menu 67 Multi information display 7 MUTE indicator 7 N Normal tuning 35 O OPTICAL jack 14 Option menu 45 OSD Shift, Function Setup 59 P Pairing, Option menu 48 PHONES - Yamaha RX-V567 | Owners Manual - Page 83
decoding mode 31 Subwoofer 9 Supplied accessories 4 Surround back speaker 9 Surround speaker 9 T Test Tone, Speaker Setup 53 Tone control 29 TrafficProgram, Option menu 48 TU, Advanced Setup menu 67 Tuner indicator 7 TV Audio In, HDMI Setup 56 TV monitor connection 15 V VIDEO AUX - Yamaha RX-V567 | Owners Manual - Page 84
© 2010 Yamaha Corporation YC506B0/OMEN - Yamaha RX-V567 | Owners Manual - Page 85
List of remote control codes Lista de códigos de mando a distancia Liste des codes de commande Lijst met afstandsbedieningscodes Liste der Fernbedienungscodes Lista över fjärrstyrningskoder Elenco dei codici di telecomando TV A.R. Systems 0320 Acme 0342 Acura 0323, 0343 - Yamaha RX-V567 | Owners Manual - Page 86
Genexxa 0320, 0340, 0347, 0350 GFM 0128, 0227 Giant 0282 Gibralter 0008, 0030, 0050, 0062 GoldHand 0277 Goldline 0320 GoldStar 0007, 0008, 0012, 0026, 0031, 0050, 0053, 0161, 0277, 0282, 0320, 0323, 0342, 0343, 0346, 0349, 0350 Goodmans 0246, 0272, 0282, 0320, 0323, 0337, - Yamaha RX-V567 | Owners Manual - Page 87
0239, 0256, 0257, 0259, 0261, 0263, 0267, 0280, 0281, 0287, 0296, 0299, 0301, 0303, 0305, 0313, 0319, 0320, 0324, 0333, 0339, 0342, 0349, 0350, 0353, 0357, 0360, 0380, 0383, 0452, 0459, 0460 Philips Magnavox 0011, 0032, 0033 Phoenix 0161, 0277, 0320, 0339, 0349, 0350 Phonola 0277, - Yamaha RX-V567 | Owners Manual - Page 88
Yamaha Yamishi Yokan Yoko Yorx Zanussi Zenith 0008, 0026, 0050, 0053, 0080, 0081, 0082, 0083, 1027, 1028 Dell 1016 Denko 1008 DiamondVision 1096 DigiFusion 1014 DIRECTV 1019, 1105, 1110, 1111, 1113, 1116, 1122 Dish Network 1018 Dishpro 1018 Dual 1009, 1027, 1028 Dumont 1026, 1028 - Yamaha RX-V567 | Owners Manual - Page 89
1068, 1069, 1070, 1071 Weltblick 1031 XR-1000 1068, 1069 Yamaha 1064, 1065 Yamishi 1008, 1029 Yokan 1008, 1029 Yoko 1008, 1029 DK Digital 2339 Dmtech 2176 Dual 2380 Durabrand 2136 DVX 2355 Easy Home 2359 Eclipse 2354 E-Dem 2364 Electrohome 2362 Elin 2362 Elta 2341, - Yamaha RX-V567 | Owners Manual - Page 90
2089, 2118, 2151, 2323 Yamakawa 2363, 2380 Yukai 2186 Zenith 2002, 2129, 2133, 2159, 2223 Blu-ray Disc LG Panasonic Pioneer Samsung Sharp Sony Yamaha 2033 2011, 2209, 2214 2212 2045, 2113 2194, 2220, 2221 2075 2064 DVR Bush Hitachi Panasonic Philips Pioneer RCA Samsung Sharp Sony Toshiba - Yamaha RX-V567 | Owners Manual - Page 91
4219 Digital Stream 4105 DIRECTV 4056, 4064, 4067, 4068, 4070, 4071, 4074, 4107, 4116, 4119, 4121, 4122, 4123, 4127, 4192, 4193, 4194, 4195, 4196, 4197, 4198, 4199, 4200, 4201, 4202, 4203, 4206, 4207, 4221 Discoverer 4212 Discovery 4216 Diseqc 4216 Dish Network 4018, 4065, 4089 - Yamaha RX-V567 | Owners Manual - Page 92
, 5095 CD Recorder Yamaha 5083 MD Yamaha 5080, 5081, 5086 Tape Yamaha 5084, 5087 Tuner Yamaha 5066, 5071, 5085, 5088, 5090, 5092, 5094 XM Yamaha 5091, 5093 SIRIUS Yamaha 5064, 5067 DOCK Yamaha 5068, 5089 NET Yamaha 5076, 5079 LD Yamaha 2080 Amplifier Yamaha 5019, 5020 © 2010
-
 1
1 -
 2
2 -
 3
3 -
 4
4 -
 5
5 -
 6
6 -
 7
7 -
8
-
9
-
10
-
11
-
12
-
13
-
14
-
15
-
16
-
17
-
18
-
19
-
20
-
21
-
22
-
23
-
24
-
25
-
26
-
27
-
28
-
29
-
30
-
31
-
32
-
33
-
34
-
35
-
36
-
37
-
38
-
39
-
40
-
41
-
42
-
43
-
44
-
45
-
46
-
47
-
48
-
49
-
50
-
51
-
52
-
53
-
54
-
55
-
56
-
57
-
58
-
59
-
60
-
61
-
62
-
63
-
64
-
65
-
66
-
67
-
68
-
69
-
70
-
71
-
72
-
73
-
74
-
75
-
76
-
77
-
78
-
79
-
80
-
81
-
82
-
83
-
84
-
85
-
86
-
87
-
88
-
89
-
90
-
91
-
92
 |
 |

Owner’s Manual
AV Receiver
English