Yamaha RX-V567 Owners Manual - Page 4
About this manual, Supplied accessories, Attaching the VIDEO AUX input cover supplied
 |
UPC - 027108935980
View all Yamaha RX-V567 manuals
Add to My Manuals
Save this manual to your list of manuals |
Page 4 highlights
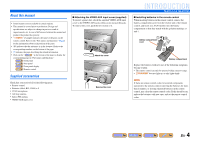
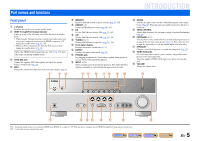
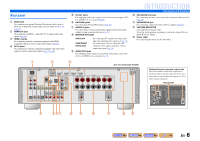
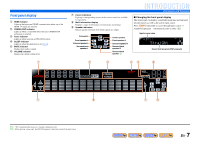
About this manual • Some features are not available in certain regions. • This manual is created prior to production. Design and specifications are subject to change in part as a result of improvements, etc. In case of differences between the manual and product, the product has priority. • "dHDMI1" (example) indicates the name of the parts on the remote control. Refer to the "Part names and functions" (☞p. 5) for the information about each position of the parts. • J1 indicates that the reference is in the footnote. Refer to the corresponding numbers on the bottom of the page. • ☞ indicates the page describing the related information. • Click on the " " at the bottom of the page to display the corresponding page in "Part names and functions." Front panel Rear panel Front panel display Remote control Supplied accessories Check that you received all of the following parts. • Remote control • Batteries (AAA, R03, UM-4) x 2 • YPAO microphone • AM loop antenna • Indoor FM antenna • VIDEO AUX input cover ■ Attaching the VIDEO AUX input cover (supplied) To protect against dust, attach the supplied VIDEO AUX input cover to the VIDEO AUX jacks when you do not use the jacks. To remove the cover, push the left section of it. Attach the cover PUSH Remove the cover INTRODUCTION Features and capabilities ■ Installing batteries in the remote control When inserting batteries in the remote control, remove the battery compartment cover from the reverse side of the remote control, and insert two AAA batteries into the battery compartment so that they match with the polarity markings (+ and -). ac Battery compartment cover b Battery compartment Replace the batteries with new ones if the following symptoms become evident: • The remote control can only be operated within a narrow range. • bTRANSMIT does not light up, or only lights dimly. NOTE If there are remote control codes for external components registered to the remote control, removing the batteries for more than 2 minutes, or leaving exhausted batteries in the remote control, may clear the remote control codes. If this should occur, replace the batteries with new ones, and set the remote control codes. En 4
-
 1
1 -
 2
2 -
 3
3 -
 4
4 -
 5
5 -
 6
6 -
 7
7 -
 8
8 -
 9
9 -
 10
10 -
11
-
12
-
13
-
14
-
15
-
16
-
17
-
18
-
19
-
20
-
21
-
22
-
23
-
24
-
25
-
26
-
27
-
28
-
29
-
30
-
31
-
32
-
33
-
34
-
35
-
36
-
37
-
38
-
39
-
40
-
41
-
42
-
43
-
44
-
45
-
46
-
47
-
48
-
49
-
50
-
51
-
52
-
53
-
54
-
55
-
56
-
57
-
58
-
59
-
60
-
61
-
62
-
63
-
64
-
65
-
66
-
67
-
68
-
69
-
70
-
71
-
72
-
73
-
74
-
75
-
76
-
77
-
78
-
79
-
80
-
81
-
82
-
83
-
84
-
85
-
86
-
87
-
88
-
89
-
90
-
91
-
92
 |
 |
