Yamaha RX-V567 Owners Manual - Page 67
High quality playback using bi- amplification connections
 |
UPC - 027108935980
View all Yamaha RX-V567 manuals
Add to My Manuals
Save this manual to your list of manuals |
Page 67 highlights
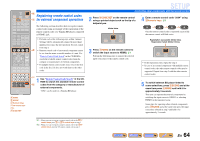
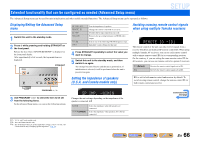
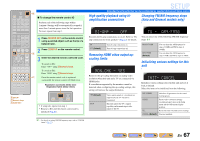
SOURCE 1 1 5 TRANSMIT CODE SET SLEEP RECEIVER HDMI 2 3 4 AV 2 3 4 AUDIO 6 1 2 V-AUX [ A ] [ B ] DOCK TUNER n ■ To change the remote control ID Perform each of the following steps within 1 minute. Settings will be automatically stopped if more than 1 minute passes since the last operation. To reset, repeat from step 1. FM AM PRESET TUNING INFO MEMORY MOVIE ENHANCER SUR. DECODE MUSIC STEREO STRAIGHT DIRECT 1 Press nCODE SET on the remote control using a pointed object such as the tip of a ballpoint pen. BD DVD SETUP SCENE TV CD RADIO OPTION 2 Press iSETUP on the remote control. i ENTER VOLUME RETURN DISPLAY TOP MENU REC POP-UP MENU MUTE 1 2 3 4 5 6 7 8 9 INPUT MUTE 0 10 TV TV VOL TV CH ENT 3 Enter the desired remote control ID code. To switch to ID1: Enter "5019" using lNumeric keys. To switch to ID2: Enter "5020" using lNumeric keys. l Once the remote control code is registered successfully the remote control will blink twice. Registration successful: blinks twice Registration failed: blinks 6 times i SETUP l Numeric keys n CODE SET SOURCE TRANSMIT SLEEP HDMI CODE SET RECEIVER • If setup fails, repeat from step 1. • Returns to ID1 after the remote control code is initialized (☞p. 65). J 1 : For details on setting FM/AM frequency steps, refer to "FM/AM tuning" (☞p. 35). SETUP Extended functionality that can be configured as needed (Advanced Setup menu) High quality playback using biamplification connections Changing FM/AM frequency steps (Asia and General models only) BI-AMP - OFF Switches the bi-amp connections on or off. Refer to "Biamp connection for front speakers" (☞p. 13) for details. ON OFF (Default) Turns bi-amp connections on. Turns bi-amp connections off. Removing HDMI video output upscaling limits MON.CHK - YES Removes the up-scaling limitation on analog video resolution when this unit and a TV are connected via HDMI jacks. If a resolution supported by the monitor cannot be detected when configuring the up-scaling settings, this setting will remove the output limitation. YES (Default) SKIP Video output signals of a resolution not supported by the TV will not be transmitted. This unit ignores the TV's support capability and transmits input video signals to the TV. TU - AM9/FM50 You can select one of the following FM/AM frequency steps: J1 AM10/FM100 AM9/FM50 (Default) You can adjust the AM frequency by steps of 10kHz and FM by steps of 100kHz. You can adjust the AM frequency by steps of 9kHz and FM by steps of 50kHz. Initializing various settings for this unit INIT- CANCEL Initializes various settings stored in this unit and sets it back to default. Select the items to be initialized from the following. DSP PARAM VIDEO ALL CANCEL (Default) Initializes all parameters for the sound field programs. Resets video conversion settings (resolution/aspect ratio) in the Setup menu and the OSD menus display position. Resets this unit to default factory settings. Does not initialize. En 67
-
 1
1 -
2
-
3
-
4
-
5
-
6
-
7
-
8
-
9
-
10
-
11
-
12
-
13
-
14
-
15
-
16
-
17
-
18
-
19
-
20
-
21
-
22
-
23
-
24
-
25
-
26
-
27
-
28
-
29
-
30
-
31
-
32
-
33
-
34
-
35
-
36
-
37
-
38
-
39
-
40
-
41
-
42
-
43
-
44
-
45
-
46
-
47
-
48
-
49
-
50
-
51
-
52
-
53
-
54
-
55
-
56
-
57
-
58
-
59
-
60
-
61
-
 62
62 -
 63
63 -
 64
64 -
 65
65 -
 66
66 -
 67
67 -
 68
68 -
 69
69 -
 70
70 -
 71
71 -
 72
72 -
73
-
74
-
75
-
76
-
77
-
78
-
79
-
80
-
81
-
82
-
83
-
84
-
85
-
86
-
87
-
88
-
89
-
90
-
91
-
92
 |
 |
