Yamaha RX-V567 Owners Manual - Page 25
OPTION, SETUP, ENTER, Cursor, to apply the results - hdmi problem
 |
UPC - 027108935980
View all Yamaha RX-V567 manuals
Add to My Manuals
Save this manual to your list of manuals |
Page 25 highlights
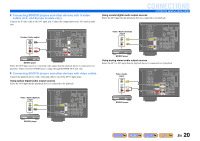
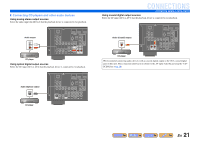
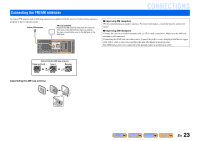
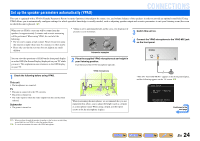
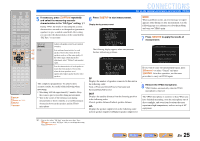
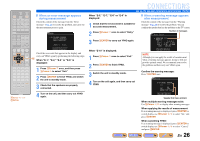
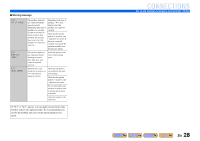
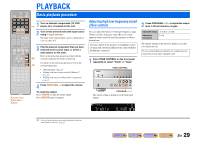
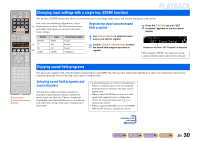
SOURCE 1 1 5 TRANSMIT CODE SET SLEEP RECEIVER HDMI 2 3 4 AV 2 3 4 AUDIO 6 1 2 V-AUX [ A ] [ B ] DOCK TUNER FM AM PRESET TUNING INFO MEMORY MOVIE ENHANCER SUR. DECODE MUSIC STEREO STRAIGHT DIRECT BD DVD SETUP SCENE TV CD RADIO OPTION ENTER VOLUME RETURN DISPLAY TOP MENU REC POP-UP MENU MUTE 1 2 3 4 5 6 7 8 9 INPUT MUTE 0 10 TV TV VOL TV CH ENT i SETUP j Cursor B / D / E j ENTER q OPTION 5 If necessary, press qOPTION repeatedly and select the measuring acoustic characteristics in the "EQ Type" setting. J1 During YPAO, the results of measuring the acoustic characteristics are used to set the equalizer (parametric equalizer) to give a unified sound field. After setting, you can select the characteristics of the sound field in "EQ Type," as necessary. Natural (Default) i Flat q j Front Adjusts all speaker sound to give natural acoustics. Sets uniform characteristics for each speaker. Choose this when all of the speakers used are of the same quality. If the treble range sounds harsh after adjustment, select "Natural" and measure again. Sets the characteristics of each speaker to match the front speakers. Choose this when the front speakers are of significantly higher quality than the other speakers. This completes preparations. To achieve more accurate results, be careful of the following when measuring. • Measuring will take approximately 3 minutes. Keep the room as quiet as possible during measurement. • Wait in the corner of the listening room during measurement or leave it entirely, to avoid becoming an obstruction between the speakers and the YPAO microphone. CONNECTIONS Set up the speaker parameters automatically (YPAO) 6 Press iSETUP to start measurement. Display during measurement Auto Setup ;Initializing . ;Pre Check ;Main Check ;Calculation ;Level Check CH = Front L 02% [ ] :Exit p The following display appears when measurement finishes without any problems. Auto Setup RESULT SP : 3/4/0.1 DIST: 2.50/ 3.00m LVL : -1.0/ +1.5dB . >Set Cancel [p]/[[]:Select [ENTER]:Finish SP Displays the number of speakers connected to this unit in the following order: Total of Front and Center/Total of Surround and Surround Back/Subwoofer DIST Displays the speaker distance from the listening position in the following order: Closest speaker distance/Farthest speaker distance LVL Displays the speaker output levels in the following order: Lowest speaker output level/Highest speaker output level NOTE When a problem occurs, an error message or report appears either during or after measurement. Use the following page as a reference to solve the problem, and carry out YPAO again. 7 Press jENTER to apply the results of measurement. Auto Setup AUTO SETUP Finished Disconnect Microphone PRESS [ENTER] [SETUP]:Exit If you want to carry out measurement again, press jCursor E to select "Cancel" and press jENTER. After this operation, use the same procedure to carry out YPAO again. 8 Remove the YPAO microphone. YPAO finishes automatically when the YPAO microphone is removed. The YPAO microphone is sensitive to heat. When you have finished measuring, store the microphone out of direct sunlight, and away from locations that may experience high temperatures, such as on top of AV equipment. J 1 : You can also select "EQ Type" using the cursor keys. Press jCursor B to select "EQ Type," and you can change the setting using jCursor D / E. En 25
-
 1
1 -
2
-
3
-
4
-
5
-
6
-
7
-
8
-
9
-
10
-
11
-
12
-
13
-
14
-
15
-
16
-
17
-
18
-
19
-
 20
20 -
 21
21 -
 22
22 -
 23
23 -
 24
24 -
 25
25 -
 26
26 -
 27
27 -
 28
28 -
 29
29 -
 30
30 -
31
-
32
-
33
-
34
-
35
-
36
-
37
-
38
-
39
-
40
-
41
-
42
-
43
-
44
-
45
-
46
-
47
-
48
-
49
-
50
-
51
-
52
-
53
-
54
-
55
-
56
-
57
-
58
-
59
-
60
-
61
-
62
-
63
-
64
-
65
-
66
-
67
-
68
-
69
-
70
-
71
-
72
-
73
-
74
-
75
-
76
-
77
-
78
-
79
-
80
-
81
-
82
-
83
-
84
-
85
-
86
-
87
-
88
-
89
-
90
-
91
-
92
 |
 |
