Yamaha RX-V567 Owners Manual - Page 12
U.S.A. and Canada models only, Changing speaker impedance, Connecting speakers
 |
UPC - 027108935980
View all Yamaha RX-V567 manuals
Add to My Manuals
Save this manual to your list of manuals |
Page 12 highlights
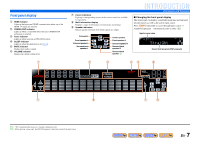
■ (U.S.A. and Canada models only) Changing speaker impedance This unit is configured for 8Ω speakers as the factory setting. When connecting to 6Ω speakers, carry out the following procedure to switch to 6Ω. 1 Switch this unit to the standby mode. 2 Press A while pressing and holding STRAIGHT on the front panel. Release the keys when "ADVANCED SETUP" is displayed on the front panel display. After approximately a few seconds, the top menu items are displayed. J1 A PROGRAM l / h 4 Press STRAIGHT repeatedly to select a "6ΩMIN." 5 Switch this unit to the standby mode, and then switch it on again. The power turns on, when the settings you made has been configured. ■ Connecting speakers 3 2 FRONT 1 4 CONNECTIONS Connecting speakers Connecting the banana plug (Except U.K., Europe, Asia and Korea models) Tighten the knob, and then insert the banana plug into the end of the terminal. FRONT Banana plug YPAO MIC PHONES SILENT CINEMA INFO MEMORY PRESET FM AM INPUT BD DVD SCENE TV CD TONE CONTROL PROGRAM RADIO STRAIGHT STRAIGHT 3 Check that "SP IMP." is displayed on the front panel. SP IMP. -8 MIN 1 Remove approximately 10 mm of insulation from the ends of the speaker cables, and twist the bare wires of the cables together firmly so that they will not cause short circuits. 2 Loosen the speaker terminals. 3 Insert the bare wire of the speaker cable into the gap on the side of the terminal. 4 Tighten the terminal. J 1 : Refer to the "Extended functionality that can be configured as needed (Advanced Setup menu)" (☞p. 66) for details on the Advanced Setup menu. En 12
-
 1
1 -
2
-
3
-
4
-
5
-
6
-
 7
7 -
 8
8 -
 9
9 -
 10
10 -
 11
11 -
 12
12 -
 13
13 -
 14
14 -
 15
15 -
 16
16 -
 17
17 -
18
-
19
-
20
-
21
-
22
-
23
-
24
-
25
-
26
-
27
-
28
-
29
-
30
-
31
-
32
-
33
-
34
-
35
-
36
-
37
-
38
-
39
-
40
-
41
-
42
-
43
-
44
-
45
-
46
-
47
-
48
-
49
-
50
-
51
-
52
-
53
-
54
-
55
-
56
-
57
-
58
-
59
-
60
-
61
-
62
-
63
-
64
-
65
-
66
-
67
-
68
-
69
-
70
-
71
-
72
-
73
-
74
-
75
-
76
-
77
-
78
-
79
-
80
-
81
-
82
-
83
-
84
-
85
-
86
-
87
-
88
-
89
-
90
-
91
-
92
 |
 |
