Yamaha RX-V683 RX-V683 Owner s Manual - Page 10
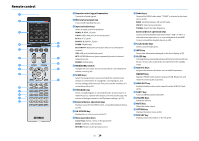
INFO WPS key, ZONE CONTROL key - zone 2 setup
 |
View all Yamaha RX-V683 manuals
Add to My Manuals
Save this manual to your list of manuals |
Page 10 highlights
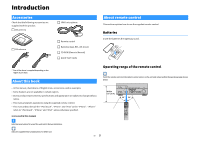
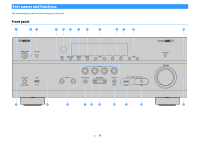
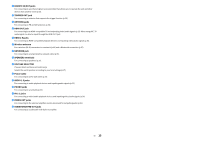
a MAIN ZONE z key Turns on/off (standby) the unit. b Standby indicator Lights up when the unit is in standby mode under any of the following conditions. • HDMI Control is enabled (p.113) • Standby Through is enabled (p.114) • Network Standby is enabled (p.115) c YPAO MIC jack For connecting the supplied YPAO microphone (p.40). d ZONE 2 key Enables/disables the audio output to Zone2 (p.83). e Remote control sensor Receives remote control signals (p.5). f ZONE CONTROL key Changes the zone (main zone or the Zone2) that is controlled by the keys and knobs on the front panel (p.83). g INFO (WPS) key Selects the information displayed on the front display (p.89). Enters the wireless network connection setup (WPS push button configuration) by holding down for 3 seconds (p.48). h MEMORY key Registers FM/AM radio stations (p.64) and USB, Bluetooth, and network content (p.85) as presets. i PRESET keys Select a preset FM/AM radio station (p.64). j FM and AM keys Switch between FM and AM (p.63). k Front display Displays information (p.11). l TUNING keys Select the radio frequency (p.63). m PURE DIRECT key Enables/disables Pure Direct (p.62). n PHONES jack For connecting headphones. o USB jack For connecting a USB storage device (p.69). p INPUT keys Select an input source. q TONE CONTROL key Adjusts the high-frequency range and low-frequency range of output sounds (p.91). En r SCENE keys Select the assigned input source (included the selected radio station or content when it is assigned), sound program, and various settings with one touch. Also, turns on the unit when it is in standby mode (p.56). s PROGRAM keys Select a sound program or a surround decoder (p.57). t STRAIGHT (CONNECT) key Enables/disables the straight decode mode (p.61). Enters MusicCast CONTROLLER registration by holding down for 5 seconds (p.54). u HDMI IN jack For connecting to HDMI-compatible playback devices and inputting video/audio signals (p.33). v AUDIO jack Connect a portable audio player to the unit with a stereo mini-cable (p.33). w VOLUME knob Adjusts the volume. 10
-
 1
1 -
2
-
3
-
4
-
 5
5 -
 6
6 -
 7
7 -
 8
8 -
 9
9 -
 10
10 -
 11
11 -
 12
12 -
 13
13 -
 14
14 -
 15
15 -
16
-
17
-
18
-
19
-
20
-
21
-
22
-
23
-
24
-
25
-
26
-
27
-
28
-
29
-
30
-
31
-
32
-
33
-
34
-
35
-
36
-
37
-
38
-
39
-
40
-
41
-
42
-
43
-
44
-
45
-
46
-
47
-
48
-
49
-
50
-
51
-
52
-
53
-
54
-
55
-
56
-
57
-
58
-
59
-
60
-
61
-
62
-
63
-
64
-
65
-
66
-
67
-
68
-
69
-
70
-
71
-
72
-
73
-
74
-
75
-
76
-
77
-
78
-
79
-
80
-
81
-
82
-
83
-
84
-
85
-
86
-
87
-
88
-
89
-
90
-
91
-
92
-
93
-
94
-
95
-
96
-
97
-
98
-
99
-
100
-
101
-
102
-
103
-
104
-
105
-
106
-
107
-
108
-
109
-
110
-
111
-
112
-
113
-
114
-
115
-
116
-
117
-
118
-
119
-
120
-
121
-
122
-
123
-
124
-
125
-
126
-
127
-
128
-
129
-
130
-
131
-
132
-
133
-
134
-
135
-
136
-
137
-
138
-
139
-
140
-
141
-
142
-
143
-
144
-
145
-
146
-
147
-
148
-
149
-
150
-
151
-
152
 |
 |
