Yamaha RX-V683 RX-V683 Owner s Manual - Page 16
Connecting speakers, Ideal speaker layout, Functions of each speaker
 |
View all Yamaha RX-V683 manuals
Add to My Manuals
Save this manual to your list of manuals |
Page 16 highlights
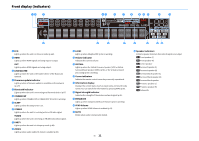
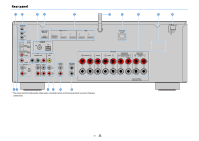
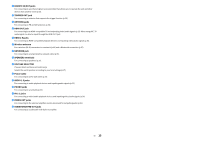
1 Connecting speakers The unit has 7 built-in amplifiers. You can connect 2 to 9 speakers and up to 2 subwoofers to create the favorite acoustic space in your room. You can also apply bi-amp connections or multi-zone configurations to enhance your system (p.23). Caution • Under its default settings, the unit is configured for 8-ohm speakers. When connecting 6-ohm speakers, set the unit's speaker impedance to "6 Ω MIN". In this case, you can also use 4-ohm speakers as the front speakers. For details, see "Setting the speaker impedance" (p.20). Ideal speaker layout E 0.5 to 1 m (1.6 to 3.3 ft) R 0.5 to 1 m (1.6 to 3.3 ft) 1.8 m (5.9 ft) 1 2 1.8 m (5.9 ft) 9 3 9 4 10°~30° 6 10°~30° 7 0.3 m (1 ft) or more 5 Functions of each speaker Speaker type Front (L/R) 12 Center 3 Surround (L/R) 45 Surround back (L/R) 67 Front presence (L/R) ER Subwoofer 9 Function Produce front left/right channel sounds (stereo sounds). Produces center channel sounds (such as movie dialogues and vocals). Produce surround left/right channel sounds. Surround speakers also produce surround back channel sounds when no surround back speakers are connected. Produce surround back left/right channel sounds. Produce CINEMA DSP effect sounds or heights channel sounds of Dolby Atmos and DTS:X contents. Produces LFE (low-frequency effect) channel sounds and reinforces bass parts of other channels. This channel is counted as "0.1". You can connect 2 subwoofers to the unit and place them on the left/right (or front/rear) sides of the room. X • We recommend using front presence speakers to have a full effect of the 3-dimensional sound fields. However, the unit creates Virtual Presence Speaker (VPS) using the front, center and surround speakers to produce 3-dimensional sound fields even when no front presence speakers are connected (p.58). • Use "Ideal speaker layout" (diagram on the left) as reference. You do not need to exactly adjust the speaker layout to this diagram since the YPAO function of the unit will automatically optimize the speaker settings (such as distances) to suit the speaker layout. • When using only one surround back speaker, place it straight behind the listening position (middle of "SBL" and "SBR" in the diagram). En 16
-
 1
1 -
2
-
3
-
4
-
5
-
6
-
7
-
8
-
9
-
10
-
 11
11 -
 12
12 -
 13
13 -
 14
14 -
 15
15 -
 16
16 -
 17
17 -
 18
18 -
 19
19 -
 20
20 -
 21
21 -
22
-
23
-
24
-
25
-
26
-
27
-
28
-
29
-
30
-
31
-
32
-
33
-
34
-
35
-
36
-
37
-
38
-
39
-
40
-
41
-
42
-
43
-
44
-
45
-
46
-
47
-
48
-
49
-
50
-
51
-
52
-
53
-
54
-
55
-
56
-
57
-
58
-
59
-
60
-
61
-
62
-
63
-
64
-
65
-
66
-
67
-
68
-
69
-
70
-
71
-
72
-
73
-
74
-
75
-
76
-
77
-
78
-
79
-
80
-
81
-
82
-
83
-
84
-
85
-
86
-
87
-
88
-
89
-
90
-
91
-
92
-
93
-
94
-
95
-
96
-
97
-
98
-
99
-
100
-
101
-
102
-
103
-
104
-
105
-
106
-
107
-
108
-
109
-
110
-
111
-
112
-
113
-
114
-
115
-
116
-
117
-
118
-
119
-
120
-
121
-
122
-
123
-
124
-
125
-
126
-
127
-
128
-
129
-
130
-
131
-
132
-
133
-
134
-
135
-
136
-
137
-
138
-
139
-
140
-
141
-
142
-
143
-
144
-
145
-
146
-
147
-
148
-
149
-
150
-
151
-
152
 |
 |
