Yamaha RX-V683 RX-V683 Owner s Manual - Page 33
Connecting audio devices (such as CD players), Connecting to the jacks on the front panel
 |
View all Yamaha RX-V683 manuals
Add to My Manuals
Save this manual to your list of manuals |
Page 33 highlights
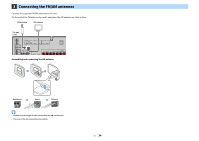
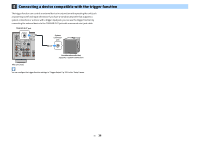
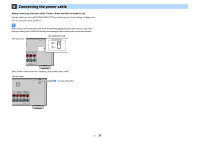
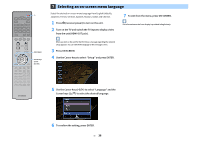
Connecting audio devices (such as CD players) Connect audio devices such as CD players, MD players, and a turntable to the unit. Depending on the audio output jacks available on your audio device, choose one of the following connections. Audio output jacks on audio device Digital optical Digital coaxial Analog stereo Turntable (PHONO) Audio input jacks on the unit AUDIO 1-2 (OPTICAL) AV 1 (COAXIAL) AUDIO 3 (COAXIAL) AV 2 (AUDIO) AUDIO 4-5 PHONO The unit (rear) AV 1-2 jacks AUDIO 1-5 jacks Audio output (either digital optical, digital coaxial, or analog stereo) TRIGGER OUT 12V 0.1A IN OUT REMOTE AUDIO 1 (2 TV) OPTICAL AUDIO 2 OPTICAL AUDIO 3 COAXIAL COAXIAL Y PHONO GND HDMI OUT (HDCP2.2) HDMI (HDCP2.2) 1 2 3 4 ARC (1 BD/DVD) ANTENNA (4 RADIO) FM AM O OPTICAL AV 1 COMPONENT VIDEO AV 2 VIDEO COAXIAL PB PR AUDIO 4 AUDIO 5 C ZONE OUT ZONE 2 PRE OUT SUBWOOFER 1 L 2 R PHONO L GND R PHONO jacks Ground lead O C L R OPTICAL COAXIAL L R Audio device PHONO L L R R GND Turntable Audio output (PHONO) If you select the input source by pressing AV 1-2, AUDIO or PHONO, the audio played back on the audio device will be output from the unit. When connecting a turntable • The PHONO jack of the unit is compatible with an MM cartridge. To connect a turntable with a low-output MC cartridge, use a boosting transformer. • Connecting the turntable to the GND terminal of the unit may reduce noise in the signal. Connecting to the jacks on the front panel Use the VIDEO AUX jack to temporarily connect a playback device to the unit. Before making a connection, stop playback on the device and turn down the volume on the unit. Connect an HDMI-compatible device (such as game consoles and camcorders) to the unit with an HDMI cable. Connect a portable audio player to the unit with a stereo mini-cable. INPUT SCENE 1 2 3 TONE CONTROL PROGRAM 4 STRAIGHT (CONNECT) VIDEO AUX HDMI IN HDMI AUDIO VOLUME The unit (front) Game console Camcorder Portable audio player If you select "VIDEO AUX" as the input source by pressing V-AUX, the video/audio played back on the device will be output from the unit. Y You need to prepare an HDMI cable or audio cable that match the output jacks on your device. En 33
-
 1
1 -
2
-
3
-
4
-
5
-
6
-
7
-
8
-
9
-
10
-
11
-
12
-
13
-
14
-
15
-
16
-
17
-
18
-
19
-
20
-
21
-
22
-
23
-
24
-
25
-
26
-
27
-
 28
28 -
 29
29 -
 30
30 -
 31
31 -
 32
32 -
 33
33 -
 34
34 -
 35
35 -
 36
36 -
 37
37 -
 38
38 -
39
-
40
-
41
-
42
-
43
-
44
-
45
-
46
-
47
-
48
-
49
-
50
-
51
-
52
-
53
-
54
-
55
-
56
-
57
-
58
-
59
-
60
-
61
-
62
-
63
-
64
-
65
-
66
-
67
-
68
-
69
-
70
-
71
-
72
-
73
-
74
-
75
-
76
-
77
-
78
-
79
-
80
-
81
-
82
-
83
-
84
-
85
-
86
-
87
-
88
-
89
-
90
-
91
-
92
-
93
-
94
-
95
-
96
-
97
-
98
-
99
-
100
-
101
-
102
-
103
-
104
-
105
-
106
-
107
-
108
-
109
-
110
-
111
-
112
-
113
-
114
-
115
-
116
-
117
-
118
-
119
-
120
-
121
-
122
-
123
-
124
-
125
-
126
-
127
-
128
-
129
-
130
-
131
-
132
-
133
-
134
-
135
-
136
-
137
-
138
-
139
-
140
-
141
-
142
-
143
-
144
-
145
-
146
-
147
-
148
-
149
-
150
-
151
-
152
 |
 |
