Yamaha V665 Owners Manual - Page 96
RX-V665/V565/V465
 |
UPC - 027108933061
View all Yamaha V665 manuals
Add to My Manuals
Save this manual to your list of manuals |
Page 96 highlights
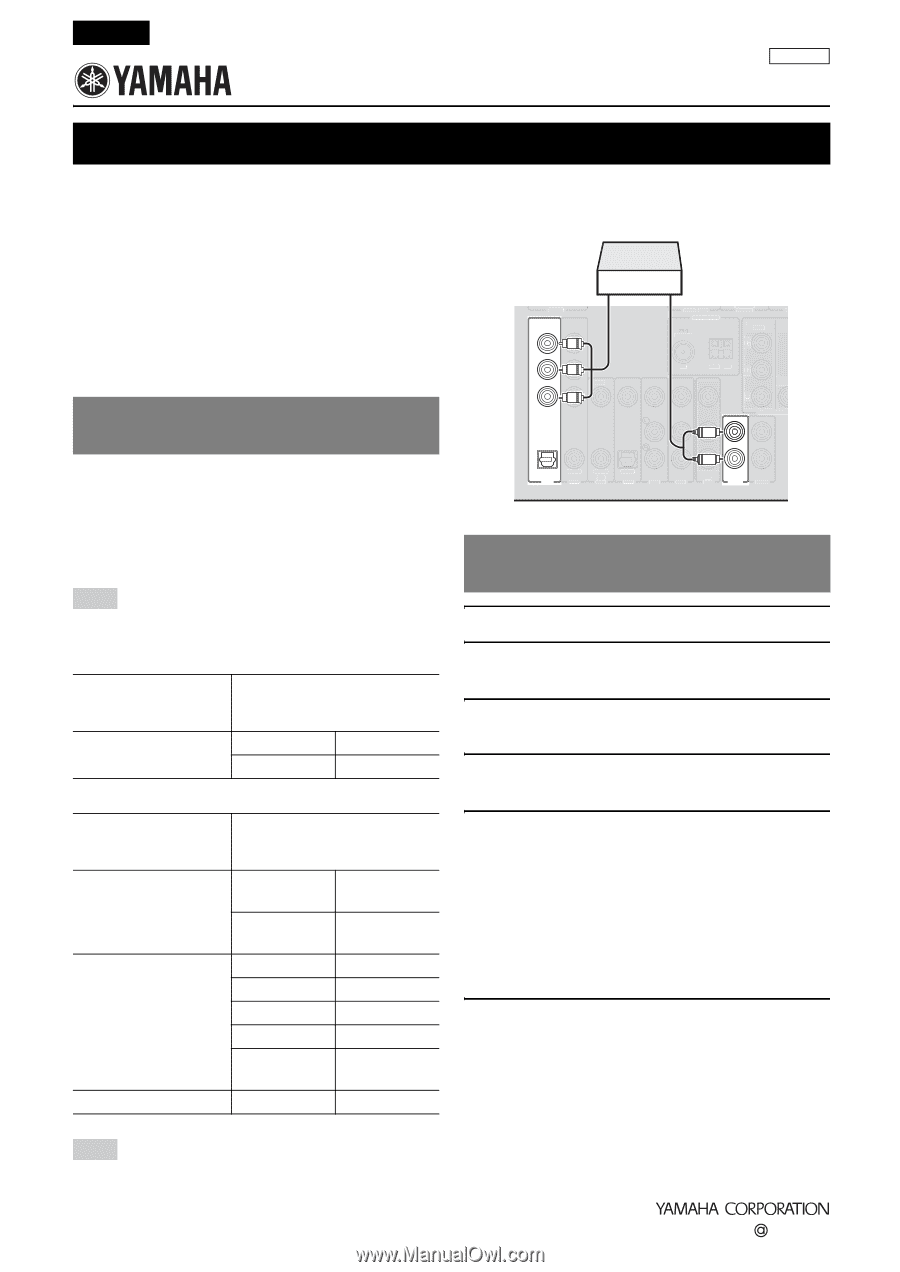
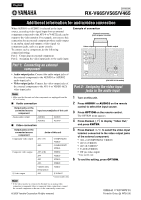
English UCRABGLEF RX-V665/V565/V465 Additional information for audio/video connection When AUDIO1 or AUDIO2 is selected as the input source, an analog video signal input from an external component connected to the AV1-6 or V-AUX jack can be output to the video monitor. For example, you can use this connection for an external component whose audio output is an analog signal and outputs a video signal via component jacks, such as a game console. To connect such a component, do the following connection/setting. Part 1: Connecting an external component Part 2: Assigning the video input jacks to the audio input Part 1: Connecting an external component • Audio output jacks: Connect the audio output jacks of the external component to the AUDIO1 or AUDIO2 audio input jacks. • Video output jacks: Connect the video output jacks of the external component to the AV1-6 or VIDEO AUX video input jacks. Note • Make sure that this unit and other components are unplugged from the AC wall outlets. ■ Audio connection Output jacks on the connected source component Analog audio output Input sources/jacks of this unit AUDIO1 AUDIO2 AUDIO AUDIO ■ Video connection Output jacks on the connected source component Jacks of this unit Component video output AV1 (TV) COMPONENT VIDEO AV2 COMPONENT VIDEO Composite video output AV3 (CD) VIDEO AV4 VIDEO AV5 VIDEO AV6 VIDEO VIDEO AUX (Front panel) VIDEO S-Video output AV5 S-VIDEO* * Some models only. Note • If the video monitor is connected to this unit via an analog video connection (component video or composite video connection), connect the external component to this unit via the same analog connection. Example of connection External component (such as game console) Video output DOCK COMPONENT VIDEO PR PR PB PB VIDEO Y Y Audio output HDMI OUT ANTENNA UNBAL. (BD/DVD) HDMI 1 H COMPONENT VIDEO PR FM GND AM PB VID Y MONITOR OU L OPTICAL ( TV ) AV 1 COAXIAL AV 2 COAXIAL (CD) AV 3 OPTICAL AV 4 AV 5 AV 6 R AV OUT AUDIO1 AUDIO2 (RX-V665 U.S.A.model) Part 2: Assigning the video input jacks to the audio input 1 Turn on this unit. 2 Press AUDIO1 or AUDIO2 on the remote control to select the input source. 3 Press OPTION on the remote control. The OPTION menu appears. 4 Press Cursor k / n to display "Video Out," and press ENTER. 5 Press Cursor l / h to select the video input terminal connected to the video output jacks of the external component. • AV1-2 (COMPONENT VIDEO) • AV3-6 (VIDEO) • AV5 (S-VIDEO)* • V-AUX (VIDEO) • Off (no video input) * Some models only. 6 To end the setting, press OPTION. © 2009 Yamaha Corporation All rights reserved. Printed in China WT51530
-
 1
1 -
2
-
3
-
4
-
5
-
6
-
7
-
8
-
9
-
10
-
11
-
12
-
13
-
14
-
15
-
16
-
17
-
18
-
19
-
20
-
21
-
22
-
23
-
24
-
25
-
26
-
27
-
28
-
29
-
30
-
31
-
32
-
33
-
34
-
35
-
36
-
37
-
38
-
39
-
40
-
41
-
42
-
43
-
44
-
45
-
46
-
47
-
48
-
49
-
50
-
51
-
52
-
53
-
54
-
55
-
56
-
57
-
58
-
59
-
60
-
61
-
62
-
63
-
64
-
65
-
66
-
67
-
68
-
69
-
70
-
71
-
72
-
73
-
74
-
75
-
76
-
77
-
78
-
79
-
80
-
81
-
82
-
83
-
84
-
85
-
86
-
87
-
88
-
89
-
90
-
 91
91 -
 92
92 -
 93
93 -
 94
94 -
 95
95 -
 96
96
 |
 |