Zanussi ZCG551GNC Product Manaul - Page 6
Before first use
 |
View all Zanussi ZCG551GNC manuals
Add to My Manuals
Save this manual to your list of manuals |
Page 6 highlights
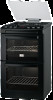
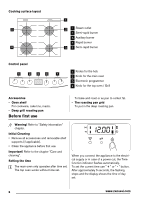
Cooking surface layout 5 4 1 2 1 Steam outlet 2 Semi-rapid burner 3 Auxiliary burner 4 Rapid burner 3 5 Semi-rapid burner Control panel 1 2 3 4 1 1 Knobs for the hob 2 Knob for the main oven 3 Electronic programmer 4 Knob for the top oven / Grill Accessories • Oven shelf For cookware, cake tins, roasts. • Deep grill roasting pan Before first use To bake and roast or as pan to collect fat. • The roasting pan grid To put in the deep roasting pan. Warning! Refer to "Safety information" chapter. Initial Cleaning • Remove all accessories and removable shelf supports (if applicable). • Clean the appliance before first use. Important! Refer to the chapter "Care and cleaning". Setting the time The main oven only operates after time set. The top oven works without time set. When you connect the appliance to the electrical supply or in case of a power cut, the Time function indicator flashes automatically. To set the current time use " + " or " - " button. After approximately 5 seconds, the flashing stops and the display shows the time of day set. 6 www.zanussi.com
-
 1
1 -
 2
2 -
 3
3 -
 4
4 -
 5
5 -
 6
6 -
 7
7 -
 8
8 -
 9
9 -
 10
10 -
 11
11 -
 12
12 -
13
-
14
-
15
-
16
-
17
-
18
-
19
-
20
-
21
-
22
-
23
-
24
-
25
-
26
-
27
-
28
 |
 |
