2006 Lexus IS 350 Navigation Manual - Page 38
2006 Lexus IS 350 Manual
Page 38 highlights
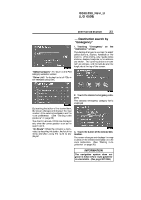
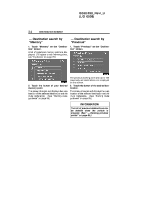
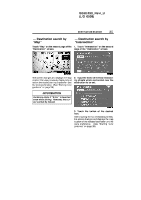
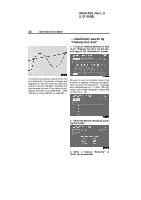
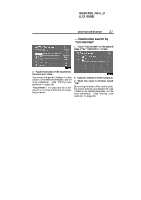
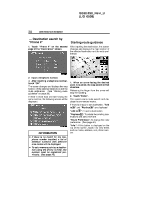
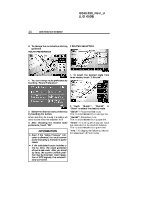
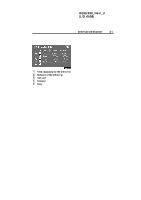
IS350/250_Navi_U (L/O 0508) 38 DESTINATION SEARCH - Destination search by "Phone #" 1. Touch "Phone #" on the second page of the "Destination" screen. Starting route guidance After inputting the destination, the screen changes and displays the map location of the selected destination and the route preference. 2. Input a telephone number. 3. After inputting a telephone number, touch "OK". The screen changes and displays the map location of the selected destination and the route preference. (See "Starting route guidance" on page 38.) If there is more than one site having the same number, the following screen will be displayed. 1. When an arrow facing the desired point is touched, the map scrolls in that direction. Releasing the finger from the arrow will stop the scrolling. 2. Touch "Enter". The system starts route search and displays recommended routes. If there is already a set destination, "Add to " and "Replace " are displayed. "Add to ": To add a destination. "Replace ": To delete the existing destinations and set a new one. "Route Preference": To change the route preference. (See page 40.) "Info.": If this button is displayed on the top of the screen, touch it to view items such as name, address, and phone number. INFORMATION D If there is no match for the telephone number inputted, a list of identical numbers with different area codes will be displayed. D To set a memory point as a destination using the phone number, the number must be registered previously. (See page 76.)
-
 1
1 -
2
-
3
-
4
-
5
-
6
-
7
-
8
-
9
-
10
-
11
-
12
-
13
-
14
-
15
-
16
-
17
-
18
-
19
-
20
-
21
-
22
-
23
-
24
-
25
-
26
-
27
-
28
-
29
-
30
-
31
-
32
-
 33
33 -
 34
34 -
 35
35 -
 36
36 -
 37
37 -
 38
38 -
 39
39 -
 40
40 -
 41
41 -
 42
42 -
 43
43 -
44
-
45
-
46
-
47
-
48
-
49
-
50
-
51
-
52
-
53
-
54
-
55
-
56
-
57
-
58
-
59
-
60
-
61
-
62
-
63
-
64
-
65
-
66
-
67
-
68
-
69
-
70
-
71
-
72
-
73
-
74
-
75
-
76
-
77
-
78
-
79
-
80
-
81
-
82
-
83
-
84
-
85
-
86
-
87
-
88
-
89
-
90
-
91
-
92
-
93
-
94
-
95
-
96
-
97
-
98
-
99
-
100
-
101
-
102
-
103
-
104
-
105
-
106
-
107
-
108
-
109
-
110
-
111
-
112
-
113
-
114
-
115
-
116
-
117
-
118
-
119
-
120
-
121
-
122
-
123
-
124
-
125
-
126
-
127
-
128
-
129
-
130
-
131
-
132
-
133
-
134
-
135
-
136
-
137
-
138
-
139
-
140
-
141
-
142
-
143
-
144
-
145
-
146
-
147
-
148
-
149
-
150
-
151
-
152
-
153
-
154
-
155
-
156
-
157
-
158
-
159
-
160
-
161
-
162
-
163
-
164
-
165
-
166
-
167
-
168
-
169
-
170
-
171
-
172
-
173
-
174
-
175
-
176
-
177
-
178
-
179
-
180
-
181
-
182
-
183
-
184
-
185
-
186
-
187
-
188
-
189
-
190
-
191
-
192
-
193
-
194
-
195
-
196
-
197
-
198
-
199
-
200
-
201
-
202
-
203
-
204
-
205
-
206
-
207
-
208
-
209
-
210
-
211
-
212
-
213
-
214
-
215
-
216
-
217
-
218
-
219
-
220
-
221
-
222
-
223
-
224
-
225
-
226
-
227
-
228
-
229
-
230
-
231
-
232
-
233
-
234
-
235
-
236
-
237
-
238
-
239
-
240
-
241
-
242
-
243
-
244
-
245
-
246
-
247
-
248
-
249
-
250
-
251
-
252
-
253
-
254
-
255
-
256
-
257
-
258
-
259
-
260
-
261
-
262
-
263
-
264
-
265
-
266
-
267
-
268
-
269
-
270
-
271
-
272
-
273
-
274
-
275
-
276
-
277
-
278
 |
 |
