1997 Pontiac Grand Am Owner's Manual - Page 150
1997 Pontiac Grand Am Manual
Page 150 highlights
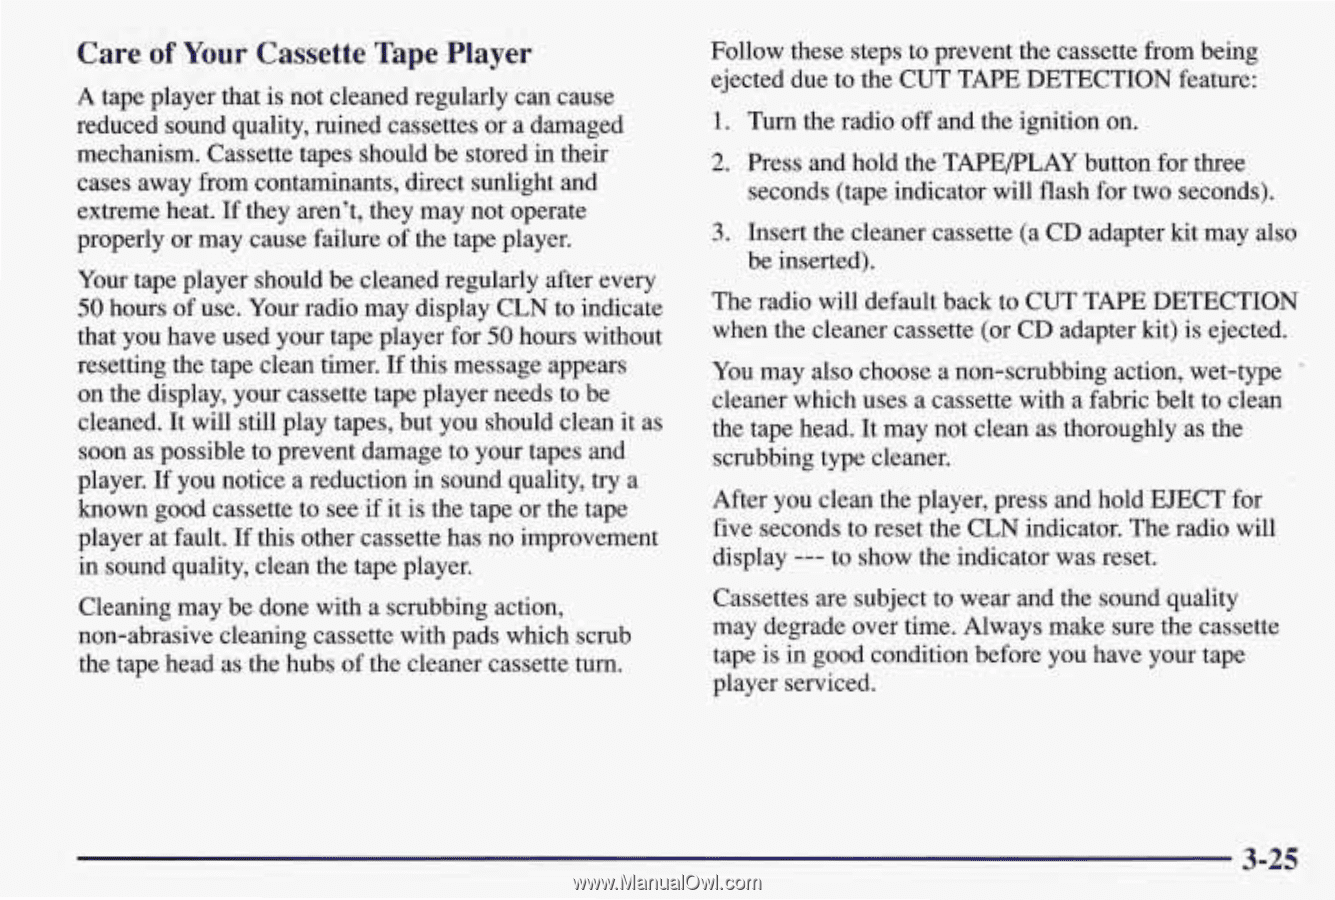
Care of Your Cassette Tape Player A tape player that not cleanedregularly can cause is reduced sound quality, ruined cassettes or a damaged mechanism. Cassette tapes should be stored in their cases away from contaminants, direct sunlight and extreme heat. If they aren't, they may not operate properly or may cause failure of the tape player. Your tape player should be cleaned regularly after every 50 hours of use. Your radio may display CLN to indicate that you have used your player for 50 hours without tape resetting the tape clean timer. If this message appears on the display, your cassette tape player needs to be cleaned. It will still play tapes, but you should cleanit as soon aspossible to prevent damage to your tapes and player. If you notice a reduction in sound quality, try a known goodcassette to see if it is thetape orthe tape player at fault. If this other cassette has no improvement in sound quality, clean the tape player. Cleaning may bedone with a scrubbing action, non-abrasive cleaning cassette with pads which scrub the tape head asthe hubs of the cleaner cassette turn. Follow these steps to prevent thecassette from being ejected due to the CUT TAPE DETECTIONfeature: 1. Turn the radio off and the ignition on. 2. Press and hold the TAPEPLAYbutton for three seconds (tapeindicator will flash fortwo seconds). 3. Insert the cleaner cassette (a CD adapter kit may also be inserted). The radio will default back to CUT TAPE DETECTION when the cleaner cassette (or CD adapter kit) is ejected. You may also choose a non-scrubbing action, wet-type cleaner which uses a cassette with a fabric belt to clean the tape head.It may not clean as thoroughly as the scrubbing type cleaner. After you clean theplayer, press and holdEJECT for five seconds to reset the CLN indicator.The radio will display --- to show the indicator was reset. Cassettes are subject to wear andthe sound quality may degrade over time. Always make sure the cassette tape is in good condition before you have your tape player serviced. 3-25
-
 1
1 -
2
-
3
-
4
-
5
-
6
-
7
-
8
-
9
-
10
-
11
-
12
-
13
-
14
-
15
-
16
-
17
-
18
-
19
-
20
-
21
-
22
-
23
-
24
-
25
-
26
-
27
-
28
-
29
-
30
-
31
-
32
-
33
-
34
-
35
-
36
-
37
-
38
-
39
-
40
-
41
-
42
-
43
-
44
-
45
-
46
-
47
-
48
-
49
-
50
-
51
-
52
-
53
-
54
-
55
-
56
-
57
-
58
-
59
-
60
-
61
-
62
-
63
-
64
-
65
-
66
-
67
-
68
-
69
-
70
-
71
-
72
-
73
-
74
-
75
-
76
-
77
-
78
-
79
-
80
-
81
-
82
-
83
-
84
-
85
-
86
-
87
-
88
-
89
-
90
-
91
-
92
-
93
-
94
-
95
-
96
-
97
-
98
-
99
-
100
-
101
-
102
-
103
-
104
-
105
-
106
-
107
-
108
-
109
-
110
-
111
-
112
-
113
-
114
-
115
-
116
-
117
-
118
-
119
-
120
-
121
-
122
-
123
-
124
-
125
-
126
-
127
-
128
-
129
-
130
-
131
-
132
-
133
-
134
-
135
-
136
-
137
-
138
-
139
-
140
-
141
-
142
-
143
-
144
-
 145
145 -
 146
146 -
 147
147 -
 148
148 -
 149
149 -
 150
150 -
 151
151 -
 152
152 -
 153
153 -
 154
154 -
 155
155 -
156
-
157
-
158
-
159
-
160
-
161
-
162
-
163
-
164
-
165
-
166
-
167
-
168
-
169
-
170
-
171
-
172
-
173
-
174
-
175
-
176
-
177
-
178
-
179
-
180
-
181
-
182
-
183
-
184
-
185
-
186
-
187
-
188
-
189
-
190
-
191
-
192
-
193
-
194
-
195
-
196
-
197
-
198
-
199
-
200
-
201
-
202
-
203
-
204
-
205
-
206
-
207
-
208
-
209
-
210
-
211
-
212
-
213
-
214
-
215
-
216
-
217
-
218
-
219
-
220
-
221
-
222
-
223
-
224
-
225
-
226
-
227
-
228
-
229
-
230
-
231
-
232
-
233
-
234
-
235
-
236
-
237
-
238
-
239
-
240
-
241
-
242
-
243
-
244
-
245
-
246
-
247
-
248
-
249
-
250
-
251
-
252
-
253
-
254
-
255
-
256
-
257
-
258
-
259
-
260
-
261
-
262
-
263
-
264
-
265
-
266
-
267
-
268
-
269
-
270
-
271
-
272
-
273
-
274
-
275
-
276
-
277
-
278
-
279
-
280
-
281
-
282
-
283
-
284
-
285
-
286
-
287
-
288
-
289
-
290
-
291
-
292
-
293
-
294
-
295
-
296
-
297
-
298
-
299
-
300
-
301
-
302
-
303
-
304
-
305
-
306
-
307
-
308
-
309
-
310
-
311
-
312
-
313
-
314
-
315
-
316
-
317
-
318
-
319
-
320
-
321
-
322
-
323
-
324
-
325
-
326
-
327
-
328
-
329
-
330
-
331
-
332
-
333
-
334
-
335
-
336
-
337
-
338
-
339
-
340
-
341
-
342
-
343
-
344
-
345
-
346
-
347
-
348
-
349
-
350
-
351
-
352
-
353
-
354
-
355
-
356
-
357
-
358
-
359
-
360
-
361
-
362
-
363
-
364
-
365
-
366
-
367
-
368
-
369
-
370
-
371
 |
 |