2008 Subaru Tribeca Owner's Manual - Page 196
2008 Subaru Tribeca Manual

Page 196 highlights
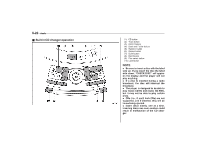
5-20 Audio ! XMTM satellite radio XMTM is a continental U.S. based satellite radio service that offers more than 160 coast to coast channels, including music, news, sports, talk and children's programming. XMTM provides digital quality audio and text information, including song title and artist name. A service fee is required to receive the XMTM service. For more information, contact your SUBARU dealer or XMTM at w w w. x m r a d i o . c o m o r c a l l 1 - 8 0 0 XMRADIO (1-800-967-2346) for U.S. www.xmradio.ca or call 1-877-GET-XMSR (1-877-438-9677) for Canada. ! Satellite radio reception Satellite radio signals are best received in areas with a clear view of the open sky. In areas where there are tall buildings, trees, tunnels or other structures that may obstruct the signal of the satellites, there may be signal interruptions. Other circumstances that may result in signal loss include driving near a wall, steep cliff or hill, or driving on the lower level of a multitiered road or inside a parking garage. To help reduce this condition, satellite radio providers have installed groundbased repeaters in heavily populated areas. However, you may still experience reception problems in some areas. ! Displaying satellite radio ID of tuner When you activate satellite radio, you should have your satellite radio tuner ID ready because each tuner is identified by its unique satellite radio tuner ID. The satellite radio ID will be needed when you activate satellite radio and receive satellite radio customer support. The satellite radio ID can be found on the audio display by tuning the channel to "0". Turn the "TUNE/TRACK" button (4) to select the satellite radio channel. ! Band selection button Push the "SAT" button (1) when the radio is off to turn on the radio. Push the "SAT" button when the radio is on to select SAT1, SAT2 or SAT3 reception. ! Channel selection Press " " of the TUNE TRACK button (4) to select the next channel and press " " of the button to select the previous channel. Keep pressing " " of the button to change to the next channel continuously and keep pressing " " of the button to change to the previous channel continuously. ! Category selection Press " " or " " of the SEEK FLDR button (7) to display the current category. Press " " again to select the next category, and press " " again to select the previous category. ! Channel scan Press the "SCAN" button (8) to change the radio to the SCAN mode. In this mode, the radio scans through the channels until a station is found. The radio will stop at the station for 5 seconds while displaying the channel number, after which scanning will continue until the entire channel has been scanned from the low end to the high end. Also during the category selection, channel scan can be performed in that category. Press the "SCAN" button again to cancel the SCAN mode and to stop on any displayed channel. ! Selecting preset channels Presetting a channel with a preset button (10) allows you to select that channel in a single operation. Up to six, SAT1, SAT2 and SAT3 channels each may be preset. ! How to preset channels 1. Press the "SAT" button (1) to select SAT1, SAT2 and SAT3 reception.
-
 1
1 -
2
-
3
-
4
-
5
-
6
-
7
-
8
-
9
-
10
-
11
-
12
-
13
-
14
-
15
-
16
-
17
-
18
-
19
-
20
-
21
-
22
-
23
-
24
-
25
-
26
-
27
-
28
-
29
-
30
-
31
-
32
-
33
-
34
-
35
-
36
-
37
-
38
-
39
-
40
-
41
-
42
-
43
-
44
-
45
-
46
-
47
-
48
-
49
-
50
-
51
-
52
-
53
-
54
-
55
-
56
-
57
-
58
-
59
-
60
-
61
-
62
-
63
-
64
-
65
-
66
-
67
-
68
-
69
-
70
-
71
-
72
-
73
-
74
-
75
-
76
-
77
-
78
-
79
-
80
-
81
-
82
-
83
-
84
-
85
-
86
-
87
-
88
-
89
-
90
-
91
-
92
-
93
-
94
-
95
-
96
-
97
-
98
-
99
-
100
-
101
-
102
-
103
-
104
-
105
-
106
-
107
-
108
-
109
-
110
-
111
-
112
-
113
-
114
-
115
-
116
-
117
-
118
-
119
-
120
-
121
-
122
-
123
-
124
-
125
-
126
-
127
-
128
-
129
-
130
-
131
-
132
-
133
-
134
-
135
-
136
-
137
-
138
-
139
-
140
-
141
-
142
-
143
-
144
-
145
-
146
-
147
-
148
-
149
-
150
-
151
-
152
-
153
-
154
-
155
-
156
-
157
-
158
-
159
-
160
-
161
-
162
-
163
-
164
-
165
-
166
-
167
-
168
-
169
-
170
-
171
-
172
-
173
-
174
-
175
-
176
-
177
-
178
-
179
-
180
-
181
-
182
-
183
-
184
-
185
-
186
-
187
-
188
-
189
-
190
-
 191
191 -
 192
192 -
 193
193 -
 194
194 -
 195
195 -
 196
196 -
 197
197 -
 198
198 -
 199
199 -
 200
200 -
 201
201 -
202
-
203
-
204
-
205
-
206
-
207
-
208
-
209
-
210
-
211
-
212
-
213
-
214
-
215
-
216
-
217
-
218
-
219
-
220
-
221
-
222
-
223
-
224
-
225
-
226
-
227
-
228
-
229
-
230
-
231
-
232
-
233
-
234
-
235
-
236
-
237
-
238
-
239
-
240
-
241
-
242
-
243
-
244
-
245
-
246
-
247
-
248
-
249
-
250
-
251
-
252
-
253
-
254
-
255
-
256
-
257
-
258
-
259
-
260
-
261
-
262
-
263
-
264
-
265
-
266
-
267
-
268
-
269
-
270
-
271
-
272
-
273
-
274
-
275
-
276
-
277
-
278
-
279
-
280
-
281
-
282
-
283
-
284
-
285
-
286
-
287
-
288
-
289
-
290
-
291
-
292
-
293
-
294
-
295
-
296
-
297
-
298
-
299
-
300
-
301
-
302
-
303
-
304
-
305
-
306
-
307
-
308
-
309
-
310
-
311
-
312
-
313
-
314
-
315
-
316
-
317
-
318
-
319
-
320
-
321
-
322
-
323
-
324
-
325
-
326
-
327
-
328
-
329
-
330
-
331
-
332
-
333
-
334
-
335
-
336
-
337
-
338
-
339
-
340
-
341
-
342
-
343
-
344
-
345
-
346
-
347
-
348
-
349
-
350
-
351
-
352
-
353
-
354
-
355
-
356
-
357
-
358
-
359
-
360
-
361
-
362
-
363
-
364
-
365
-
366
-
367
-
368
-
369
-
370
-
371
-
372
-
373
-
374
-
375
-
376
-
377
-
378
-
379
-
380
-
381
-
382
-
383
-
384
-
385
-
386
-
387
-
388
-
389
-
390
-
391
-
392
-
393
-
394
-
395
-
396
-
397
-
398
-
399
-
400
-
401
-
402
-
403
-
404
-
405
-
406
-
407
-
408
-
409
 |
 |