2011 Subaru Tribeca Owner's Manual - Page 167
2011 Subaru Tribeca Manual
Page 167 highlights
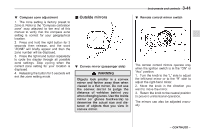
3-38 Instruments and controls Gear position Period of time multifunction button is pressed Briefly Function displayed Rear view display ON/OFF* Help lines indication ON/OFF Auto-dimming function ON/OFF* Electronic compass display ON/ OFF Enter the compass zone setting mode Enter the compass calibration mode R (reverse) More than 3 seconds Except R (reverse) Briefly 3 to 6 seconds 6 to 9 seconds 9 to 12 seconds For precautions about the rear view camera and the rear view image, refer to "Rear view camera" F6-21. ! Auto-dimming function The auto-dimming function is an anti-glare capability which automatically reduces glare coming from headlights of vehicles behind you. By briefly pressing the multifunction button, the auto-dimming function is toggled on or off. When the auto-dimming function is on, the auto dimming indicator light (green) will illuminate. Even with the mirror in anti-glare mode, the mirror surface turns bright if the transmission is shifted into reverse. This is to ensure good rearward visibility during reversing. 1) 2) 3) 4) 5) *: The setting returns to "ON" as a default setting every time the ignition switch is turned to the "ON" position. Vehicle width line (oblique vertical line) Approx. 10 feet (3 m) from the bumper (green horizontal line) Approx. 6.5 feet (2 m) from the bumper (green horizontal line) Approx. 3 feet (1 m) from the bumper (yellow horizontal line) Approx. 1.5 feet (0.5 m) from the bumper (red horizontal line) ! Rear view image display When the ignition switch is "ON" and the select lever is set to "R", the rear view camera automatically displays the rear view image behind the vehicle on the inside mirror. Also, the following help lines are indicated as a guide to help you realize the actual distance from the display. These help lines are removable. To remove the help lines, perform the following procedure. 1. Display the rear view image on the mirror. 2. Press the multifunction button for more than 3 seconds to remove the help lines. To display the help lines, press the multifunction button for more than 3 seconds.
-
 1
1 -
2
-
3
-
4
-
5
-
6
-
7
-
8
-
9
-
10
-
11
-
12
-
13
-
14
-
15
-
16
-
17
-
18
-
19
-
20
-
21
-
22
-
23
-
24
-
25
-
26
-
27
-
28
-
29
-
30
-
31
-
32
-
33
-
34
-
35
-
36
-
37
-
38
-
39
-
40
-
41
-
42
-
43
-
44
-
45
-
46
-
47
-
48
-
49
-
50
-
51
-
52
-
53
-
54
-
55
-
56
-
57
-
58
-
59
-
60
-
61
-
62
-
63
-
64
-
65
-
66
-
67
-
68
-
69
-
70
-
71
-
72
-
73
-
74
-
75
-
76
-
77
-
78
-
79
-
80
-
81
-
82
-
83
-
84
-
85
-
86
-
87
-
88
-
89
-
90
-
91
-
92
-
93
-
94
-
95
-
96
-
97
-
98
-
99
-
100
-
101
-
102
-
103
-
104
-
105
-
106
-
107
-
108
-
109
-
110
-
111
-
112
-
113
-
114
-
115
-
116
-
117
-
118
-
119
-
120
-
121
-
122
-
123
-
124
-
125
-
126
-
127
-
128
-
129
-
130
-
131
-
132
-
133
-
134
-
135
-
136
-
137
-
138
-
139
-
140
-
141
-
142
-
143
-
144
-
145
-
146
-
147
-
148
-
149
-
150
-
151
-
152
-
153
-
154
-
155
-
156
-
157
-
158
-
159
-
160
-
161
-
 162
162 -
 163
163 -
 164
164 -
 165
165 -
 166
166 -
 167
167 -
 168
168 -
 169
169 -
 170
170 -
 171
171 -
 172
172 -
173
-
174
-
175
-
176
-
177
-
178
-
179
-
180
-
181
-
182
-
183
-
184
-
185
-
186
-
187
-
188
-
189
-
190
-
191
-
192
-
193
-
194
-
195
-
196
-
197
-
198
-
199
-
200
-
201
-
202
-
203
-
204
-
205
-
206
-
207
-
208
-
209
-
210
-
211
-
212
-
213
-
214
-
215
-
216
-
217
-
218
-
219
-
220
-
221
-
222
-
223
-
224
-
225
-
226
-
227
-
228
-
229
-
230
-
231
-
232
-
233
-
234
-
235
-
236
-
237
-
238
-
239
-
240
-
241
-
242
-
243
-
244
-
245
-
246
-
247
-
248
-
249
-
250
-
251
-
252
-
253
-
254
-
255
-
256
-
257
-
258
-
259
-
260
-
261
-
262
-
263
-
264
-
265
-
266
-
267
-
268
-
269
-
270
-
271
-
272
-
273
-
274
-
275
-
276
-
277
-
278
-
279
-
280
-
281
-
282
-
283
-
284
-
285
-
286
-
287
-
288
-
289
-
290
-
291
-
292
-
293
-
294
-
295
-
296
-
297
-
298
-
299
-
300
-
301
-
302
-
303
-
304
-
305
-
306
-
307
-
308
-
309
-
310
-
311
-
312
-
313
-
314
-
315
-
316
-
317
-
318
-
319
-
320
-
321
-
322
-
323
-
324
-
325
-
326
-
327
-
328
-
329
-
330
-
331
-
332
-
333
-
334
-
335
-
336
-
337
-
338
-
339
-
340
-
341
-
342
-
343
-
344
-
345
-
346
-
347
-
348
-
349
-
350
-
351
-
352
-
353
-
354
-
355
-
356
-
357
-
358
-
359
-
360
-
361
-
362
-
363
-
364
-
365
-
366
-
367
-
368
-
369
-
370
-
371
-
372
-
373
-
374
-
375
-
376
-
377
-
378
-
379
-
380
-
381
-
382
-
383
-
384
-
385
-
386
-
387
-
388
-
389
-
390
-
391
-
392
-
393
-
394
-
395
-
396
-
397
-
398
-
399
-
400
-
401
-
402
-
403
-
404
-
405
-
406
-
407
-
408
-
409
-
410
-
411
-
412
-
413
-
414
-
415
-
416
-
417
-
418
 |
 |
