ASRock X79 Extreme11 LSI SAS2 Integrated RAID Solution User Guide - Page 17
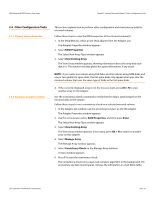
Managing Hot Spare Disks
 |
View all ASRock X79 Extreme11 manuals
Add to My Manuals
Save this manual to your list of manuals |
Page 17 highlights
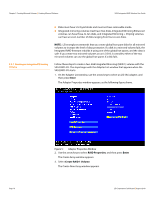
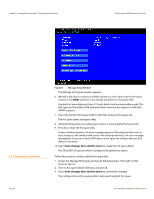
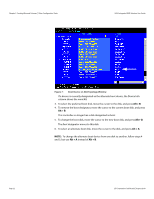
SAS2 Integrated RAID Solution User Guide Chapter 3: Creating Mirrored Volumes | Managing Hot Spare Disks 3.3 Managing Hot Spare Disks 3.3.1 Creating Hot Spare Disks 4. Again, wait until synchronization completes on the new disk and the volume returns to the Optimal state. 5. In the Adapter List window of the SAS2 BIOS CU, use the arrow keys to select the LSI SAS adapter with the RAID 1 volume, and then press Enter. The Adapter Properties window appears. 6. Use the arrow keys to select RAID Properties, and then press Enter. The Select New Array Type window appears. 7. Select View Existing Array. The View Array window appears. If necessary, press Alt + N to switch to the RAID 1 volume with the new, higher-capacity disk drives. 8. Select Manage Array. The Manage Array window appears. 9. Select Online Capacity Expansion. A menu window appears with a warning message and with options to start the expansion process or quit. 10. Press Y to start the expansion. The RAID Properties window appears when the expansion process completes. 11. Run a commercial tool specific to the operating system to move or increase the size of the partition on the newly expanded RAID1 volume. You can create one or two global hot spare disks to protect the data on mirrored volumes on an LSI SAS2 controller. You can also delete hot spare disks. Follow these steps to add global hot spare disks to an existing volume. The steps begin with the Adapter List window that appears when the configuration utility starts: 1. In the Adapter List window, use the arrow keys to select the LSI SAS adapter on which you want to create hot spare disks, and then press Enter. The Adapter Properties window appears, as shown in Figure 5. 2. Use the arrow keys to select RAID Properties, and then press Enter. The Select New Array Type window appears. 3. Select View Existing Array. The View Array window appears. If necessary, press Alt + N to switch to another array on this adapter. 4. Select Manage Array. The Manage Array window appears. 5. Select Manage Hot Spares, which is the first option, as shown in the following figure. LSI Corporation Confidential | August 2010 Page 17
-
 1
1 -
2
-
3
-
4
-
5
-
6
-
7
-
8
-
9
-
10
-
11
-
 12
12 -
 13
13 -
 14
14 -
 15
15 -
 16
16 -
 17
17 -
 18
18 -
 19
19 -
 20
20 -
 21
21 -
 22
22 -
23
-
24
-
25
-
26
-
27
-
28
-
29
-
30
-
31
-
32
-
33
-
34
-
35
-
36
-
37
-
38
-
39
-
40
-
41
-
42
 |
 |