ASRock X79 Extreme11 LSI SAS2 Integrated RAID Solution User Guide - Page 19
Other Configuration Tasks
 |
View all ASRock X79 Extreme11 manuals
Add to My Manuals
Save this manual to your list of manuals |
Page 19 highlights
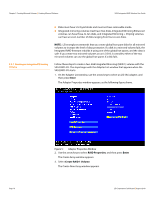
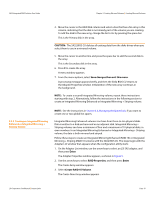
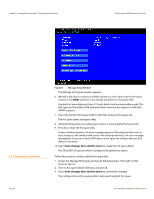
SAS2 Integrated RAID Solution User Guide Chapter 3: Creating Mirrored Volumes | Other Configuration Tasks 3.4 Other Configuration Tasks 3.4.1 Viewing Volume Properties 3.4.2 Running a Consistency Check This section explains how to perform other configuration and maintenance tasks for mirrored volumes. Follow these steps to view the RAID properties of the mirrored volume(s): 1. In the SAS2 BIOS CU, select an LSI SAS2 adapter from the Adapter List. The Adapter Properties window appears. 2. Select RAID Properties. The Select New Array Type window appears. 3. Select View Existing Array. The View Array window appears, showing information about the array and each disk in it. The window includes global hot spare information, if any exists. NOTE: If you create one volume using SAS disks, another volume using SATA disks, and one or two global hot spare disks, the hot spare disks only appear when you view the mirrored volume that uses the same type of disks as the hot spare disks. 4. If the currently displayed array is not the one you want, press Alt + N to view another array on the adapter. Use the Consistency Check command to verify that the data is synchronized on the mirrored disks in the volume. Follow these steps to run a consistency check on a selected mirrored volume: 1. In the Adapter List window, use the arrow keys to select an LSI SAS adapter. The Adapter Properties window appears. 2. Use the arrow keys to select RAID Properties, and then press Enter. The Select New Array Type window appears. 3. Select View Existing Array. The View Array window appears. If necessary, press Alt + N to switch to another array on this adapter. 4. Select Manage Array. The Manage Array window appears. 5. Select Consistency Check on the Manage Array window. A menu window appears. 6. Press Y to start the consistency check. The consistency check runs a read-read-compare algorithm in the background. If it encounters any data miscompares, it stores the information in a bad block table. LSI Corporation Confidential | August 2010 Page 19
-
 1
1 -
2
-
3
-
4
-
5
-
6
-
7
-
8
-
9
-
10
-
11
-
12
-
13
-
 14
14 -
 15
15 -
 16
16 -
 17
17 -
 18
18 -
 19
19 -
 20
20 -
 21
21 -
 22
22 -
 23
23 -
 24
24 -
25
-
26
-
27
-
28
-
29
-
30
-
31
-
32
-
33
-
34
-
35
-
36
-
37
-
38
-
39
-
40
-
41
-
42
 |
 |