ASRock X79 Extreme11 LSI SAS2 Integrated RAID Solution User Guide - Page 28
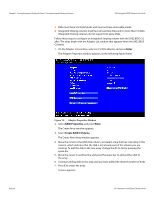
The SAS Topology window appears.
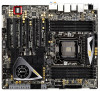 |
View all ASRock X79 Extreme11 manuals
Add to My Manuals
Save this manual to your list of manuals |
Page 28 highlights
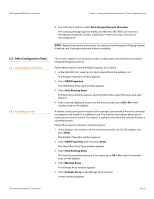
Chapter 5: Creating Integrated Striping Volumes | Other Configuration Tasks SAS2 Integrated RAID Solution User Guide 5.3.3 Deleting an Array 5.3.4 Locating Disk Drives in a Volume 6. Press Y to activate the array. The array becomes active after a pause. CAUTION: Before you delete an array, be sure to back up the data. Follow these steps to delete a selected volume (array): 1. In the Adapter List window, use the arrow keys to select an LSI SAS adapter. The Adapter Properties window appears. 2. Use the arrow keys to select RAID Properties, and then press Enter. The Select New Array Type window appears. 3. Select View Existing Array. The View Array window appears. If necessary, press Alt + N to switch to another array on this adapter. 4. Select Manage Array. The Manage Array window appears. 5. Select Delete Array. A menu window appears. 6. Either press Y to delete the array, or press N to cancel the deletion process. After a pause, the utility deletes the array. You can use the SAS2 BIOS CU to locate and identify a specific physical disk drive in a disk enclosure by flashing the drive's LED. You can also flash the LEDs of all the disk drives in a RAID volume, if they are in a disk enclosure. When you add a disk drive to a new mirrored volume, the LED on the disk drive starts flashing. The LED stops flashing when you finish creating the volume. You can locate individual disk drives from the SAS Topology window by flashing their LEDs. To do this, follow these steps: 1. Select the desired SAS2 controller on the Adapter List window and press Enter. The Adapter Properties window appears. 2. Highlight SAS Topology, and press Enter. The SAS Topology window appears. 3. Select the disk in the Device Identifier column, and press Enter. The LED on the disk flashes until you press a key to stop it. 4. To identify all the disk drives in a volume, select the volume in the left column of the SAS Topology window, and press Enter. The LEDs flash on all disk drives in the volume until you press a key to stop them. Page 28 LSI Corporation Confidential | August 2010
-
 1
1 -
2
-
3
-
4
-
5
-
6
-
7
-
8
-
9
-
10
-
11
-
12
-
13
-
14
-
15
-
16
-
17
-
18
-
19
-
20
-
21
-
22
-
 23
23 -
 24
24 -
 25
25 -
 26
26 -
 27
27 -
 28
28 -
 29
29 -
 30
30 -
 31
31 -
 32
32 -
 33
33 -
34
-
35
-
36
-
37
-
38
-
39
-
40
-
41
-
42
 |
 |
