Bosch HBL5056AUC Use and Care Manual - Page 18
To Remove The Oven Door, To Reinstall the Oven Door - security
 |
UPC - 825225838326
View all Bosch HBL5056AUC manuals
Add to My Manuals
Save this manual to your list of manuals |
Page 18 highlights
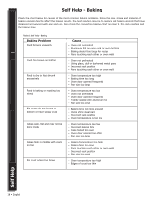
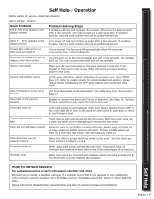
Self Help Care and Maintenance Operating the Oven Getting Familiar... Removing the Oven Door WARNING • Make sure oven is cool and power to the oven has been turned off before removing the door. Failure to do so could result in electrical shock or burns. • The oven door is heavy and fragile. Use both hands to remove the oven door. The door front is glass. Handle carefully to avoid breaking. • Grasp only the sides of the oven door. Do not grasp the handle as it may swing in your hand and cause damage or injury. • Failure to grasp the oven door firmly and properly could result in personal injury or product damage. WARNING To avoid injury from hinge brackets snapping closed, be sure that both levers are securely in place before removing door. Also, do not force door open or closed - the hinge could be damaged and injury could result. To Remove The Oven Door: 1. Be sure to read the above WARNING before attempting to remove oven door. 2. Open door completely. 3. Lift hinge brackets (one on each side) into slots (see Figure 15). 4. Close door slightly until hinge brackets lock into place. 5. Close door about halfway (until it stops). 6. Grasp firmly on both sides. 7. Pull out and up. Place door in a stable location. To Reinstall the Oven Door: 1. Holding door firmly on both sides, drop hinges down and into hinge slots. 2. Open door completely so that hinge brackets (one on each side) release. 3. Open and close the door slowly and completely to test the installation. The door should close easily and be straight, not crooked. Figure 15: Hinge Bracket Locked Into Place Figure 16: Hinge Bracket Released Bulb socket (fixed in place) 16 • English Lens Halogen Bulb Figure 17: Oven Light
-
 1
1 -
2
-
3
-
4
-
5
-
6
-
7
-
8
-
9
-
10
-
11
-
12
-
 13
13 -
 14
14 -
 15
15 -
 16
16 -
 17
17 -
 18
18 -
 19
19 -
 20
20 -
 21
21 -
 22
22 -
 23
23 -
24
-
25
-
26
-
27
-
28
-
29
-
30
-
31
-
32
-
33
-
34
-
35
-
36
-
37
-
38
-
39
-
40
-
41
-
42
-
43
-
44
-
45
-
46
-
47
-
48
-
49
-
50
-
51
-
52
-
53
-
54
-
55
-
56
-
57
-
58
-
59
-
60
-
61
-
62
-
63
-
64
 |
 |
