Bose Lifestyle 10 Owner's guide - Page 19
Bose Lifestyle 10 Manual
 |
View all Bose Lifestyle 10 manuals
Add to My Manuals
Save this manual to your list of manuals |
Page 19 highlights
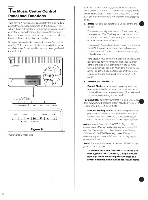
8. INPUT SELECTOR KEYS:Each selector key will turn the systemon, to theselected mode. TUNER: Selects the tuner mode. • CD:Selects andprepares to playcompact disc player. TAPE: Selectsanexternal component connected to the TAPE PLAY jacks. VIDEO:Selects anexternalcomponent connected to the VIDEO SOUND input jacks. AUX: Selects an external component connected to the AUX INPUT jacks. See the "Using External Components' section. 9. CD PLAYBACK KEYS: PLAY /PAUSE PHI:Beginscompact disc playback; pauses if a disc is playing; resumes play if a disc is paused. STOP: Stops CD playback. Pfol SKIP: Skips forward to beginning of next track. 1•444 SKIP: Skips back to beginning of track. then to the beginningofprevious track witheach press. FF Searches forward quickly, with sound. FR: Searches in reverse quickly, with sound. REPEATD:Repeats anentire disc. REPEAT T:Repeats a single track. • RANDOM:Plays all tracksona disc inrandomorder. INTRO: Automatically plays the first ten seconds of eachrackonadisc insequence. See the 'Compact Disc Player Operation" section. 10. SPEAKERS:For futureuse only. The switch shouldbe left in position "A.' 11. CD PROGRAMMING KEYS: SET: Stores a track in the memory. CLEAR : Deletes a programmed track. CHECK: Displays the programmed track in sequence. See the "Programming the Compact Disc Player" section. 12. BLANK KEY:For futureusewithCD changers. • The House Code System. In the unlikely event that the commands you give to your remote control should conflict with those of another, nearby Lifestyle", music system, you will need to establisha new.non-conflictinghouse code for your system. Make sure that your unit is pluggedinand therear- panel power switch(for 220-240Vmodelsonly) isON(I).Remove any CD from the unit and close the cover. Turn the unit over (seeRg. 12). Change the position(s)of switch 2, or 3, or 4 by moving it in the opposite direction. Be sure to change exactly the sane switch positions on the remote control. Otherwise, the systemwillnot respond to theremote control commands. Unplug the power cord, or turn the rear-panel power switch OFF(0).HouseCode changes willnot takeeffect until the Music Center has been unplugged, or this power switch turned off,for one minute. Turn theunit right side up arc plug it into the AC outlet, or turn the backpanelpower switchON(I). Switch 1of the housecode system(on theMusic Center)is factory preset. It is used to change the Zone 2 output from variable to fixed (line-level). This switch should be left in its originalposition, bothon theMusicCenter and the corresponding switchon theremote control. DIP Switch Remote Control L Factory Preset Position New Position ma DIP Switch Mt ic Center Figure 12 The House Code System 18
-
 1
1 -
2
-
3
-
4
-
5
-
6
-
7
-
8
-
9
-
10
-
11
-
12
-
13
-
 14
14 -
 15
15 -
 16
16 -
 17
17 -
 18
18 -
 19
19 -
 20
20 -
 21
21 -
 22
22 -
 23
23 -
 24
24 -
25
-
26
-
27
-
28
 |
 |
