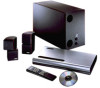
Bose Lifestyle 10 Owner's guide - Page 20
protective
 |
View all Bose Lifestyle 10 manuals
Add to My Manuals
Save this manual to your list of manuals |
Page 20 highlights
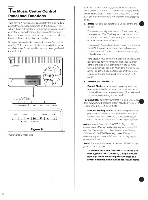
Tuner (Radio) Operation TheLifestyle", music oenter'sAM/FM tunerwillstoreup to 33 selected stationsin thememory(Preset).Any selectionofAM andFMstationsmay bepresetinanyorder,regardless of where theyare foundonthe dial.Inmostareas, this willaccommodate themajority of stations withusablesignal strengthsonbothbands. A labelis providedontherear of the remote controlfa easy reference toany radio stationsyou choose topreset,asexplained below. Remove thelabel's protectiveplastic cover. Programming the inner The tuner is programmedusing theMusicCentercontrol panel. Please take a few moments to learn the programing system for storing your favorite stations, described below. Note:Becauseof thislargereservoirofstoredradiostations, tuneror:terationissimplifiedbyusingpresets, rather than relianceonmanual tuning usedwith conventional audio systems. Begin by turning theMusicCenter off (press the OFFkey). Open the Music Center lid to access the full control panel inside. Then press TUNER A. This resets priority to Zone 1 and selects thetuner bandlast played. Note:it ishelpfultohavea penciIandpaperavailable to recordeach station'slocationasyou enterpresets. 1. To changeto the AMorFMband for the firststationyou wish to store,pressboth theTUNERA andVkeyssimultaneously.The tuner willswitch fromFM to AM(orreverse).Thedisplaywillchangeaccordingly from "FM....MHz." to "AM....kHz." 2. Press the MANUAL key until the PRESET indicator in the display goesoff.Manual tuning isnow possible. The tuner is now ready to store stations. Note:After 15seconds withno manualactivity, the tuner-will revert topresetmode. Simplypress the MANUAL keyonce again to regainmanualcontrol. 3. Press the TUNER A or V key repeatedly to approach the desired station frequency. Alternatively, hold down the TUNER A or V key for about two seconds, then release: The tuner will "seek" up or down the band, stopping automatically at the first broadcast withsufficient signalstrength.If thisisnot thepreferred station,repeat until thedesired stationis selected. 19 4. To storeaselected station, press theMEMORYkey. PRESETwill flashin the display,indicatinga preset location, 1 through30,maynow be selected forthestation. Note: Thiscondition willlastforabout 10seconds;tithe PRESETindication goesoutbefore you havestoredastation,simplypress MEMORYagain. • S. While the PRESET indication flashes, select a preset loca- tion for yourstationusing theTUNERA orV keysagain. Press either key repeatedly to reach the desired preset number(the radio stationwon't changenow,just the preset number and locationyouareabout toload).Preset numbersstepupinsequenceonthe display window: 1, 2.3 29, 30.1, 2....(0rreverse, ifyouusetheV key.) 6. When the desired preset number appears in the display. press theSTOREkey.Your stationisnow stored inmemoryandwill playwhenever that preset numberiscalled. 7. To storeanother station in thesame(AMorFM)band,repeat steps2.6.Tostorea stationfrom the otherband.repeat steps 1-6.Apresetlocationmay bechangedatany time.Whenanew stationis stored, a location's previous station will be "forgotten." Note: Fewpeople listen routinelyto30rackbstations, so somepresetstrategymaybeinorder. Forinstance. youmight want tostoreyourfavoritehalf-dozenstationsinpositions 1.6, thoseyou useons)(rarely(forout-of-town ballgamesorforeign-language broadcasts)atanotherlocation -25through 30, forexample. Oryoumightassign each householdmemberhisor herownpreset region:astationmaybeloadedinto more thanonepreset location. Presets willremaininmemory forseveral days even during • power outages,or when the Lifestyle""music centerisunplugged forseveral days. Aftera moreextendedperiod the memorymay havecleared.If thisoccurs,thepresetproceduremaybe followedagain.Youcanrecord these presetson a labelontheback of theremote control. r PRESET anust i(iCar STORE I I I L RAMO •xceJ TAPE I 1) AUX NOCO AUT0441, CO VOLUME OPP I v II V L•Mafkii PLAYWAJSE Tuner Controls Figure 13
-
 1
1 -
2
-
3
-
4
-
5
-
6
-
7
-
8
-
9
-
10
-
11
-
12
-
13
-
14
-
 15
15 -
 16
16 -
 17
17 -
 18
18 -
 19
19 -
 20
20 -
 21
21 -
 22
22 -
 23
23 -
 24
24 -
 25
25 -
26
-
27
-
28
 |
 |
