Bose Lifestyle 10 Owner's guide - Page 7
Preparation,
 |
View all Bose Lifestyle 10 manuals
Add to My Manuals
Save this manual to your list of manuals |
Page 7 highlights
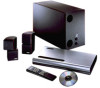
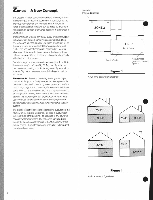
Preparation pack the Music Center, remote control and the accessoriesfrom the shippingcarton.Theitemscontainedin the cartonareshown inFigure 1B. Pleaseretain the cartonmaterials.If youeverneed totransport yourLifestyle" music center again, thisistheonly safecontainer for that purpose. B. Choose where to locate the Music Center for your installation. Thismay beona shelf or pieceof furnitureorinsidea cabinet spacious enough for the openlid. Note: Thesystemgenerates verytittleheat butitisa good idea toleaveafewinchesofairspaceaboveandbehindthe unit, andminimal ventilatbnopeningsshouldbeprovidedif themainunitis usedinsidea cabinet Because the remote contrashigh frequency signals14/ 111pass through wallsand enclosures, thesystem canremain outofsighteven when in use. C. Loadbatteriesinto theremote control(SeeFig.1A).Slide thebattery compartment cover from thebottomsurface of the control. Insertthree(3)M-type(1.5v)batteriesin the threeslots(long-life alkaline batteriesare best).Carefullymatch up the(+)and(-)polaritymarkingson the batterieswith thoseon tieskits. Note:Donot touch thefactorypreset miniatureDIPswitch, which is explained with house codes in "The Remote Control" ut, . • e Dip Switch rt a • Lifestyle" Music Center -rtStosat__ Remote Control AM Loop Antenna FMAntenna orFMAntenna Adapter III FigureIA Remote Control's Battery Compartment Batteries Figure 1B Ycur Lifestyle" Music Center canon cosairis tnese items 6
-
 1
1 -
 2
2 -
 3
3 -
 4
4 -
 5
5 -
 6
6 -
 7
7 -
 8
8 -
 9
9 -
 10
10 -
 11
11 -
 12
12 -
13
-
14
-
15
-
16
-
17
-
18
-
19
-
20
-
21
-
22
-
23
-
24
-
25
-
26
-
27
-
28
 |
 |
