Brother International CS-8072 Users Manual - English - Page 14
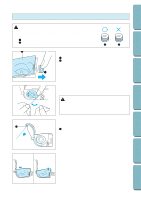
CAUTION, button to stop the machine. - wind bobbin
 |
View all Brother International CS-8072 manuals
Add to My Manuals
Save this manual to your list of manuals |
Page 14 highlights
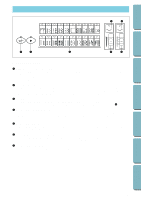
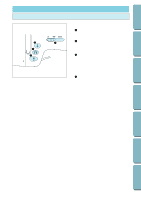
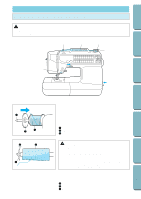
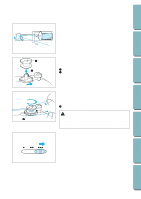
CONTENTS 3. Pass the thread through the thread guide as shown by the arrows. BEFORE USE SEWING UTILITY STITCHES MAINTENANCE 2 1 1 2 1 2 3 1 4. Align the groove in the bobbin with the spring on the shaft and place the bobbin on the bobbin winder shaft. Then, push the bobbin winder shaft to the right. 1 Spring on the shaft 2 Groove of the bobbin 5. Wind the thread clockwise around the bobbin four or five times, pass the end of the thread through the slit in the bobbin winder seat, and then pull the thread in the direction shown in the illustration. Use the cutter to cut the thread. 1 Bobbin winder seat CAUTION Be sure to follow the process described. If the thread is not cut with the cutter, and the bobbin is wound, when the thread runs low it may tangle around the bobbin and cause the needle to break. 6. Slide the sewing speed controller to its maximum (as far to the right as possible). 7. Press the "START/STOP" button. The bobbin will stop winding when it is full. 8. After the bobbin has stopped moving, press the "START/STOP" button to stop the machine. 9. Cut the thread, slide the bobbin winder shaft to the left and remove the bobbin. Note Immediately after winding the bobbin, it is normal to hear the sound of the clutch engaging when beginning to sew or manually turning the balance wheel. 11 SEWING CHART PATTERNS (PROGRAMMED IN MACHINE)
-
 1
1 -
2
-
3
-
4
-
5
-
6
-
7
-
8
-
 9
9 -
 10
10 -
 11
11 -
 12
12 -
 13
13 -
 14
14 -
 15
15 -
 16
16 -
 17
17 -
 18
18 -
 19
19 -
20
-
21
-
22
-
23
-
24
-
25
-
26
-
27
-
28
-
29
-
30
-
31
-
32
-
33
-
34
-
35
-
36
-
37
-
38
-
39
-
40
-
41
-
42
-
43
-
44
-
45
-
46
-
47
-
48
-
49
-
50
-
51
-
52
-
53
-
54
-
55
-
56
-
57
-
58
-
59
-
60
-
61
-
62
-
63
-
64
-
65
-
66
-
67
-
68
-
69
-
70
-
71
-
72
-
73
-
74
-
75
-
76
-
77
-
78
-
79
-
80
-
81
-
82
 |
 |
