Brother International CS-8072 Users Manual - English - Page 66
Hemstitching 2, Illustration of finished product.
 |
View all Brother International CS-8072 manuals
Add to My Manuals
Save this manual to your list of manuals |
Page 66 highlights
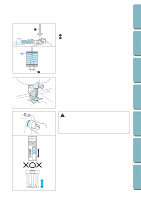
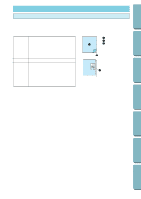
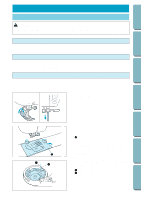
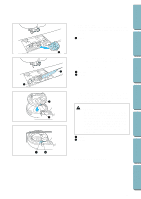
CONTENTS 5. Illustration of finished product. BEFORE USE SEWING UTILITY STITCHES MAINTENANCE Hemstitching 2 1 2 25 26 27 28 29 30 1 27 28 1. Press the key to turn on the LED lamp, and press the stitch pattern switch key to select the stitch for hemstitching. * Check that the stitch pattern switch key's LED lamp is lit. 1 Lamp is lit 2 Lamp is lit 2. Pull out several threads from both sides of the 4 mm (3/16'') area which is not yet open. (Pull out four threads, leave five threads and then pull out four threads, the width of five threads is approximately 4 mm (3/16'') or less.) 1 Approx. 4 mm (3/16'') or less 2 Four threads (pull out) 3 Five threads (leave) 3. Sew the decorative stitch on the center of the five threads created above. * Using a wing needle is an option. 4. Illustration of finished product. 63 SEWING CHART PATTERNS (PROGRAMMED IN MACHINE)
-
 1
1 -
2
-
3
-
4
-
5
-
6
-
7
-
8
-
9
-
10
-
11
-
12
-
13
-
14
-
15
-
16
-
17
-
18
-
19
-
20
-
21
-
22
-
23
-
24
-
25
-
26
-
27
-
28
-
29
-
30
-
31
-
32
-
33
-
34
-
35
-
36
-
37
-
38
-
39
-
40
-
41
-
42
-
43
-
44
-
45
-
46
-
47
-
48
-
49
-
50
-
51
-
52
-
53
-
54
-
55
-
56
-
57
-
58
-
59
-
60
-
 61
61 -
 62
62 -
 63
63 -
 64
64 -
 65
65 -
 66
66 -
 67
67 -
 68
68 -
 69
69 -
 70
70 -
 71
71 -
72
-
73
-
74
-
75
-
76
-
77
-
78
-
79
-
80
-
81
-
82
 |
 |
