Brother International CS-8072 Users Manual - English - Page 41
Overcasting (when Using The Optional Side Cutter), Normal Sewing
 |
View all Brother International CS-8072 manuals
Add to My Manuals
Save this manual to your list of manuals |
Page 41 highlights
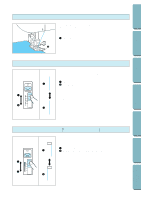
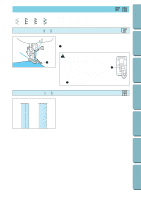
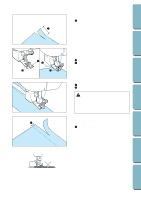
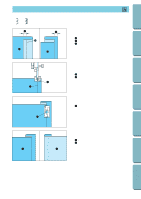
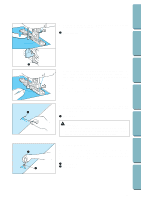
CONTENTS BEFORE USE OVERCASTING (WHEN USING THE OPTIONAL SIDE CUTTER) 1 7 8 1: Normal sewing 7: Overcasting stitch for light and medium weight fabrics 8: Overcasting stitch for heavyweight fabrics 1. Push the "NEEDLE POSITION" button to raise the needle, then turn off the power. 2. Raise the presser foot lever. 3. Press the black button at the back of the presser foot holder, and remove the presser foot. SEWING UTILITY STITCHES MAINTENANCE SEWING CHART 5 4. Use the included disc-shaped screwdriver to loosen the screw of the presser foot holder, and remove the presser foot holder. 5 6 1 2 5. Set the fork of the operating lever around the needle clamp screw. 1 Needle clamp screw 2 Operating lever * Make sure that the fork of the operating lever is set onto the screw firmly. 5 6. With the presser foot raised, align the presser foot holder screw hole directly with the notch in 6 the side cutter, then insert the screw and lightly tighten it. Lower the presser foot lever and firmly tighten the screw. 38 PATTERNS (PROGRAMMED IN MACHINE)
-
 1
1 -
2
-
3
-
4
-
5
-
6
-
7
-
8
-
9
-
10
-
11
-
12
-
13
-
14
-
15
-
16
-
17
-
18
-
19
-
20
-
21
-
22
-
23
-
24
-
25
-
26
-
27
-
28
-
29
-
30
-
31
-
32
-
33
-
34
-
35
-
 36
36 -
 37
37 -
 38
38 -
 39
39 -
 40
40 -
 41
41 -
 42
42 -
 43
43 -
 44
44 -
 45
45 -
 46
46 -
47
-
48
-
49
-
50
-
51
-
52
-
53
-
54
-
55
-
56
-
57
-
58
-
59
-
60
-
61
-
62
-
63
-
64
-
65
-
66
-
67
-
68
-
69
-
70
-
71
-
72
-
73
-
74
-
75
-
76
-
77
-
78
-
79
-
80
-
81
-
82
 |
 |
