Brother International CS-8072 Users Manual - English - Page 38
Sewing stretch fabrics, Changing the stitch length
 |
View all Brother International CS-8072 manuals
Add to My Manuals
Save this manual to your list of manuals |
Page 38 highlights
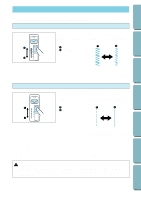
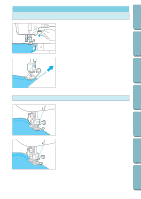
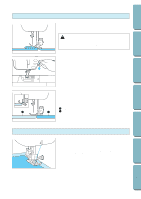
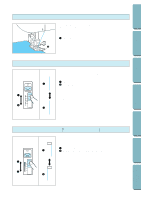
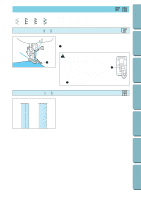
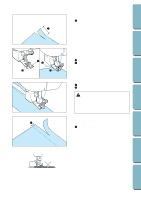
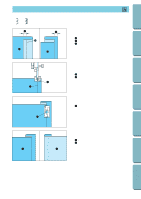
CONTENTS BEFORE USE Sewing stretch fabrics 5 6 1 Baste the fabric pieces together, then sew along the basting without pulling the fabric. * Do not pull the fabric while sewing. 1 Basting Changing the stitch length 1 1 2 2 Press the stitch length manual change key to light up the LED lamp. Move the stitch length adjustment lever up or down to adjust the stitch length. 1 Up: Longer 2 Down: Shorter * For thin material which is less than 1.0 mm (1/16") thick, the maximum stitch length will automatically be set to 4.0 mm (3/ 16") while sewing, even if the length setting is longer than 4.0 mm (3/16"). SEWING UTILITY STITCHES MAINTENANCE SEWING CHART Changing the needle position (only " 1 " straight stitch (left) and " 5 " triple stretch stitch) Press the stitch width manual change key to light up the LED lamp. Move the stitch width adjustment lever up or down to adjust the needle position. 1 Up: 7.0 mm (1/4") [right needle position] 1 2 Down: 0 mm (0") [left needle position] * The needle position cannot be changed in the straight stitch (middle) setting. 1 2 2 PATTERNS (PROGRAMMED IN MACHINE) 35
-
 1
1 -
2
-
3
-
4
-
5
-
6
-
7
-
8
-
9
-
10
-
11
-
12
-
13
-
14
-
15
-
16
-
17
-
18
-
19
-
20
-
21
-
22
-
23
-
24
-
25
-
26
-
27
-
28
-
29
-
30
-
31
-
32
-
 33
33 -
 34
34 -
 35
35 -
 36
36 -
 37
37 -
 38
38 -
 39
39 -
 40
40 -
 41
41 -
 42
42 -
 43
43 -
44
-
45
-
46
-
47
-
48
-
49
-
50
-
51
-
52
-
53
-
54
-
55
-
56
-
57
-
58
-
59
-
60
-
61
-
62
-
63
-
64
-
65
-
66
-
67
-
68
-
69
-
70
-
71
-
72
-
73
-
74
-
75
-
76
-
77
-
78
-
79
-
80
-
81
-
82
 |
 |
