Brother International CS-8072 Users Manual - English - Page 21
SELECTING A STITCH PATTERN, power switch is turned OFF. Always check
 |
View all Brother International CS-8072 manuals
Add to My Manuals
Save this manual to your list of manuals |
Page 21 highlights
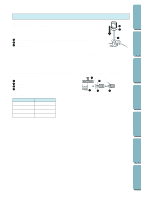
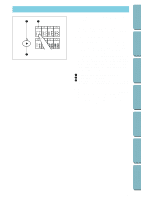
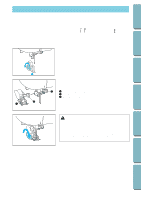
CONTENTS BEFORE USE SELECTING A STITCH PATTERN 3 1 12 34 56 78 21 22 23 24 25 26 27 28 2 This sewing machine is equipped with 40 built-in utility and decorative stitches. Press the stitch selection key that shows the stitch you want to sew. The LED lamp will light up. If the stitch you want to sew is shown on the right side of the stitch selection key, touch the stitch pattern switch key. The LED lamp will light up. * When the LED lamp on the stitch pattern switch key is lit, the stitch pattern on the right side is selected. When the LED lamp on the stitch pattern switch key is turned off, the stitch pattern on the left side is selected. * You must press the stitch pattern switch key to change it. It will not change automatically when another key is pressed (except when the main power switch is turned OFF). Always check the stitch pattern switch key's LED lamp when you make a stitch selection. 1 A lit LED lamp shows the selection. 2 Stitch pattern switch key 3 If the lamp is lit the right side is selected; if the lamp is turned off the left side is selected. Note - Before changing the stitch, press the "NEEDLE POSITION" button to raise the needle. - When the main power switch is turned ON, the stitch pattern switch key's LED lamp will turn off, and the straight stitch (left) is automatically selected. SEWING UTILITY STITCHES MAINTENANCE SEWING CHART PATTERNS (PROGRAMMED IN MACHINE) 18
-
 1
1 -
2
-
3
-
4
-
5
-
6
-
7
-
8
-
9
-
10
-
11
-
12
-
13
-
14
-
15
-
 16
16 -
 17
17 -
 18
18 -
 19
19 -
 20
20 -
 21
21 -
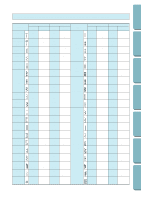 22
22 -
 23
23 -
 24
24 -
 25
25 -
 26
26 -
27
-
28
-
29
-
30
-
31
-
32
-
33
-
34
-
35
-
36
-
37
-
38
-
39
-
40
-
41
-
42
-
43
-
44
-
45
-
46
-
47
-
48
-
49
-
50
-
51
-
52
-
53
-
54
-
55
-
56
-
57
-
58
-
59
-
60
-
61
-
62
-
63
-
64
-
65
-
66
-
67
-
68
-
69
-
70
-
71
-
72
-
73
-
74
-
75
-
76
-
77
-
78
-
79
-
80
-
81
-
82
 |
 |
