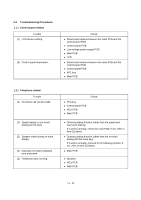
Brother International IntelliFax-2600 Service Manual - Page 156
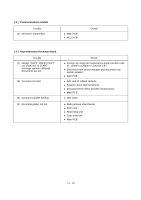
Clean the grounding contacts on the drum unit, gear drive, unit, and main cover. - printer toner
 |
View all Brother International IntelliFax-2600 manuals
Add to My Manuals
Save this manual to your list of manuals |
Page 156 highlights
Trouble (3) Light (4) Dark Action to be taken At the scanner Check the following components: - CIS unit - Main PCB At the printer side Replace the toner cartridge with a new one and print 4 to 5 pages. If the problem persists, proceed to the next step. Remove the toner cartridge and start printing. If printing takes place, clean the toner sensor or replace the toner sensor PCB. Clean the high-voltage contacts for the transfer roller on the drum unit, main cover, and high-voltage power supply PCB. (Contacts in the illustration given on page VI-21) Clean the high-voltage contacts for the developer roller on the drum unit, main cover, and high-voltage power supply PCB. (Contacts in the illustration given on page VI-21) Clean the grounding contacts on the drum unit, gear drive unit, and main cover. (Contacts and in the illustration given on page VI-21) Check the connection of the main-high-voltage flat cable. Replace the drum unit. Replace the high-voltage power supply PCB. Replace the main PCB. At the scanner Check the following components: - CIS unit - Main PCB At the printer side Slide the wire cleaner tab to clean the corona wire inside the drum unit. Clean the high-voltage contacts for the grid and corona wire on the drum unit, main cover, and high-voltage power supply PCB. (Contacts and in the illustration given on page VI21) Replace the drum unit. VI - 17
-
 1
1 -
2
-
3
-
4
-
5
-
6
-
7
-
8
-
9
-
10
-
11
-
12
-
13
-
14
-
15
-
16
-
17
-
18
-
19
-
20
-
21
-
22
-
23
-
24
-
25
-
26
-
27
-
28
-
29
-
30
-
31
-
32
-
33
-
34
-
35
-
36
-
37
-
38
-
39
-
40
-
41
-
42
-
43
-
44
-
45
-
46
-
47
-
48
-
49
-
50
-
51
-
52
-
53
-
54
-
55
-
56
-
57
-
58
-
59
-
60
-
61
-
62
-
63
-
64
-
65
-
66
-
67
-
68
-
69
-
70
-
71
-
72
-
73
-
74
-
75
-
76
-
77
-
78
-
79
-
80
-
81
-
82
-
83
-
84
-
85
-
86
-
87
-
88
-
89
-
90
-
91
-
92
-
93
-
94
-
95
-
96
-
97
-
98
-
99
-
100
-
101
-
102
-
103
-
104
-
105
-
106
-
107
-
108
-
109
-
110
-
111
-
112
-
113
-
114
-
115
-
116
-
117
-
118
-
119
-
120
-
121
-
122
-
123
-
124
-
125
-
126
-
127
-
128
-
129
-
130
-
131
-
132
-
133
-
134
-
135
-
136
-
137
-
138
-
139
-
140
-
141
-
142
-
143
-
144
-
145
-
146
-
147
-
148
-
149
-
150
-
 151
151 -
 152
152 -
 153
153 -
 154
154 -
 155
155 -
 156
156 -
 157
157 -
 158
158 -
 159
159 -
 160
160 -
 161
161 -
162
-
163
-
164
-
165
-
166
-
167
-
168
-
169
-
170
-
171
-
172
-
173
-
174
-
175
-
176
-
177
-
178
-
179
-
180
-
181
-
182
-
183
-
184
-
185
-
186
-
187
-
188
-
189
-
190
-
191
-
192
-
193
-
194
-
195
-
196
-
197
-
198
-
199
 |
 |
