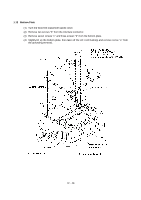
Brother International IntelliFax-2600 Service Manual - Page 61
Once removed, the spacer will become unusable and new one will have to be put back in.
 |
View all Brother International IntelliFax-2600 manuals
Add to My Manuals
Save this manual to your list of manuals |
Page 61 highlights
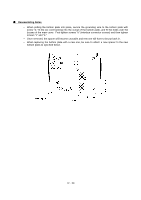
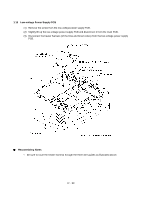
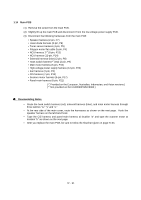
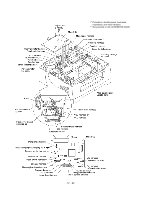
Reassembling Notes • When putting the bottom plate into place, secure the grounding wire to the bottom plate with screw "e," fit the AC cord bushing into the cutout of the bottom plate, and fit the holes over the bosses of the main cover. First tighten screws "b" (interface connector screws) and then tighten screws "c" and "d." • Once removed, the spacer will become unusable and new one will have to be put back in. • When replacing the bottom plate with a new one, be sure to attach a new spacer to the new bottom plate as specified below. IV - 29
-
 1
1 -
2
-
3
-
4
-
5
-
6
-
7
-
8
-
9
-
10
-
11
-
12
-
13
-
14
-
15
-
16
-
17
-
18
-
19
-
20
-
21
-
22
-
23
-
24
-
25
-
26
-
27
-
28
-
29
-
30
-
31
-
32
-
33
-
34
-
35
-
36
-
37
-
38
-
39
-
40
-
41
-
42
-
43
-
44
-
45
-
46
-
47
-
48
-
49
-
50
-
51
-
52
-
53
-
54
-
55
-
 56
56 -
 57
57 -
 58
58 -
 59
59 -
 60
60 -
 61
61 -
 62
62 -
 63
63 -
 64
64 -
 65
65 -
 66
66 -
67
-
68
-
69
-
70
-
71
-
72
-
73
-
74
-
75
-
76
-
77
-
78
-
79
-
80
-
81
-
82
-
83
-
84
-
85
-
86
-
87
-
88
-
89
-
90
-
91
-
92
-
93
-
94
-
95
-
96
-
97
-
98
-
99
-
100
-
101
-
102
-
103
-
104
-
105
-
106
-
107
-
108
-
109
-
110
-
111
-
112
-
113
-
114
-
115
-
116
-
117
-
118
-
119
-
120
-
121
-
122
-
123
-
124
-
125
-
126
-
127
-
128
-
129
-
130
-
131
-
132
-
133
-
134
-
135
-
136
-
137
-
138
-
139
-
140
-
141
-
142
-
143
-
144
-
145
-
146
-
147
-
148
-
149
-
150
-
151
-
152
-
153
-
154
-
155
-
156
-
157
-
158
-
159
-
160
-
161
-
162
-
163
-
164
-
165
-
166
-
167
-
168
-
169
-
170
-
171
-
172
-
173
-
174
-
175
-
176
-
177
-
178
-
179
-
180
-
181
-
182
-
183
-
184
-
185
-
186
-
187
-
188
-
189
-
190
-
191
-
192
-
193
-
194
-
195
-
196
-
197
-
198
-
199
 |
 |

IV
- 29
±
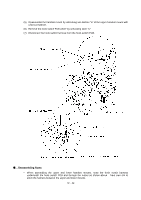
Reassembling Notes
•
When putting the bottom plate into place, secure the grounding wire to the bottom plate with
screw "e," fit the AC cord bushing into the cutout of the bottom plate, and fit the holes over the
bosses of the main cover.
First tighten screws "b" (interface connector screws) and then tighten
screws "c" and "d."
•
Once removed, the spacer will become unusable and new one will have to be put back in.
•
When replacing the bottom plate with a new one, be sure to attach a new spacer to the new
bottom plate as specified below.