Brother International MFC 9650 Owners Manual - Page 2
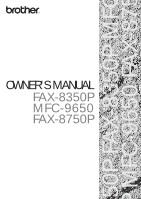
Symbols Used in This Manual, About Fax Machines 2, Fax Tones and Handshake, FAX-8350P, MFC-9650
 |
View all Brother International MFC 9650 manuals
Add to My Manuals
Save this manual to your list of manuals |
Page 2 highlights
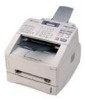
Available Models for each country U.K. Ireland Others FAX-8350P, MFC-9650, FAX-8750P FAX-8350P MFC-9650 Congratulations on purchasing your Brother Fax machine. Please set up your machine as follows - refer to the Owner's Manual for further information. 1. Check the Packing List 2. Install the Drum Unit 3. Install the Phone Line and Power Cord 4. Attach Document Tray and Support wire 5. Loading Paper 6. Connect External Telephone (Only if you are sharing one line for both telephone and fax) 7. Set Date and Time 8. Set Station ID 9. Select an Answer mode (For MFC-9650 and FAX-8750 PC user Only) 10.Connecting Brother Machine to PC Pan European Approvals Information This product has been granted a Pan-European Approval via KCS in the Netherlands. It is designed to interwork with the basic network functions for facsimile and telephony in most European countries. However, since there are still network differences between countries, other features such as caller ID, will only work in the specific country for which this product was produced. If you experience any difficulties when connecting this product, please contact your nearest Brother Office or supplier, as detailed in the warranty documentation for this product. © 1999 Brother Industries, Ltd.
-
 1
1 -
 2
2 -
 3
3 -
 4
4 -
 5
5 -
 6
6 -
 7
7 -
 8
8 -
9
-
10
-
11
-
12
-
13
-
14
-
15
-
16
-
17
-
18
-
19
-
20
-
21
-
22
-
23
-
24
-
25
-
26
-
27
-
28
-
29
-
30
-
31
-
32
-
33
-
34
-
35
-
36
-
37
-
38
-
39
-
40
-
41
-
42
-
43
-
44
-
45
-
46
-
47
-
48
-
49
-
50
-
51
-
52
-
53
-
54
-
55
-
56
-
57
-
58
-
59
-
60
-
61
-
62
-
63
-
64
-
65
-
66
-
67
-
68
-
69
-
70
-
71
-
72
-
73
-
74
-
75
-
76
-
77
-
78
-
79
-
80
-
81
-
82
-
83
-
84
-
85
-
86
-
87
-
88
-
89
-
90
-
91
-
92
-
93
-
94
-
95
-
96
-
97
-
98
-
99
-
100
-
101
-
102
-
103
-
104
-
105
-
106
-
107
-
108
-
109
-
110
-
111
-
112
-
113
-
114
-
115
-
116
-
117
-
118
-
119
-
120
-
121
-
122
-
123
-
124
-
125
-
126
-
127
-
128
-
129
-
130
-
131
-
132
-
133
-
134
-
135
-
136
-
137
-
138
-
139
-
140
-
141
-
142
-
143
-
144
-
145
-
146
-
147
-
148
-
149
-
150
-
151
-
152
-
153
-
154
-
155
-
156
-
157
-
158
-
159
-
160
-
161
-
162
-
163
-
164
-
165
-
166
-
167
-
168
-
169
-
170
-
171
-
172
-
173
-
174
-
175
-
176
-
177
-
178
-
179
-
180
-
181
-
182
-
183
-
184
-
185
-
186
-
187
-
188
 |
 |
