Brother International PQ1600S Operation Manual - Page 10
Before You Begin 1
 |
View all Brother International PQ1600S manuals
Add to My Manuals
Save this manual to your list of manuals |
Page 10 highlights
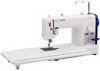
Before You Begin (1) Power Cord and Foot Controller WARNING Please use common household current. ● Attach power cord. ● Insert foot controller jack into machine. ● When you press the foot controller down lightly, the machine will run at a low speed. When more pressure is applied to foot controller, the machine's speed will increase. When you remove your foot from the foot controller, the machine will stop. Main Power Switch ● Press power switch toward the "I" position to turn machine on. ● To turn the machine off, press the power switch toward the "O" position. Power Cord Foot Controller Slower Faster Power Switch I O Thread Tension Dial ● When tighter thread tension is desired, turn the tension dial to the right. Upper and bobbin threads will meet on right side of the fabric. ● When looser thread tension is desired, turn tension dial to the left. Upper and lower threads will then meet on wrong side of fabric. 8 Upper Thread Tension Loosen Tighten Tension Block Handwheel ● Position needle using handwheel. ✽ Always turn handwheel towards you. CAUTION Be sure to keep the area under and around the needle clear. Stitch Length Regulator ● Adjust desired stitch length using stitch regulator dial. Reverse Stitch Lever ● Sewing in reverse is possible when the reverse stitch lever is in the lowered position. ✽ Make sure to continuously press the lever to its lowest position when reverse sewing is desired. ✽ When the stitch regulator dial is set between 5-7 mm, the reverse stitch length is always 5 mm. 67 45 23 Handwheel Reference Mark 1 Lower number = shorter stitches Higher number = longer stitches Stitch Length Regulator Reverse Stitch Lever
-
 1
1 -
2
-
3
-
4
-
 5
5 -
 6
6 -
 7
7 -
 8
8 -
 9
9 -
 10
10 -
 11
11 -
 12
12 -
 13
13 -
 14
14 -
 15
15 -
16
-
17
-
18
-
19
-
20
-
21
-
22
-
23
-
24
-
25
-
26
-
27
-
28
-
29
-
30
-
31
-
32
-
33
-
34
-
35
-
36
-
37
-
38
-
39
-
40
-
41
-
42
-
43
-
44
-
45
-
46
-
47
-
48
-
49
-
50
-
51
-
52
-
53
-
54
-
55
-
56
-
57
-
58
-
59
-
60
 |
 |
