Brother International SB3150 Operation Manual - Page 11
Caution
 |
View all Brother International SB3150 manuals
Add to My Manuals
Save this manual to your list of manuals |
Page 11 highlights
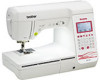
Names of Machine Parts and Their Functions Needle and presser foot section i h a b Operation buttons bc de a B f GETTING READY g c f e d 1 Needle bar thread guide Pass the upper thread through the needle bar thread guide. 2 Needle plate The needle plate is marked with guides for sewing straight seams. 3 Needle plate cover Remove the needle plate cover to clean the bobbin case and race. 4 Bobbin cover/bobbin case Remove the bobbin cover, and then insert the bobbin into the bobbin case. 5 Feed dogs The feed dogs feed the fabric in the sewing direction. 6 Presser foot The presser foot applies pressure consistently on the fabric as the sewing takes place. Attach the appropriate presser foot for the selected stitch. 7 Presser foot holder The presser foot is attached onto the presser foot holder. 8 Presser foot holder screw Use the presser foot holder screw to hold the presser foot in place. (page B-32) 9 Buttonhole lever Lower the buttonhole lever when sewing buttonholes and bar tacks or when darning. 1 "Start/Stop" button Press the "Start/Stop" button to start or stop sewing. The machine stitches at a slow speed at the beginning of sewing while the button is pressed. When sewing is stopped, the needle is lowered in the fabric. For details, refer to "STARTING TO SEW" on page B-34. The button changes color according to the machine's operation mode. Green: Red: Orange: The machine is ready to sew or is sewing. The machine can not sew. The machine is winding the bobbin thread, or the bobbin winder shaft is moved to the right side. 2 Reverse stitch button For straight, zigzag, and elastic zigzag stitch patterns that use reverse stitches, the machine will sew reverse stitches at low speed only while holding down the Reverse stitch button. The stitches are sewn in the opposite position. For other stitches, use this button to sew reinforcement stitches at the beginning and end of sewing. Press and hold this button, and the machine sews 3 stitches in the same spot and stops automatically. (page B-38) 3 Reinforcement stitch button Use this button to sew a single stitch repeatedly and tie-off. For character/decorative stitches, press this button to end with a full stitch instead of at a mid-point. The LED light beside this button lights up while the machine is sewing a full motif, and automatically turns off when the sewing is stopped. (page B38) 4 Needle position button Press the needle position button to raise or lower the needle. Pressing the button twice sews one stitch. 5 Thread cutter button Press the thread cutter button after sewing is stopped to cut both the upper and the bobbin threads. For details, refer to step j under "Sewing a stitch" on page B-36. 6 Sewing speed controller Slide the sewing speed controller to adjust the sewing speed. CAUTION • Do not press (Thread cutter button) after the threads have already been cut, otherwise the needle may break, the threads may become tangled or damage to the machine may occur. Basic operations B-3
-
 1
1 -
2
-
3
-
4
-
5
-
 6
6 -
 7
7 -
 8
8 -
 9
9 -
 10
10 -
 11
11 -
 12
12 -
 13
13 -
 14
14 -
 15
15 -
 16
16 -
17
-
18
-
19
-
20
-
21
-
22
-
23
-
24
-
25
-
26
-
27
-
28
-
29
-
30
-
31
-
32
-
33
-
34
-
35
-
36
-
37
-
38
-
39
-
40
-
41
-
42
-
43
-
44
-
45
-
46
-
47
-
48
-
49
-
50
-
51
-
52
-
53
-
54
-
55
-
56
-
57
-
58
-
59
-
60
-
61
-
62
-
63
-
64
-
65
-
66
-
67
-
68
-
69
-
70
-
71
-
72
-
73
-
74
-
75
-
76
-
77
-
78
-
79
-
80
-
81
-
82
-
83
-
84
-
85
-
86
-
87
-
88
-
89
-
90
-
91
-
92
-
93
-
94
-
95
-
96
-
97
-
98
-
99
-
100
-
101
-
102
-
103
-
104
-
105
-
106
-
107
-
108
-
109
-
110
-
111
-
112
-
113
-
114
-
115
-
116
-
117
-
118
-
119
-
120
-
121
-
122
-
123
-
124
-
125
-
126
-
127
-
128
-
129
-
130
-
131
-
132
-
133
-
134
-
135
-
136
-
137
-
138
-
139
-
140
-
141
-
142
-
143
-
144
 |
 |
