Brother International Simplicity SB530T Users Manual - English and Spanish - Page 42
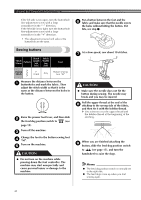
Sewing buttons
 |
View all Brother International Simplicity SB530T manuals
Add to My Manuals
Save this manual to your list of manuals |
Page 42 highlights
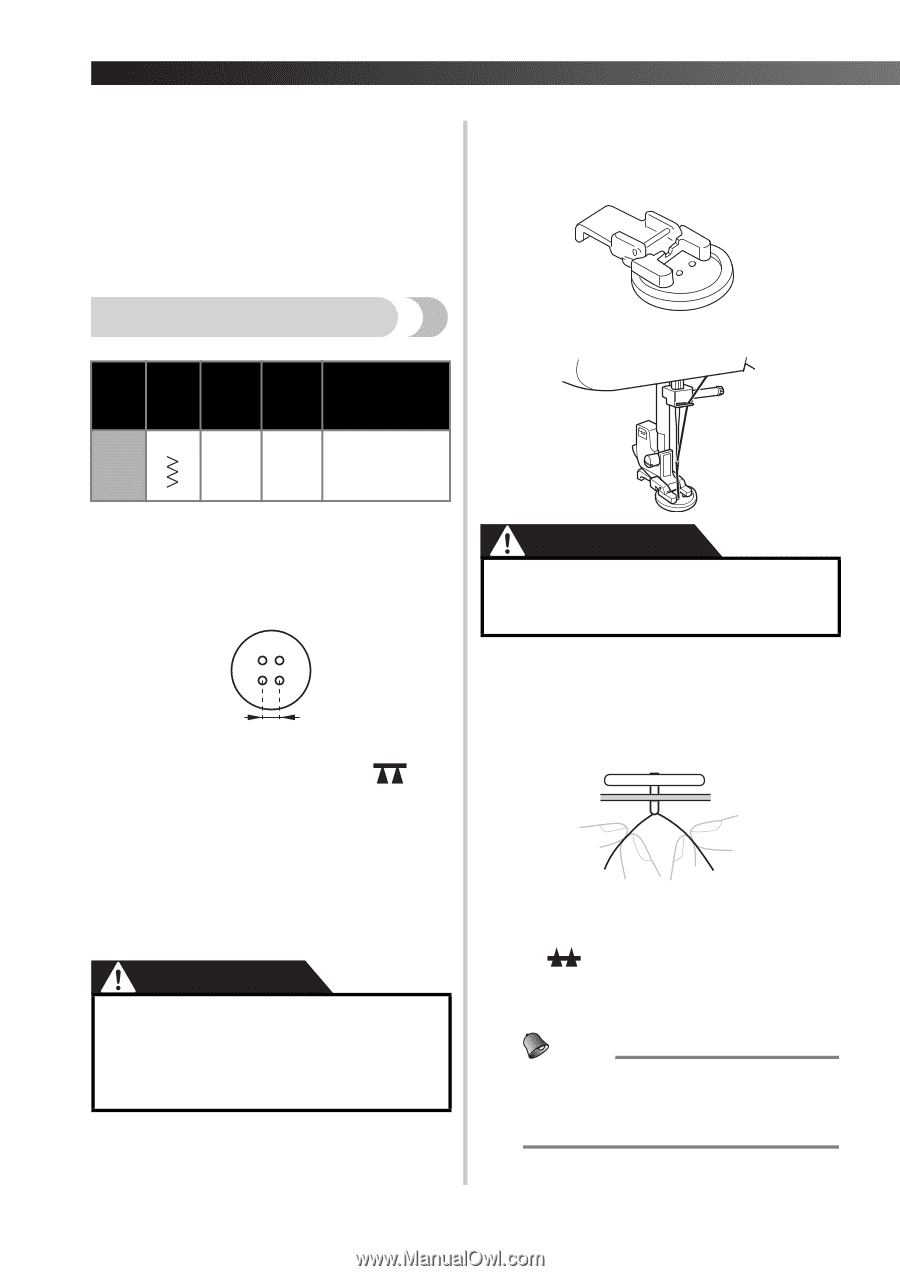
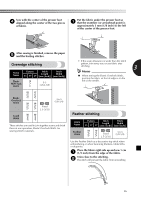
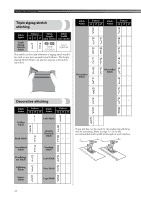
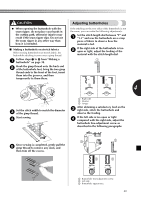
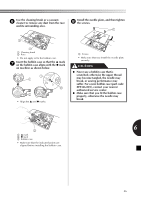
SEWING BUTTONHOLES AND BUTTONS If the left side is too open, turn the buttonhole fine-adjustment screw with a large screwdriver in the "-" direction. If the left side is too tight, turn the buttonhole fine-adjustment screw with a large screwdriver in the "+" direction. • This adjustment ensures both sides of the buttonhole are the same. Put a button between the foot and the 6 fabric and make sure that the needle enters the holes without hitting the button. If it hits, see step 1. Sewing buttons Stitch Stitch Name Pattern Length [mm (inch)] Stitch Width [mm (inch)] Zigzag 3 Stitch F (1/64) Any Foot Button sewing foot "M" At a slow speed, sew about 10 stitches. 7 Measure the distance between the 1 buttonholes and mark the fabric. Then adjust the stitch width so that it is the same as the distance between the holes in the button. Raise the presser foot lever, and then slide 2 the feed dog position switch to (see page 15). Turn off the machine. 3 Change the foot to the button sewing foot 4 "M". Turn on the machine. 5 CAUTION ● Do not turn on the machine while pressing down the foot controller. The machine may start unexpectedly and cause personal injury or damage to the machine. CAUTION ● Make sure the needle does not hit the button during sewing. The needle may break and you may be injured. Pull the upper thread at the end of the 8 stitching to the wrong side of the fabric, and then tie it with the bobbin thread. X Use scissors to cut the upper thread and the bobbin thread at the beginning of the stitching. When you are finished attaching the 9 button, slide the feed dog position switch to (see page 15), and turn the handwheel to raise the dogs. Memo ● The feed dog position switch is normally set to the right side. ● The feed dogs come up when you start sewing again. 41
-
 1
1 -
2
-
3
-
4
-
5
-
6
-
7
-
8
-
9
-
10
-
11
-
12
-
13
-
14
-
15
-
16
-
17
-
18
-
19
-
20
-
21
-
22
-
23
-
24
-
25
-
26
-
27
-
28
-
29
-
30
-
31
-
32
-
33
-
34
-
35
-
36
-
 37
37 -
 38
38 -
 39
39 -
 40
40 -
 41
41 -
 42
42 -
 43
43 -
 44
44 -
 45
45 -
 46
46 -
 47
47 -
48
-
49
-
50
-
51
-
52
-
53
-
54
-
55
-
56
-
57
-
58
-
59
-
60
-
61
-
62
-
63
-
64
-
65
-
66
-
67
-
68
-
69
-
70
-
71
-
72
-
73
-
74
-
75
-
76
-
77
-
78
-
79
-
80
-
81
-
82
-
83
-
84
-
85
-
86
-
87
-
88
-
89
-
90
-
91
-
92
-
93
-
94
-
95
-
96
-
97
-
98
-
99
-
100
-
101
-
102
-
103
-
104
 |
 |