Canon EOS C700 GS PL EOS C700 EOS C700 PL EOS C700 GS PL EOS C700 FF EOS C700 - Page 172
Use the Browser Remote controls to operate the camera., When you have finished using Browser Remote
 |
View all Canon EOS C700 GS PL manuals
Add to My Manuals
Save this manual to your list of manuals |
Page 172 highlights
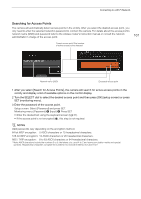
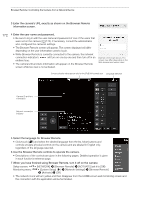
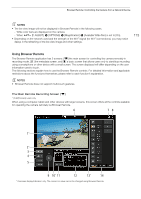
Browser Remote: Controlling the Camera from a Network Device 3 Enter the camera's URL exactly as shown on the Browser Remote information screen. 172 4 Enter the user name and password. • Be sure to log in with the user name and password of one of the users that were set on the camera (A 170). If necessary, consult the administrator who configured the camera's settings. • The Browser Remote screen will appear. The screen displayed will differ depending on the user information used to log in. • While Browser Remote is correctly connected to the camera, the network connection indicator's will turn on one by one and then turn off in an endless loop. • The camera's ID and lens information will appear on the Browser Remote screen while live view is not activated. Example of the login screen. The screen may differ depending on the Web browser and version used. Screen selection tabs appear only for the [Full] (full control) user Language selection Camera ID and lens information Network connection indicator 5 Select the language for Browser Remote. • Click/touch [H] and select the desired language from the list. Most buttons and controls emulate physical controls on the camera and are labeled in English only, regardless of the language selected. 6 Use the Browser Remote controls to operate the camera. • Descriptions of the controls are given in the following pages. Detailed operation is given in each function's reference page. 7 When you have finished using Browser Remote, turn it off on the camera Setup screen: Monitoring menu: [NETWORK] > [Browser Remote] > [ACTIVATE] (set it to [Off]) [System Setup] (B) > [Network Settings] > [Browser Remote] > [Activate] > [Off] • The network icons will turn yellow and then disappear from the HOME screen and monitoring screen and the connection with the application will be terminated.
-
 1
1 -
2
-
3
-
4
-
5
-
6
-
7
-
8
-
9
-
10
-
11
-
12
-
13
-
14
-
15
-
16
-
17
-
18
-
19
-
20
-
21
-
22
-
23
-
24
-
25
-
26
-
27
-
28
-
29
-
30
-
31
-
32
-
33
-
34
-
35
-
36
-
37
-
38
-
39
-
40
-
41
-
42
-
43
-
44
-
45
-
46
-
47
-
48
-
49
-
50
-
51
-
52
-
53
-
54
-
55
-
56
-
57
-
58
-
59
-
60
-
61
-
62
-
63
-
64
-
65
-
66
-
67
-
68
-
69
-
70
-
71
-
72
-
73
-
74
-
75
-
76
-
77
-
78
-
79
-
80
-
81
-
82
-
83
-
84
-
85
-
86
-
87
-
88
-
89
-
90
-
91
-
92
-
93
-
94
-
95
-
96
-
97
-
98
-
99
-
100
-
101
-
102
-
103
-
104
-
105
-
106
-
107
-
108
-
109
-
110
-
111
-
112
-
113
-
114
-
115
-
116
-
117
-
118
-
119
-
120
-
121
-
122
-
123
-
124
-
125
-
126
-
127
-
128
-
129
-
130
-
131
-
132
-
133
-
134
-
135
-
136
-
137
-
138
-
139
-
140
-
141
-
142
-
143
-
144
-
145
-
146
-
147
-
148
-
149
-
150
-
151
-
152
-
153
-
154
-
155
-
156
-
157
-
158
-
159
-
160
-
161
-
162
-
163
-
164
-
165
-
166
-
 167
167 -
 168
168 -
 169
169 -
 170
170 -
 171
171 -
 172
172 -
 173
173 -
 174
174 -
 175
175 -
 176
176 -
 177
177 -
178
-
179
-
180
-
181
-
182
-
183
-
184
-
185
-
186
-
187
-
188
-
189
-
190
-
191
-
192
-
193
-
194
-
195
-
196
-
197
-
198
-
199
-
200
-
201
-
202
-
203
-
204
-
205
-
206
-
207
-
208
-
209
-
210
-
211
-
212
-
213
-
214
-
215
-
216
-
217
-
218
-
219
-
220
-
221
-
222
-
223
-
224
-
225
-
226
-
227
-
228
-
229
-
230
-
231
-
232
-
233
-
234
-
235
-
236
-
237
-
238
-
239
-
240
-
241
-
242
-
243
-
244
-
245
-
246
-
247
-
248
-
249
-
250
-
251
-
252
-
253
-
254
-
255
 |
 |
