Canon EOS C700 GS PL EOS C700 EOS C700 PL EOS C700 GS PL EOS C700 FF EOS C700 - Page 40
Attaching the Handle Unit, Using a Tripod
 |
View all Canon EOS C700 GS PL manuals
Add to My Manuals
Save this manual to your list of manuals |
Page 40 highlights
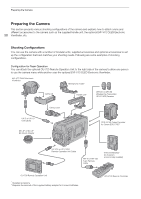
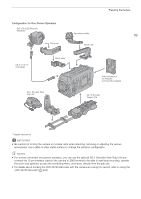
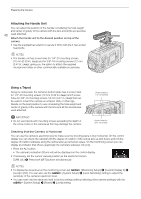
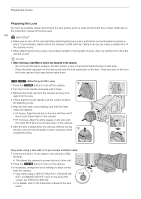
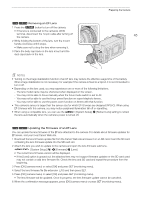
Preparing the Camera Attaching the Handle Unit You can adjust the position of the handle considering the total weight and center of gravity of the camera with the lens and all the accessories 40 used attached. Attach the handle unit to the desired position on top of the camera. • Use the supplied hex wrench to secure it firmly with the 4 hex socket head bolts. NOTES • The handle unit has screw holes for 1/4"-20 mounting screws (10 mm (0.39 in.) deep) and for 3/8"-16 mounting screws (12 mm (0.47 in.) deep), giving you the option to attach the supplied microphone holder or other commercially available accessories. Using a Tripod Along its central axis, the camera's bottom plate has 4 screw holes for 1/4"-20 mounting screws (10 mm (0.39 in.) deep) and 5 screw holes for 3/8"-16 mounting screws (12 mm (0.47 in.) deep) that can be used to mount the camera on a tripod, dolly or other rigs. Decide on the best position to use considering the total weight and center of gravity of the camera with the lens and all the accessories used attached. Screw holes for 1/4"-20 screws IMPORTANT • Do not use tripods with mounting screws exceeding the depth of the screw holes on the camera as this may damage the camera. Screw holes for 3/8"-16 screws Checking that the Camera is Horizontal You can use the camera's electronic level to make sure the shooting plane is truly horizontal. On the control display you can check the camera's tilt (the degree of rotation of the optical axis up and down) and roll (the degree of rotation sideways along the optical axis) as numerical values. On the monitoring screen you can display an indicator that shows graphically the camera's sideways roll (only). 1 Press the ALT button. • The camera's inclination (tilt and roll) will be displayed on the control display. 2 If necessary, set the current camera position as the electronic horizon. [CAM LVL] > Press both [SET] buttons simultaneously NOTES • To display the visual level on the monitoring screen set [Monitoring Setup] > [Custom Display 2] > [Level] to [On]. You can also use the [System Setup] > [Level Sensitivity] setting to adjust the sensitivity of the camera's electronic level. • You can reset only the electronic level to factory settings (without affecting other camera settings) with the [System Setup] > [Reset] > [Level] setting.
-
 1
1 -
2
-
3
-
4
-
5
-
6
-
7
-
8
-
9
-
10
-
11
-
12
-
13
-
14
-
15
-
16
-
17
-
18
-
19
-
20
-
21
-
22
-
23
-
24
-
25
-
26
-
27
-
28
-
29
-
30
-
31
-
32
-
33
-
34
-
 35
35 -
 36
36 -
 37
37 -
 38
38 -
 39
39 -
 40
40 -
 41
41 -
 42
42 -
 43
43 -
 44
44 -
 45
45 -
46
-
47
-
48
-
49
-
50
-
51
-
52
-
53
-
54
-
55
-
56
-
57
-
58
-
59
-
60
-
61
-
62
-
63
-
64
-
65
-
66
-
67
-
68
-
69
-
70
-
71
-
72
-
73
-
74
-
75
-
76
-
77
-
78
-
79
-
80
-
81
-
82
-
83
-
84
-
85
-
86
-
87
-
88
-
89
-
90
-
91
-
92
-
93
-
94
-
95
-
96
-
97
-
98
-
99
-
100
-
101
-
102
-
103
-
104
-
105
-
106
-
107
-
108
-
109
-
110
-
111
-
112
-
113
-
114
-
115
-
116
-
117
-
118
-
119
-
120
-
121
-
122
-
123
-
124
-
125
-
126
-
127
-
128
-
129
-
130
-
131
-
132
-
133
-
134
-
135
-
136
-
137
-
138
-
139
-
140
-
141
-
142
-
143
-
144
-
145
-
146
-
147
-
148
-
149
-
150
-
151
-
152
-
153
-
154
-
155
-
156
-
157
-
158
-
159
-
160
-
161
-
162
-
163
-
164
-
165
-
166
-
167
-
168
-
169
-
170
-
171
-
172
-
173
-
174
-
175
-
176
-
177
-
178
-
179
-
180
-
181
-
182
-
183
-
184
-
185
-
186
-
187
-
188
-
189
-
190
-
191
-
192
-
193
-
194
-
195
-
196
-
197
-
198
-
199
-
200
-
201
-
202
-
203
-
204
-
205
-
206
-
207
-
208
-
209
-
210
-
211
-
212
-
213
-
214
-
215
-
216
-
217
-
218
-
219
-
220
-
221
-
222
-
223
-
224
-
225
-
226
-
227
-
228
-
229
-
230
-
231
-
232
-
233
-
234
-
235
-
236
-
237
-
238
-
239
-
240
-
241
-
242
-
243
-
244
-
245
-
246
-
247
-
248
-
249
-
250
-
251
-
252
-
253
-
254
-
255
 |
 |
