Canon EOS C700 GS PL EOS C700 EOS C700 PL EOS C700 GS PL EOS C700 FF EOS C700 - Page 42
Select [Brightness], [Contrast], [Color], [Sharpness] or [Luminance] and then press SET.
 |
View all Canon EOS C700 GS PL manuals
Add to My Manuals
Save this manual to your list of manuals |
Page 42 highlights
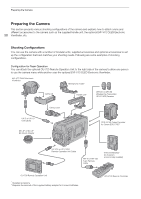
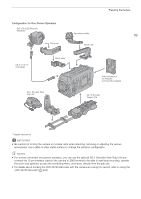
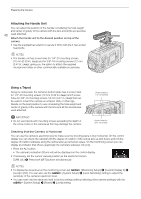
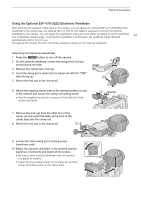
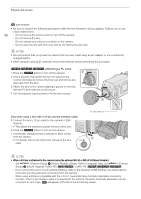
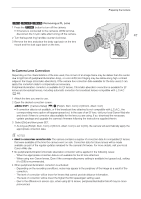
Preparing the Camera Connecting and Adjusting the Optional Viewfinder You can adjust the brightness, contrast, color, sharpness, and luminance level of the optional viewfinder. These adjustments will not affect your recordings. 42 1 Connect the camera's VIDEO terminal to the optional viewfinder's VIDEO terminal using an ቢ optional UN-5 or UN-10 Unit Cable. • Align the Í marks on the cable's plugs and the terminals. ቢ 2 Put the unit cable through one of the cable clamps on the clamp rail. • The clamp rail has 4 screw holes for the cable clamps so you can adjust their position as needed. 3 Turn on the camera and turn the dioptric adjustment ring until the viewfinder's image is sharp. ባ ቤ 4 Press the EVF button on the optional viewfinder. • The monitoring menu will open with the [EVF-V70] submenu selected. • Alternatively, you can press an assignable button set to [EVF-V70 Setup] (A 127). 5 Select [Brightness], [Contrast], [Color], [Sharpness] or [Luminance] and then press SET. 6 Select the desired level and then press SET. • Repeat steps 5 and 6 to adjust other settings as necessary. NOTES • The optional viewfinder displays in color by default. You can set [Monitoring Setup] (¢) > [B&W Image] > [VIDEO Output] to [On] to set the viewfinder to black and white. • By default, the optional viewfinder's screen will be dimmed automatically when it is not being used. You can set [Eye Sensor] to [Off] to keep the optional viewfinder's screen always bright. • When using one of the Canon Log gamma curves, you can apply a LUT to the image displayed on the optional viewfinder (A 155).
-
 1
1 -
2
-
3
-
4
-
5
-
6
-
7
-
8
-
9
-
10
-
11
-
12
-
13
-
14
-
15
-
16
-
17
-
18
-
19
-
20
-
21
-
22
-
23
-
24
-
25
-
26
-
27
-
28
-
29
-
30
-
31
-
32
-
33
-
34
-
35
-
36
-
 37
37 -
 38
38 -
 39
39 -
 40
40 -
 41
41 -
 42
42 -
 43
43 -
 44
44 -
 45
45 -
 46
46 -
 47
47 -
48
-
49
-
50
-
51
-
52
-
53
-
54
-
55
-
56
-
57
-
58
-
59
-
60
-
61
-
62
-
63
-
64
-
65
-
66
-
67
-
68
-
69
-
70
-
71
-
72
-
73
-
74
-
75
-
76
-
77
-
78
-
79
-
80
-
81
-
82
-
83
-
84
-
85
-
86
-
87
-
88
-
89
-
90
-
91
-
92
-
93
-
94
-
95
-
96
-
97
-
98
-
99
-
100
-
101
-
102
-
103
-
104
-
105
-
106
-
107
-
108
-
109
-
110
-
111
-
112
-
113
-
114
-
115
-
116
-
117
-
118
-
119
-
120
-
121
-
122
-
123
-
124
-
125
-
126
-
127
-
128
-
129
-
130
-
131
-
132
-
133
-
134
-
135
-
136
-
137
-
138
-
139
-
140
-
141
-
142
-
143
-
144
-
145
-
146
-
147
-
148
-
149
-
150
-
151
-
152
-
153
-
154
-
155
-
156
-
157
-
158
-
159
-
160
-
161
-
162
-
163
-
164
-
165
-
166
-
167
-
168
-
169
-
170
-
171
-
172
-
173
-
174
-
175
-
176
-
177
-
178
-
179
-
180
-
181
-
182
-
183
-
184
-
185
-
186
-
187
-
188
-
189
-
190
-
191
-
192
-
193
-
194
-
195
-
196
-
197
-
198
-
199
-
200
-
201
-
202
-
203
-
204
-
205
-
206
-
207
-
208
-
209
-
210
-
211
-
212
-
213
-
214
-
215
-
216
-
217
-
218
-
219
-
220
-
221
-
222
-
223
-
224
-
225
-
226
-
227
-
228
-
229
-
230
-
231
-
232
-
233
-
234
-
235
-
236
-
237
-
238
-
239
-
240
-
241
-
242
-
243
-
244
-
245
-
246
-
247
-
248
-
249
-
250
-
251
-
252
-
253
-
254
-
255
 |
 |
